


HelpDesk
Terminology
Decide on the structure of HelpDesk projects
Connecting mailbox to Easy Redmine
How to set up project configuration
How to set up project configuration – details
How to work with ticket processing
How to configure mail templates
How to configure global settings
Filter "Need reaction"
HelpDesk users
Corner situations
These instructions will go through all the steps to configure HelpDesk from the UI. From connecting mailboxes to Easy Redmine, through project settings, to finetuning the dashboards. This is not a technical manual to configure cron (or scheduled tasks on the server side). Cron must already be configured in order for HelpDesk to function. Instructions to set cron are here.
0 Terminology
Let's first start with a glossary of used terms in the following manual.
Mailbox - an email address connected to Easy Redmine, from which received emails are processed into tickets in respective HelpDesk projects
Ticket - task created from a received email in a mailbox, or a task internally created by clients in a HelpDesk project
HelpDesk project – a project connected to HelpDesk, where tickets can be created
Domain – the second part of an email address. For example, from email worker.Joe@client.com domain is just client.com
Keyword – word or a string of words contained in the mail subject
SLA - service level aggreement. In simplified meaning used in Easy Redmine, contracted time to react by company to tickets submitted by client. Calculated in hours
Original email – Email sent to a HelpDesk mailbox from which the ticket was created
Operator - this terms is going to be used for the support worker, who works with the tickets
1 Decide on the structure of HelpDesk projects
Depending on whether you want to have a single project for all tickets or differentiate HelpDesk mailboxes, or even have special projects for different clients, you need to decide about the structure of the projects before any configuration starts. This decision will affect some further steps listed in this manual.
Here are the possibilities:
1.1 Single project for all tickets
If you are only going to have one project, which gathers emails from a single mailbox, there is no decision to make >> all emails sent to the mailbox create tickets in the same project.
Example: All your clients send support requests to support@mycompany.com
It doesn't matter which level this project is, basically it lives its own life within any part of your project structure. However, if you are planning to start with a single project and later continue expanding HelpDesk, you should see the options below.
1.2 One mailbox, more HelpDesk projects
Example: You use the mailbox support@mycompany.com. All emails received go into a general project. But you have one client, who has a special project and special conditions > emails FROM domain client.com are processed in the special project.
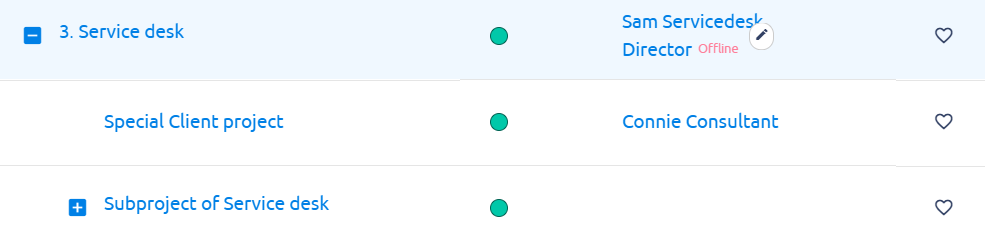
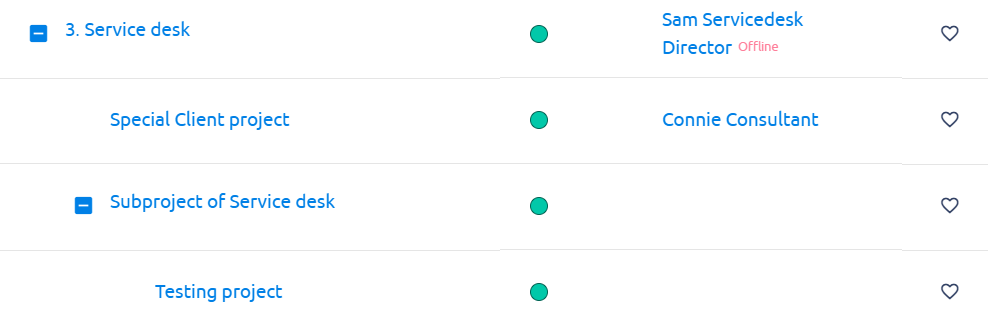
Of course, you can have a more customers separated this way. In this case, the project structure may look like this:
Another option is to have the Default HelpDesk project on the first level and the special projects beneath it.
A different way, which sometimes may be used is a structure:
>Client1
>>Project for commerce
>>Project for implementation
>>Project for HelpDesk
>Client2
>>Project for commerce
>>Project for implementation
>>Project for HelpDesk
However, this is not recommended if you are planning to gather tickets from various problems to some aggregate lists, statistics or summaries.
1.3 More mailboxes, no special client projects
Example: You are using mailboxes support@mycompany.com, info@mycompany.com, it@mycompany.com and emails are only sorted according to the mailbox, not according to the sender.
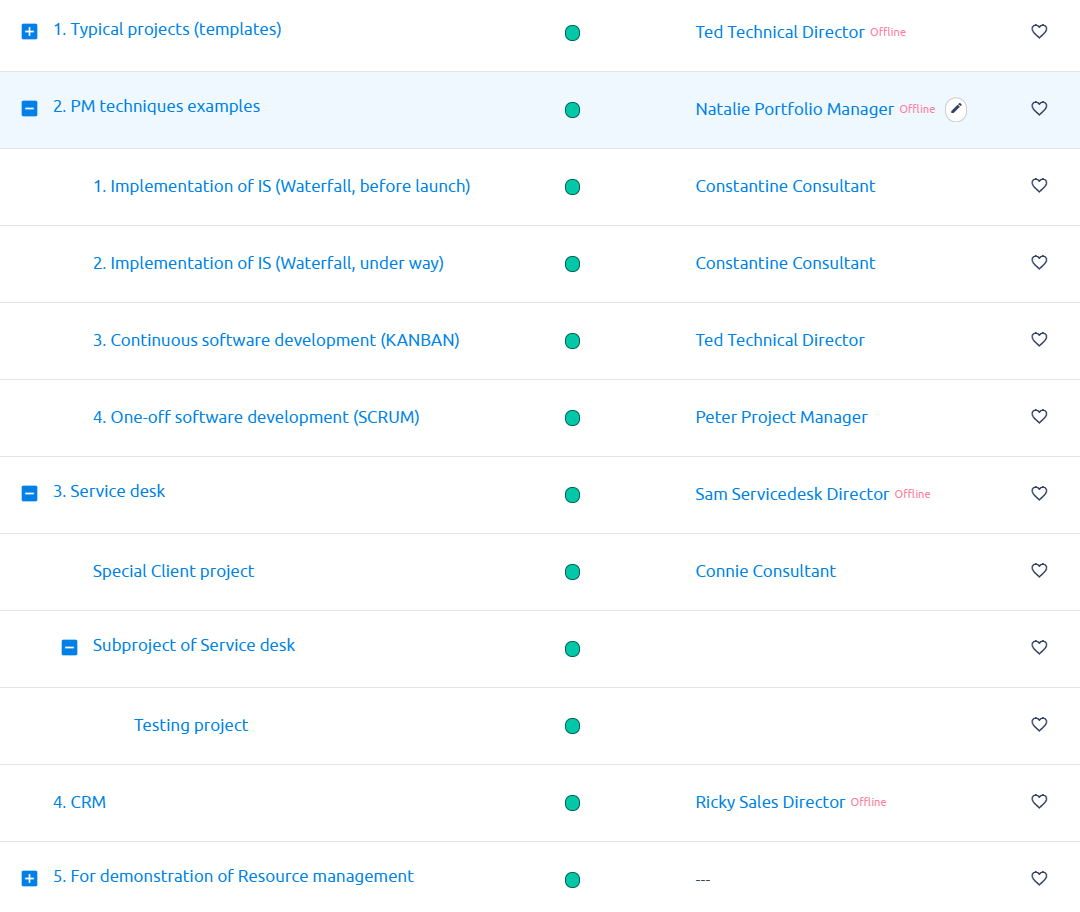
In such case, you can have the 3 projects on the same level and possibly beneath a main project covering them all.
These projects can be completely unrelated and falling to separate sections of your organization, they can be in different project trees (under different top projects).
1.4 More mailboxes, with special client projects
Current Easy Redmine HelpDesk functionality allows to separate clients solely by the sender and not by a combination of sender and receiving mailbox.
Example: You are using mailboxes support@mycompany.com, info@mycompany.com, it@mycompany.com. You have a special client sending support requests from domain client.com
The recommended structure is:
When we return to the project structure in general, there is some further consideration to be done. If you are aiming to integrate HelpDesk processing with a different department of your organization (for example development), you may want to consider putting HelpDesk projects a little bit deeper in the project structure.
Correct project structure will enable you to generate various reports, listings, statistics across more phases of your business.
2 Connecting mailbox to Easy Redmine
Now we can start with the actual setup of HelpDesk components. To have Easy Redmine process mailboxes, they need to be connected in the following way.
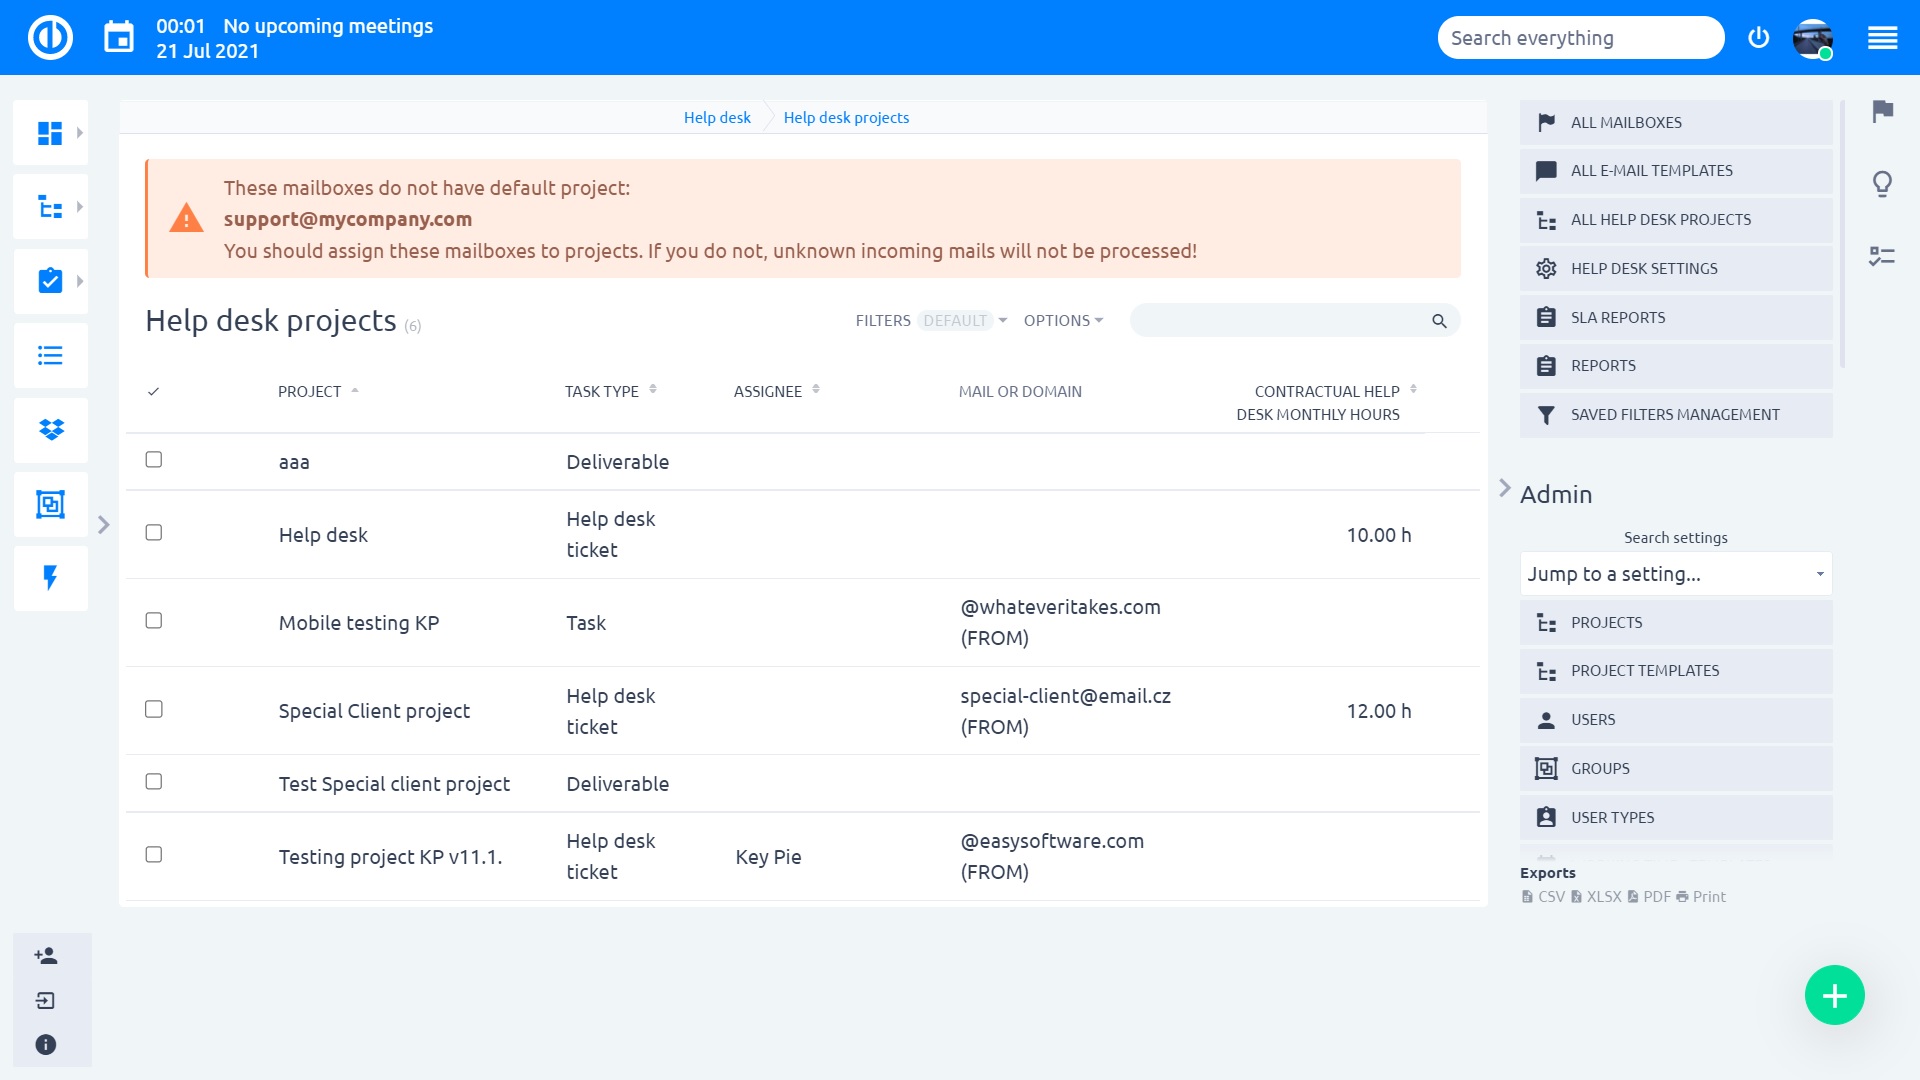
2.1 Administration >> HelpDesk >> All Mailboxes >> Add Mailbox
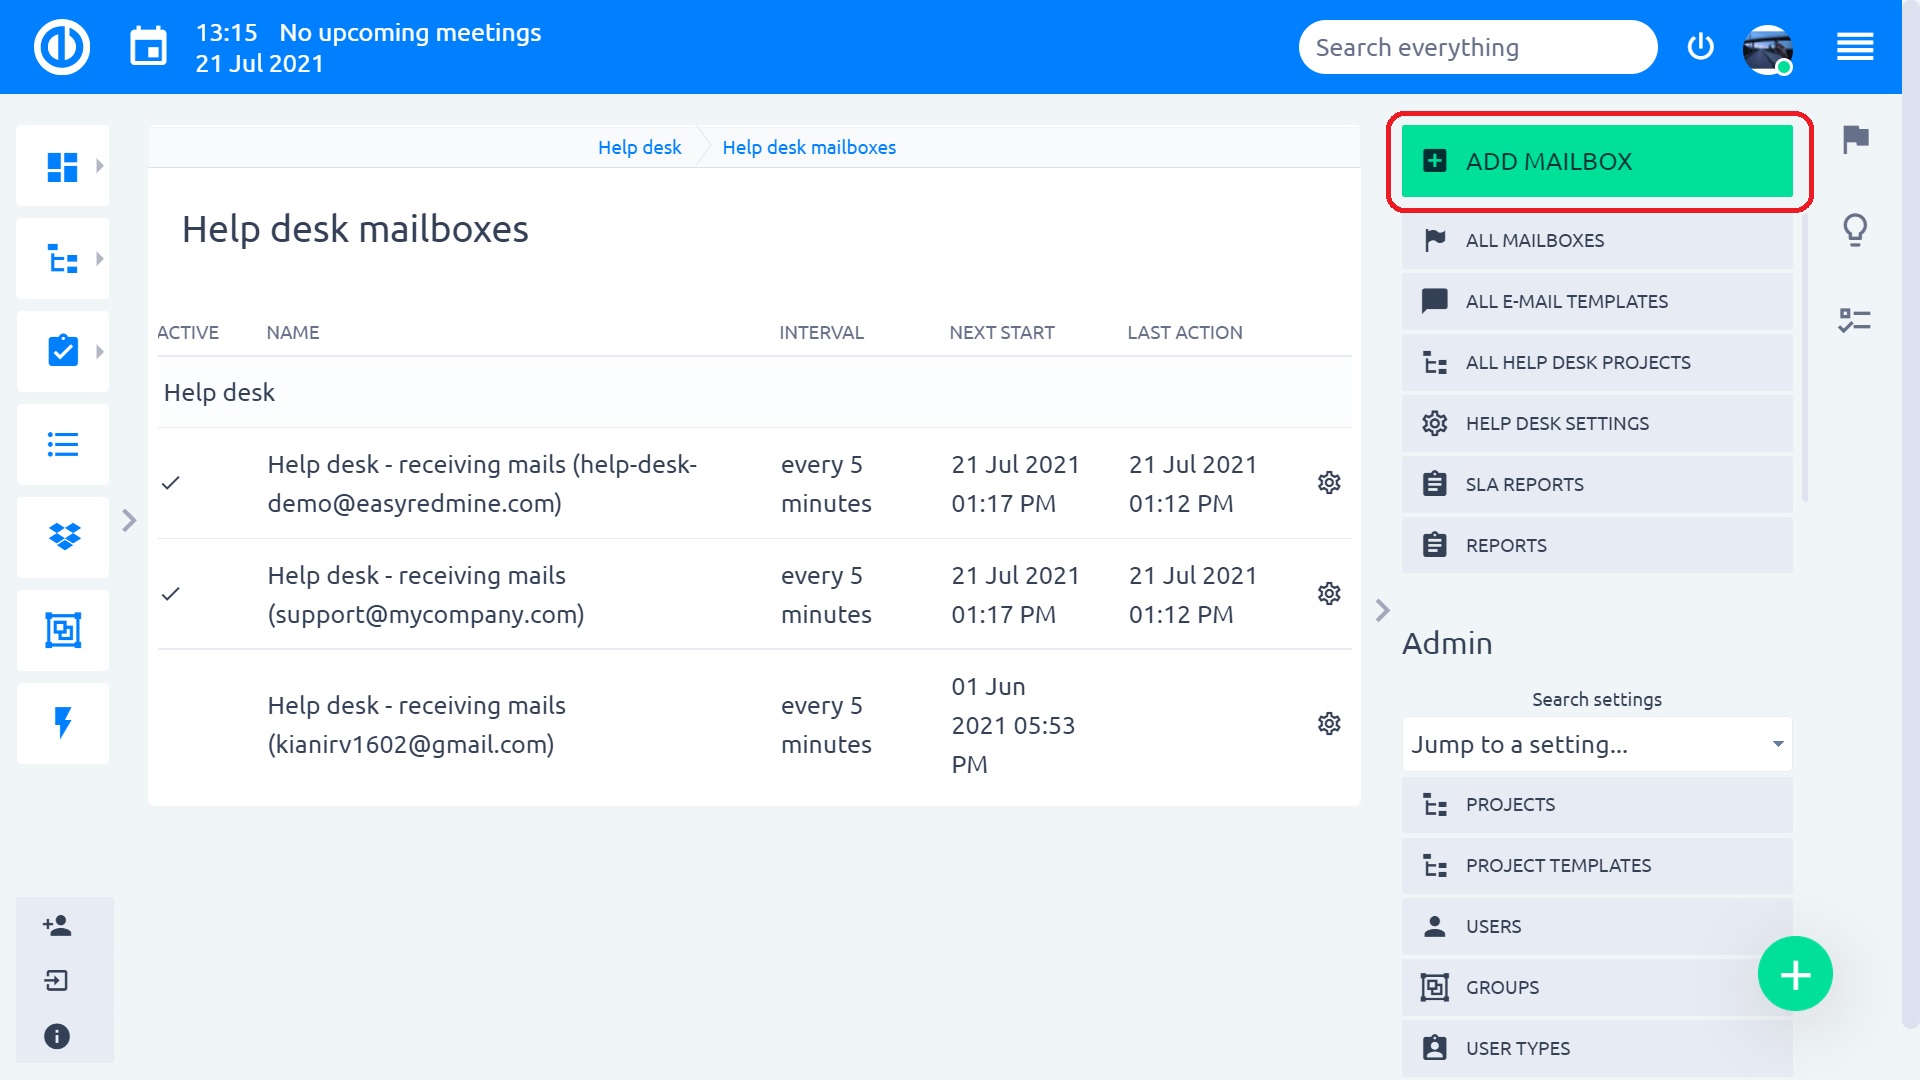
2.2 Enter valid credentials of your mailbox – click Test to make sure Easy Redmine can reach the mailbox
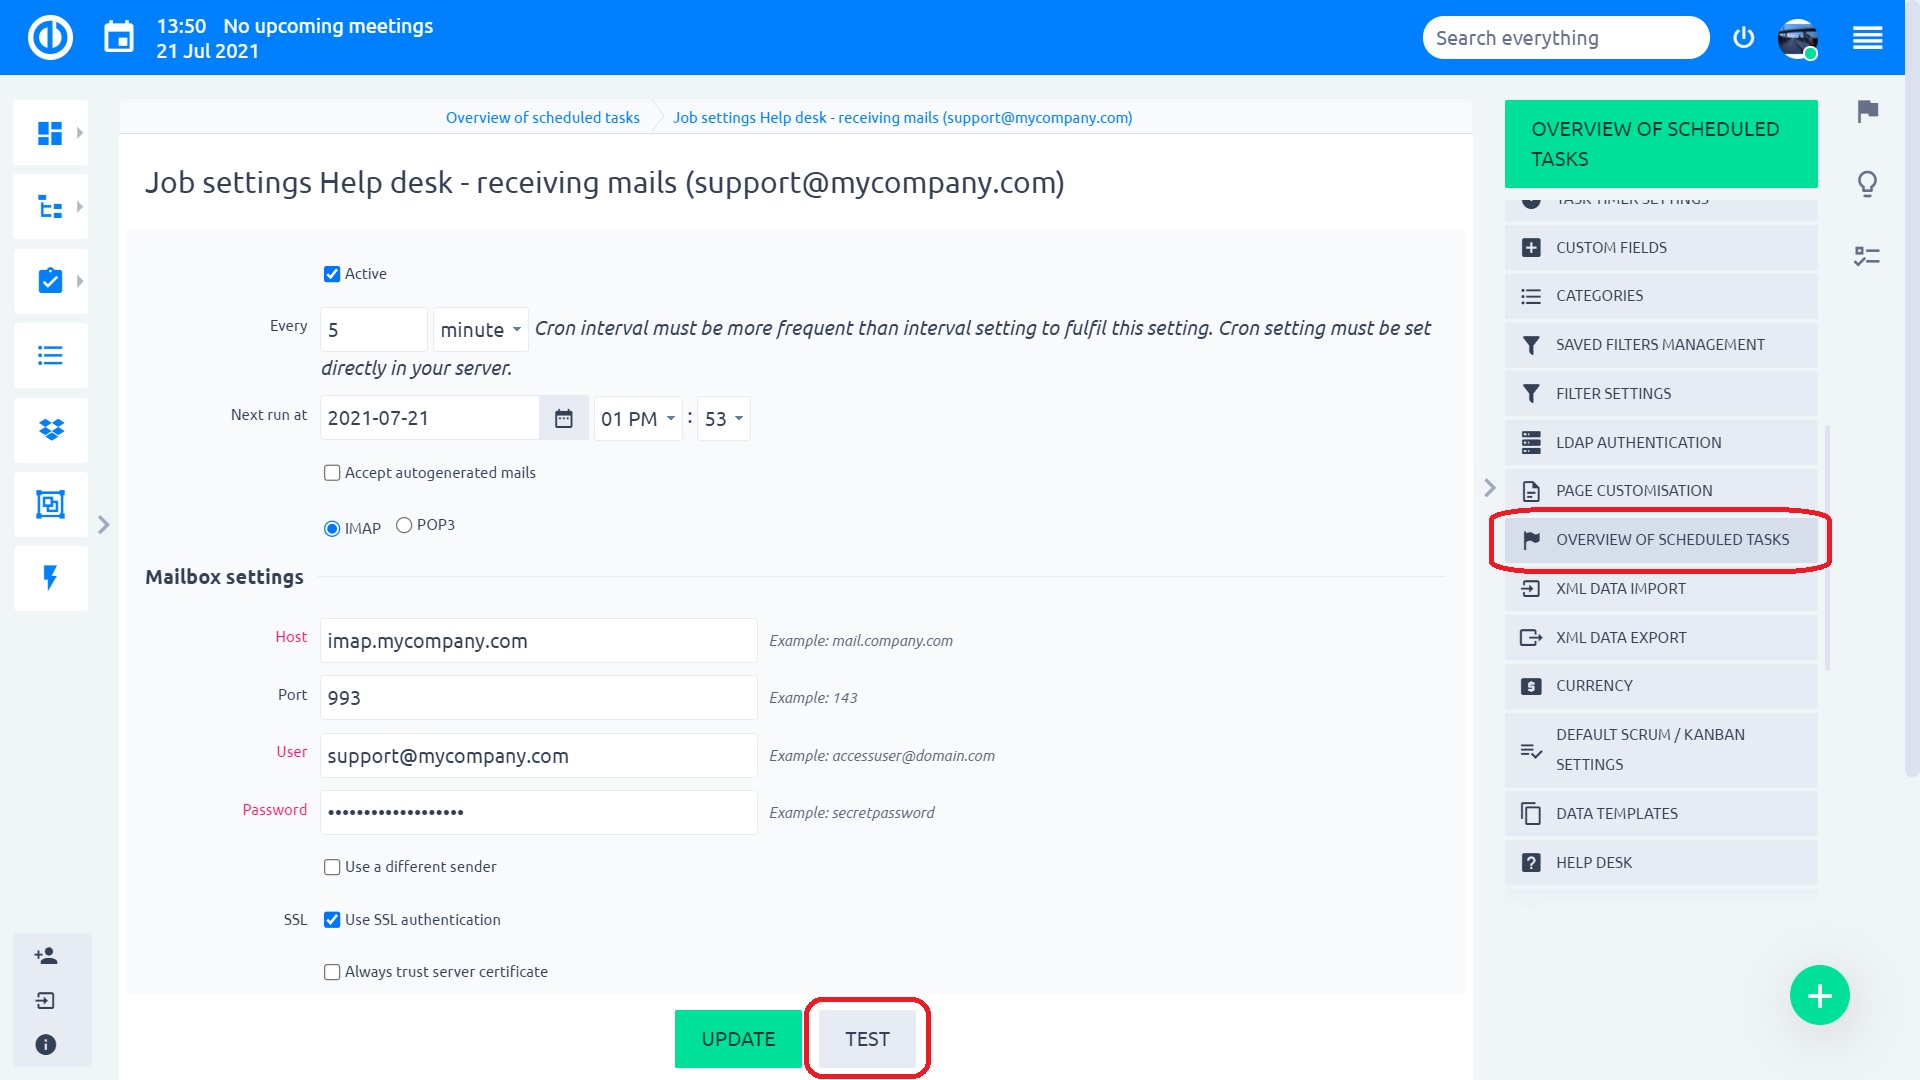
Setting notes:
- Active - mailbox is scanned regurarly by Easy Redmine for new unread messages. If disabled, Easy Redmine doesn't check the mailbox. But you can keep the mailbox in Easy Redmine for possible future use.
- Use different sender - when user on the mail server is not the same as mailbox (for example, HelpDesk-mail-user). Enter here the valid malibox, which is represented by the user.
- SSL - if you use an SSL certificate on your mailserver
-
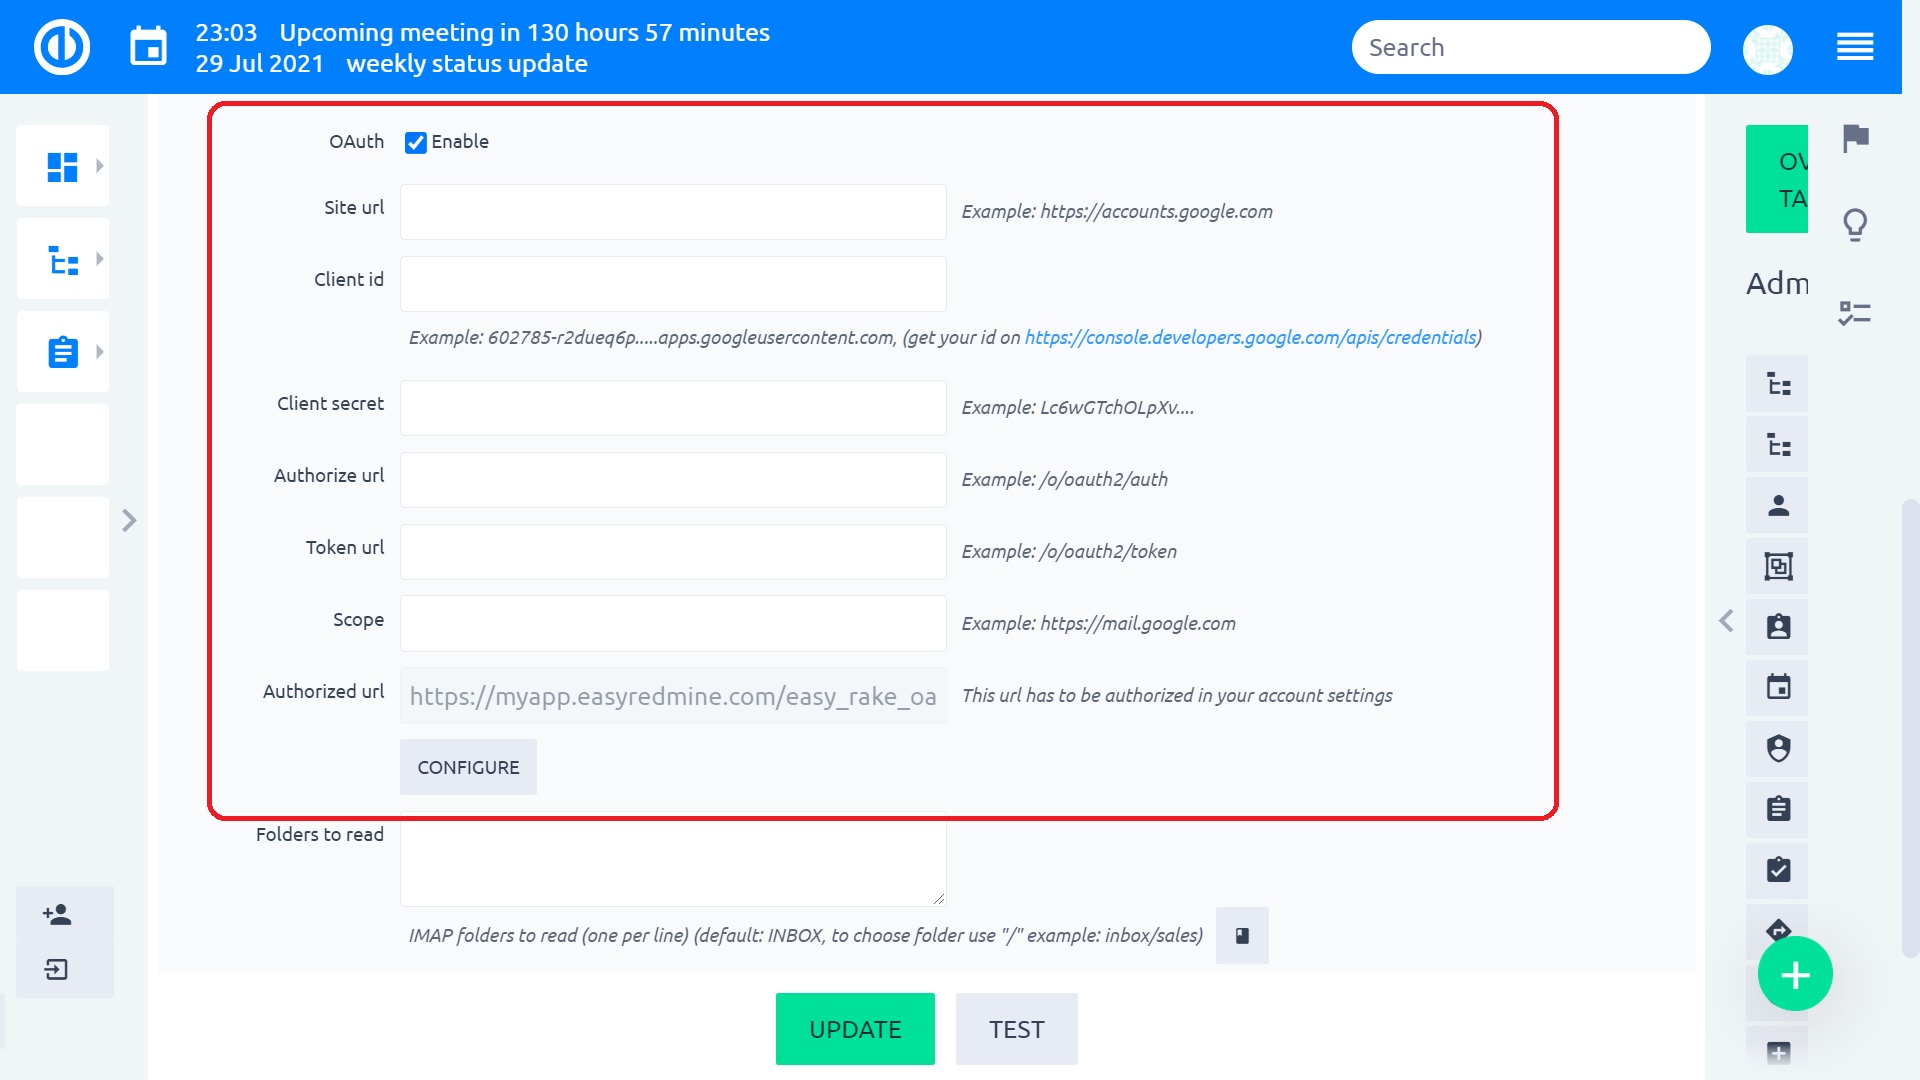
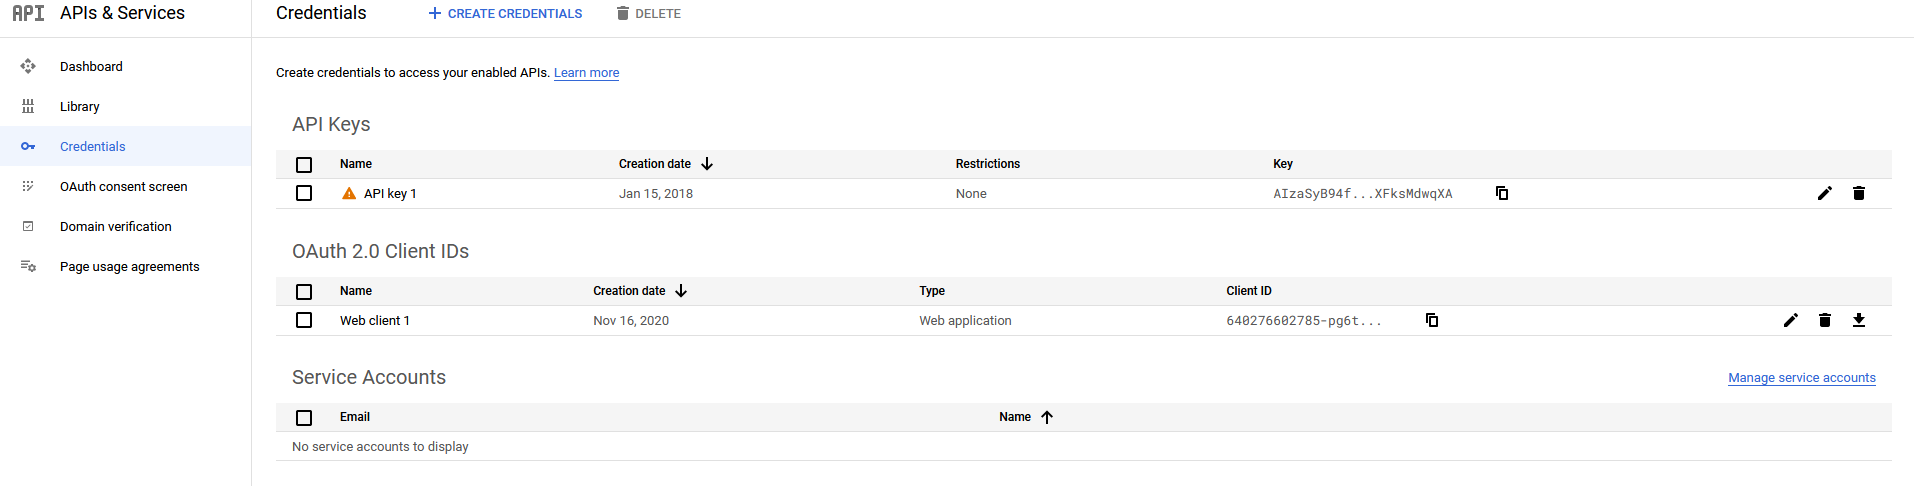
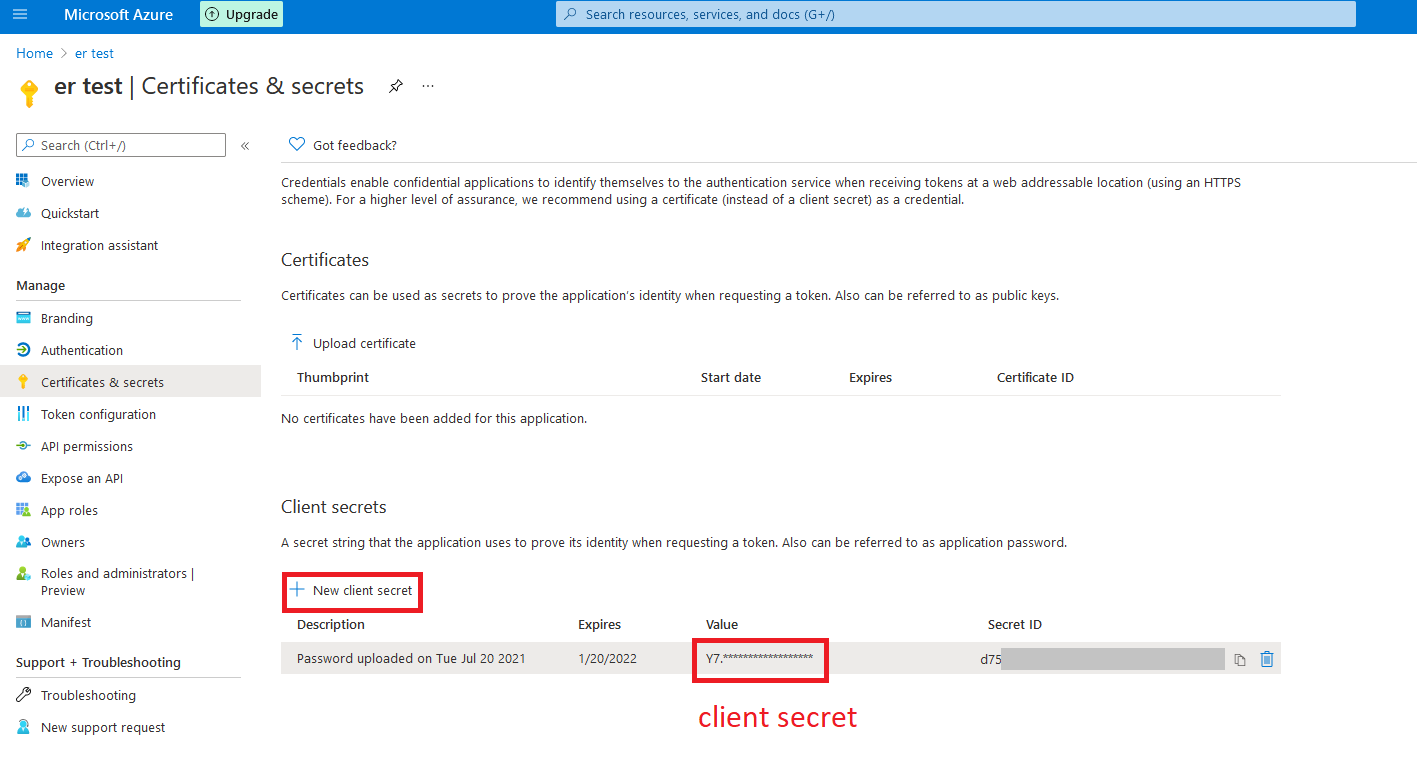
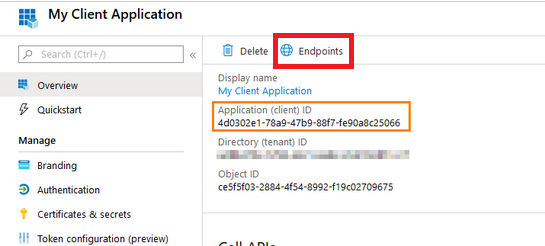
Enable OAuth – OAuth 2.0 protocol is used by hundreds of well-known services as an alternative authentication method. As for the HelpDesk's mailbox, it can be used to verify the sender's credentials using an external application, currently supported are Google Workspace (formerly G Suite) and Microsoft Exchange accounts. You need to read OAuth 2.0 documentation of the other application to know what exactly to enter in each field. Of course, you need to have admin access to the other application to find the required information, such as site URL, client ID, client secret, authorize URL, token URL, scope, etc.
- Folder - if you want Easy Redmine to only check certain folders for unread emails.
- In success move to – if an email is processed correctly by Easy Redmine (ticket has been created), it will be moved there
- In failure move to – if an email is processed incorrectly (ticket has not been created), it will be moved there
After testing the connection, click Save.
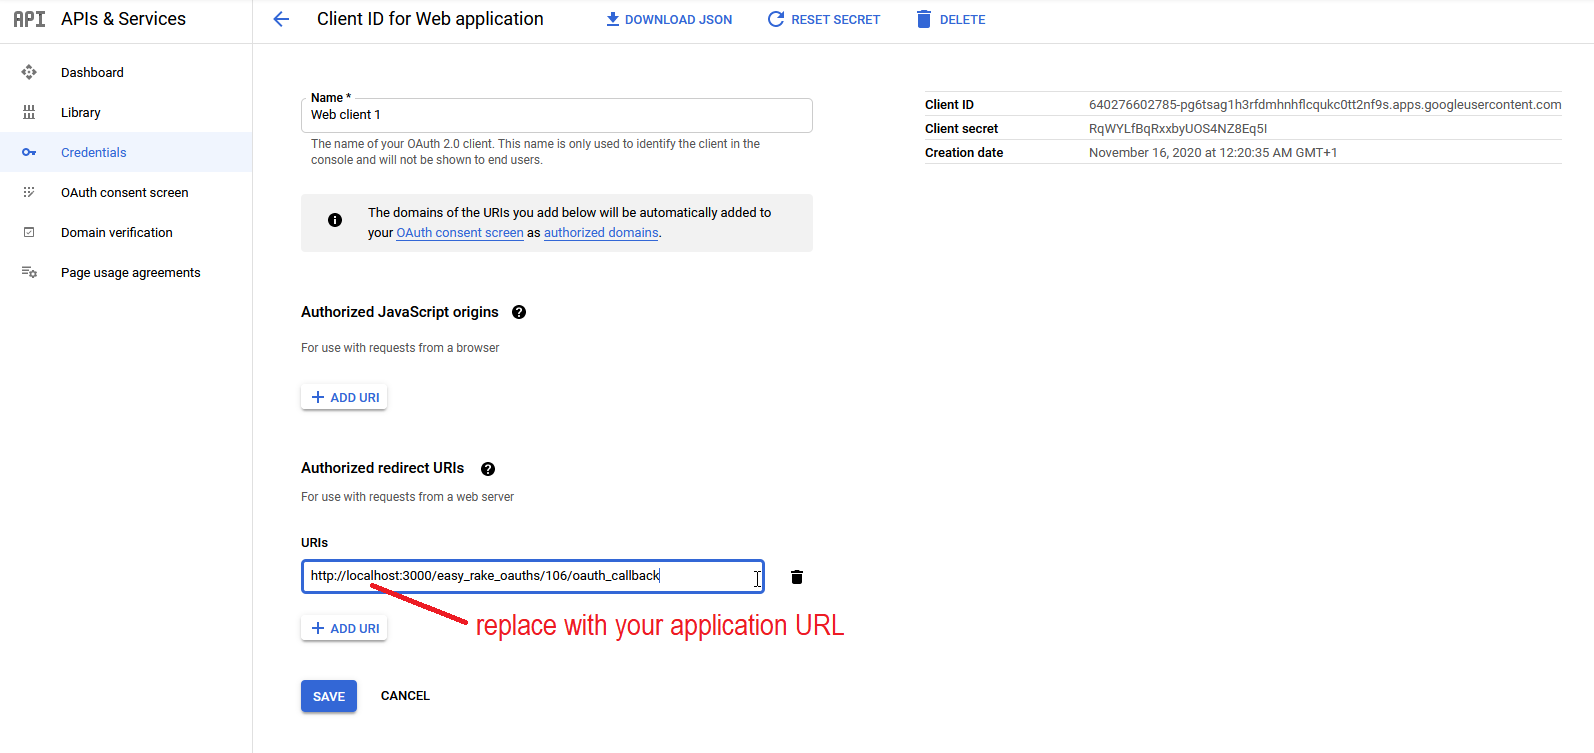
2.2.1 Where to find OAuth 2.0 credentials for Microsoft and Google accounts
To connect Easy Redmine with a Google Workspace account using OAuth 2.0 protocol, you need to create an account on the Google Cloud Platform, obtain the necessary credentials provided in there, and copy them into the mailbox settings in our application. Some useful instructions can be found here.
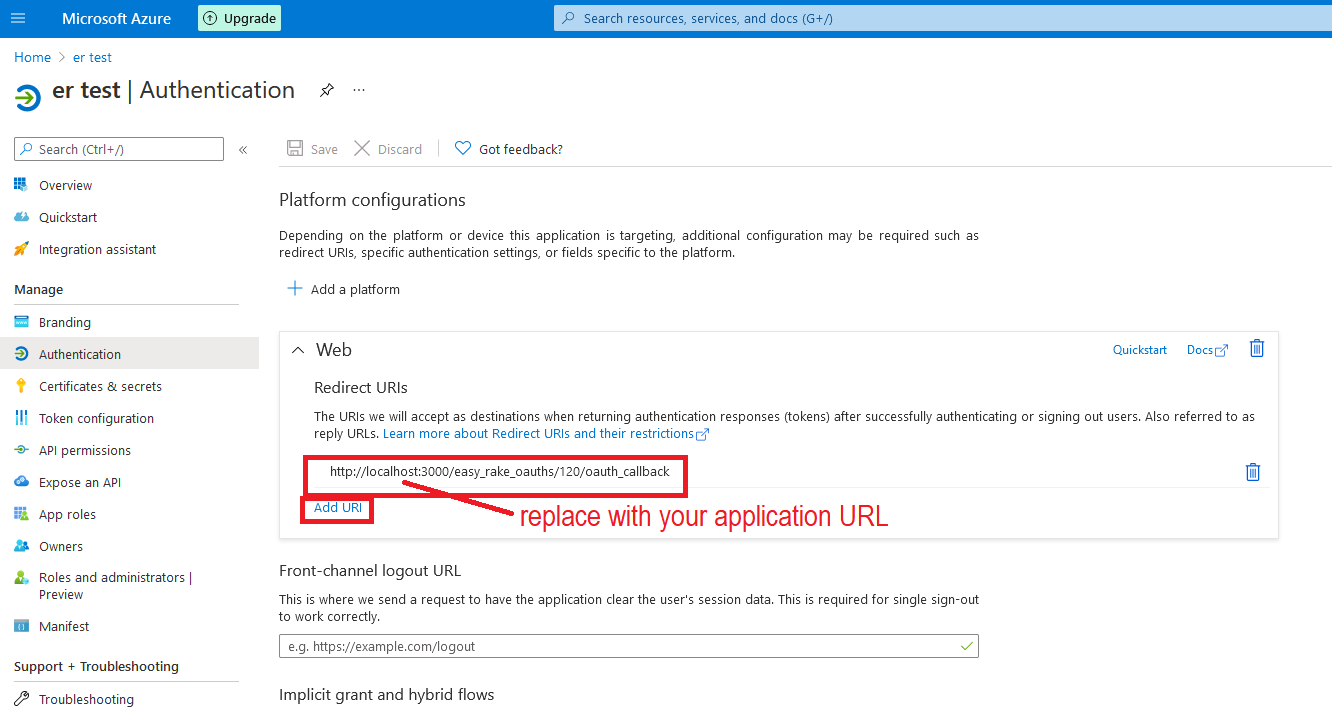
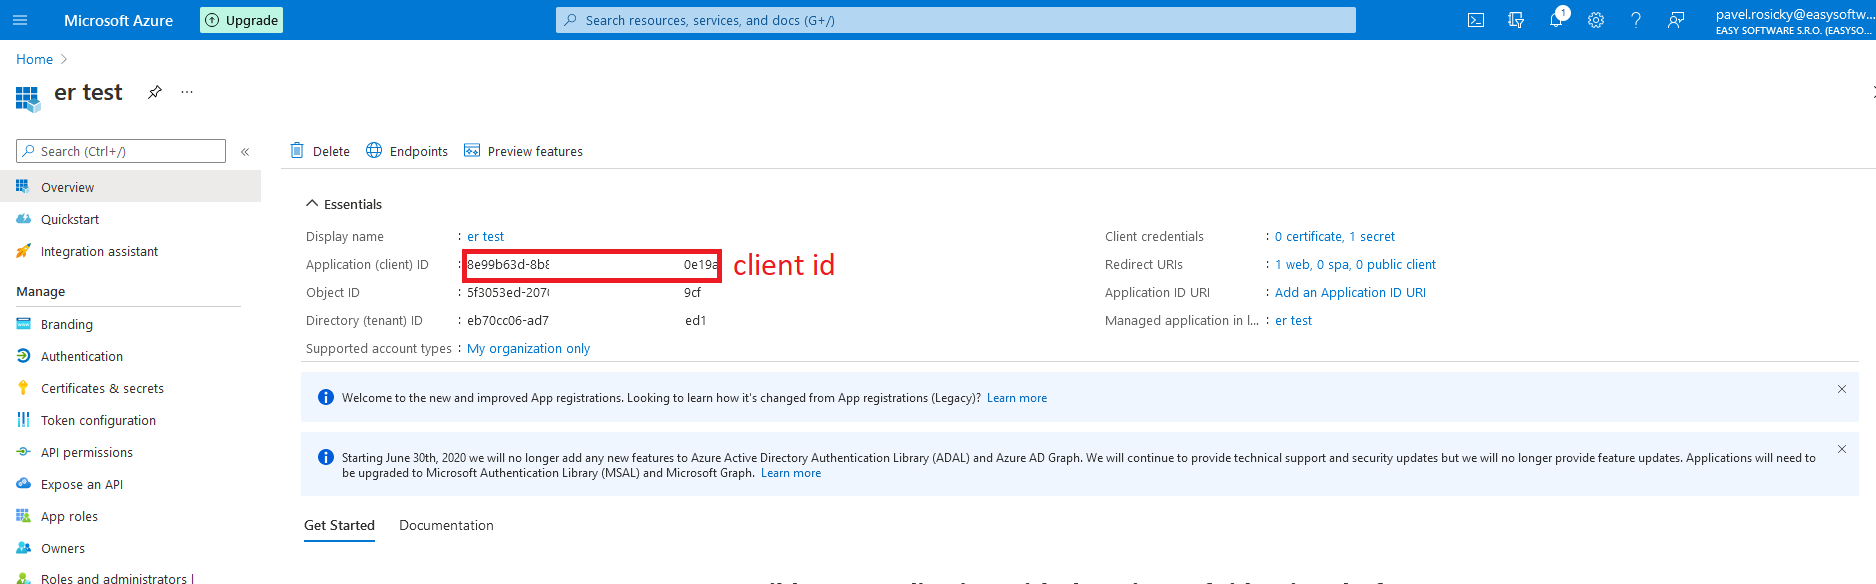
To connect Easy Redmine with a Microsoft Exchange account using OAuth 2.0 protocol, you need to create an account on the Microsoft Azure portal, obtain the necessary credentials provided in there, and copy them into the mailbox settings in our application. Some useful instructions can be found here.
Access tokens have a limited lifespan (maximum 6 months), you cannot create unlimited ones. After this time, the mailbox will stop working and a new token will need to be generated and re-entered into the application.
An OAuth 2.0 access URL of the form "/organizations/oauth2/v2.0/authorize" is valid only if access to the application is enabled within the organization. Otherwise, the access URL must be of the form "/[TENANT_ID]/organizations/oauth2/v2.0/authorize". The correct settings can be found in the Endpoints section.
When two-factor authentication (2FA) is set up in Microsoft Azure, all connected mailboxes need to be refreshed.
2.2.1.1 Error "User is authenticated but not connected"
This is because the selected Azure user through whom the mailbox is registered does not have permission to access the mailbox. In this case, it is not enough if the user is an administrator as he needs to be licensed to use Office 365. If the user has delegated permission (he is not allowed to add access to the mailbox since it requires approval by e.g. an administrator), he needs to get the appropriate scope permission in Azure and disable this option at the same time.

Solution:
- The user must either be the direct owner of the mailbox he is accessing (thus having the necessary permissions to do so).
- Alternatively, he can be another (licensed) user who has been granted access to that mailbox.
Another possible problem is that the account is created as POP3 instead of IMAP. POP3 does not support OAUTH in the system.
Solution:
- Make sure that the account is set as IMAP in both azure and in Easy Redmine.
2.2.1.2 Error: Microsoft Help Desk connects successfully but stops working after some time
You forgot to enable the right for offline access.

2.2.1.3 Use case: Many mailboxes, one super Help Desk user
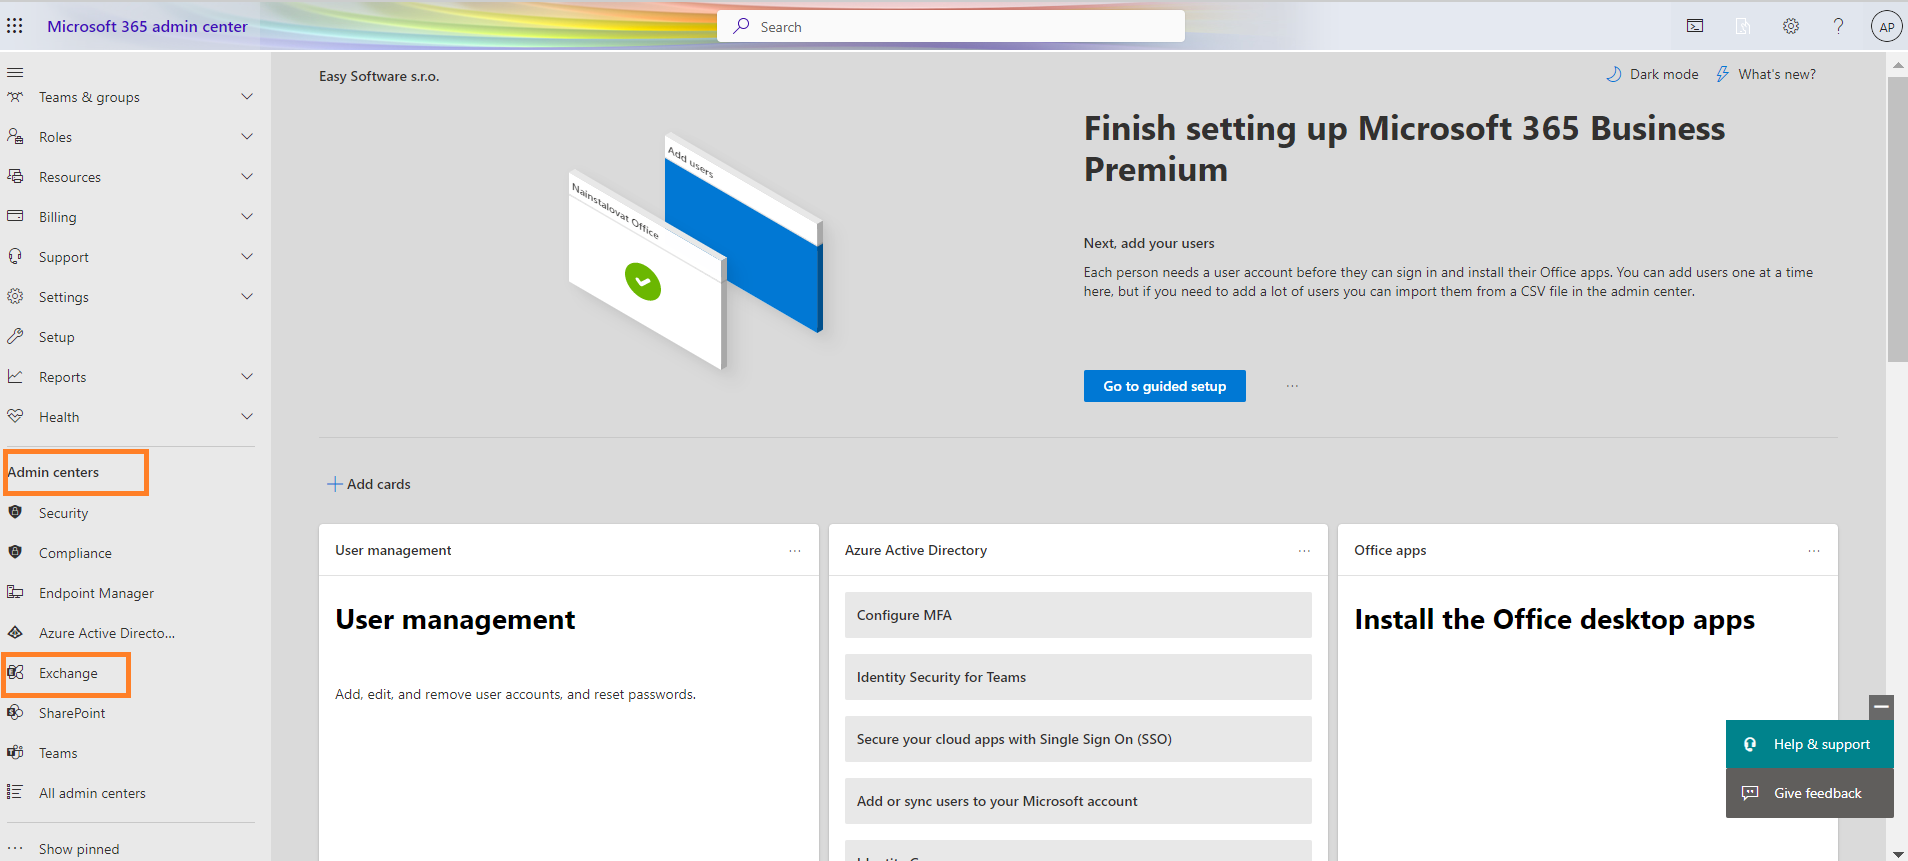
If you have multiple Help Desk mailboxes set up within Microsoft Exchange and you want to delegate access rights to all of these mailboxes to a single user, you can do so through the Microsoft 365 admin center » Admin centers » Exchange.
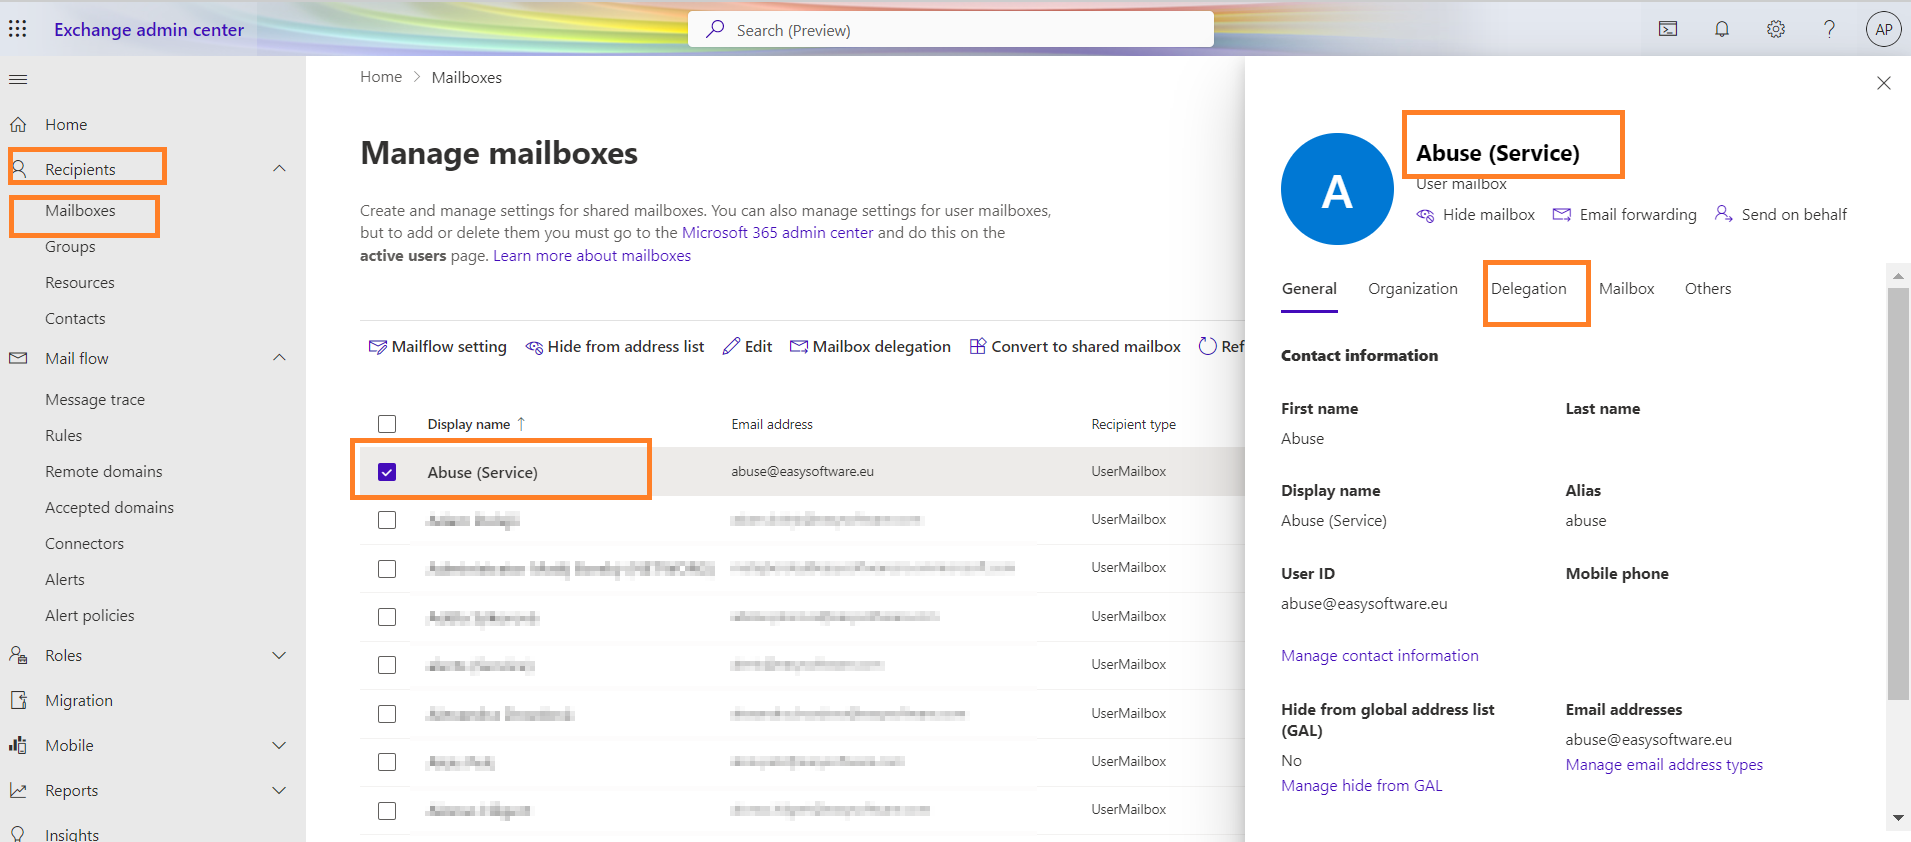
You will be redirected to the Exchange admin center section. Here, click on the Recipients » Mailboxes tab and select the mailbox whose access right you want to delegate. A right pop-up sidebar will open and click Delegation.
Below, notice the Read and manage (Full Access) sign with an Edit button to click on.
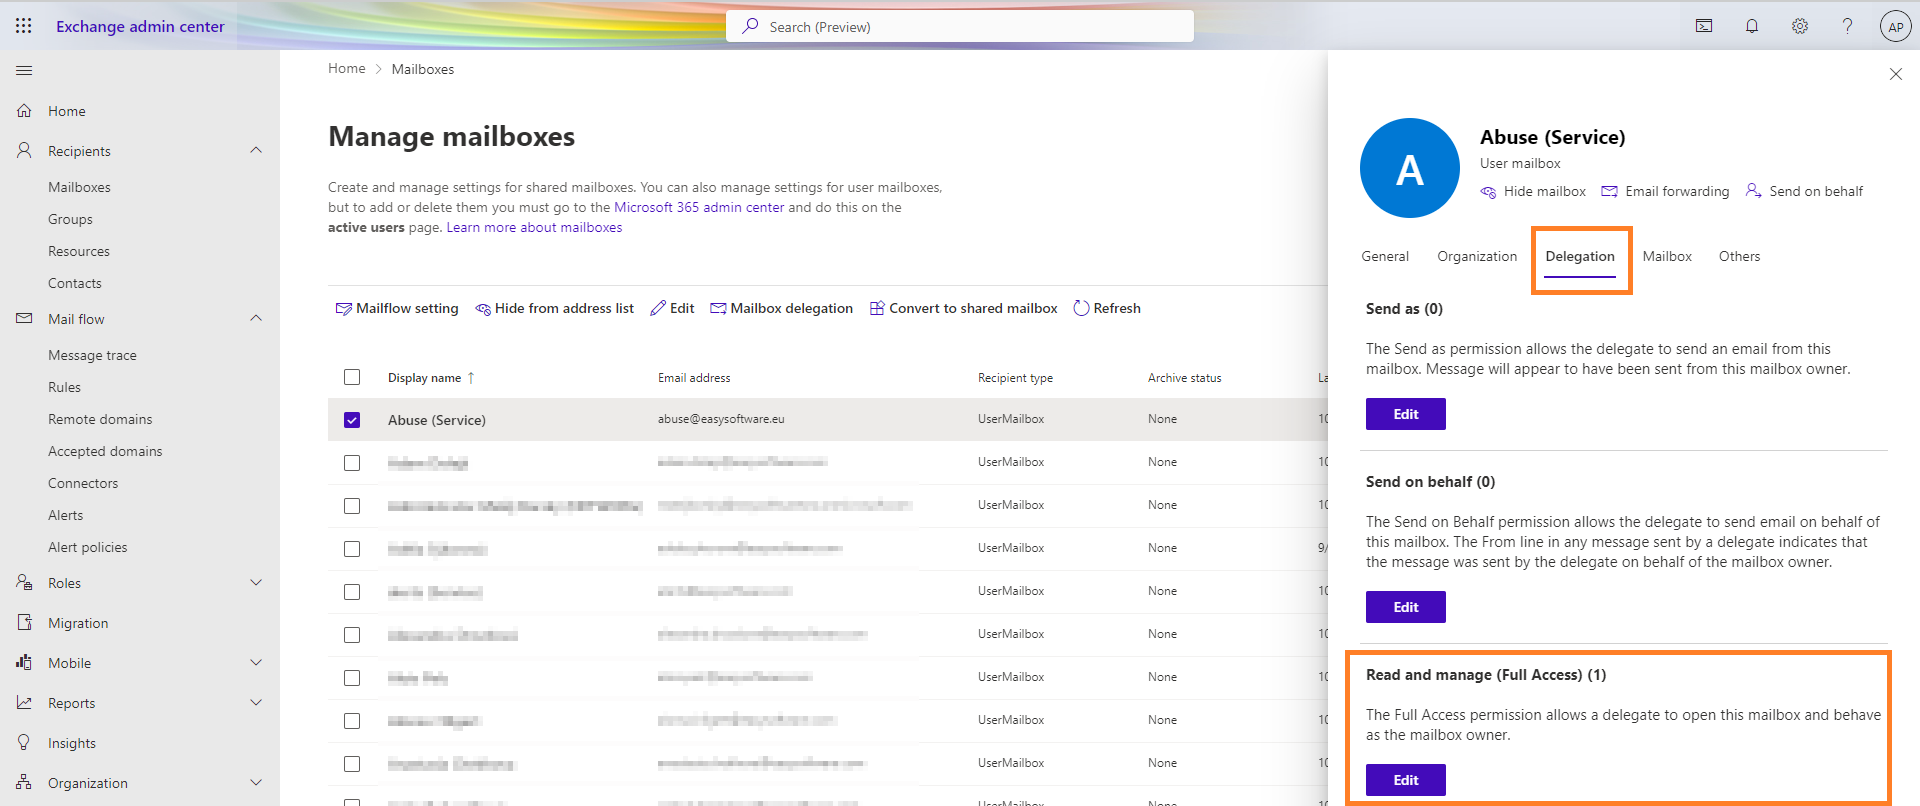
You can then search for and add users who become members of this mailbox with the same rights as the mailbox owner.
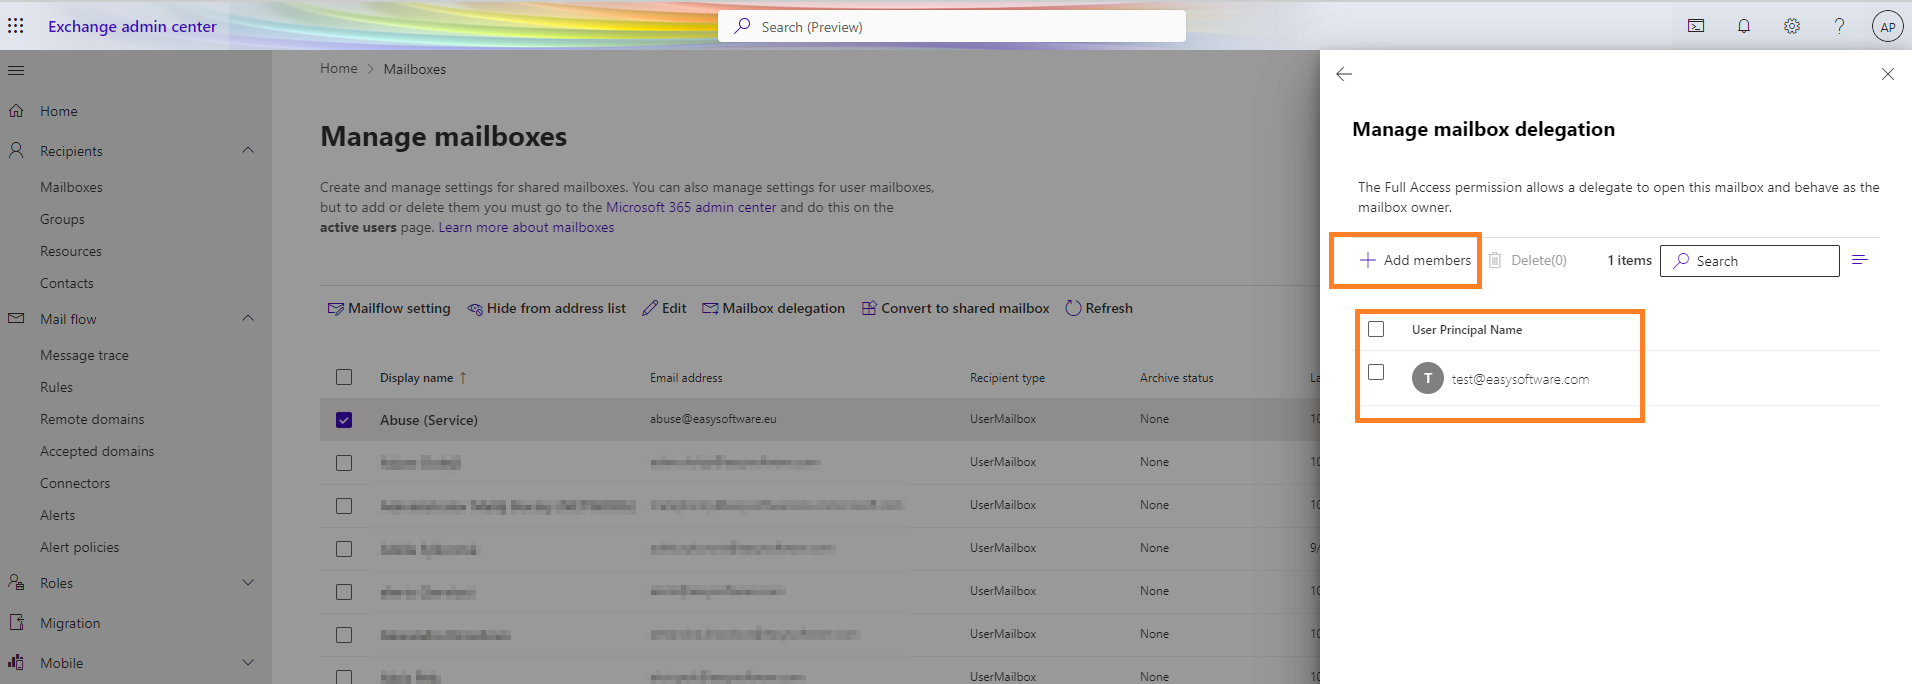
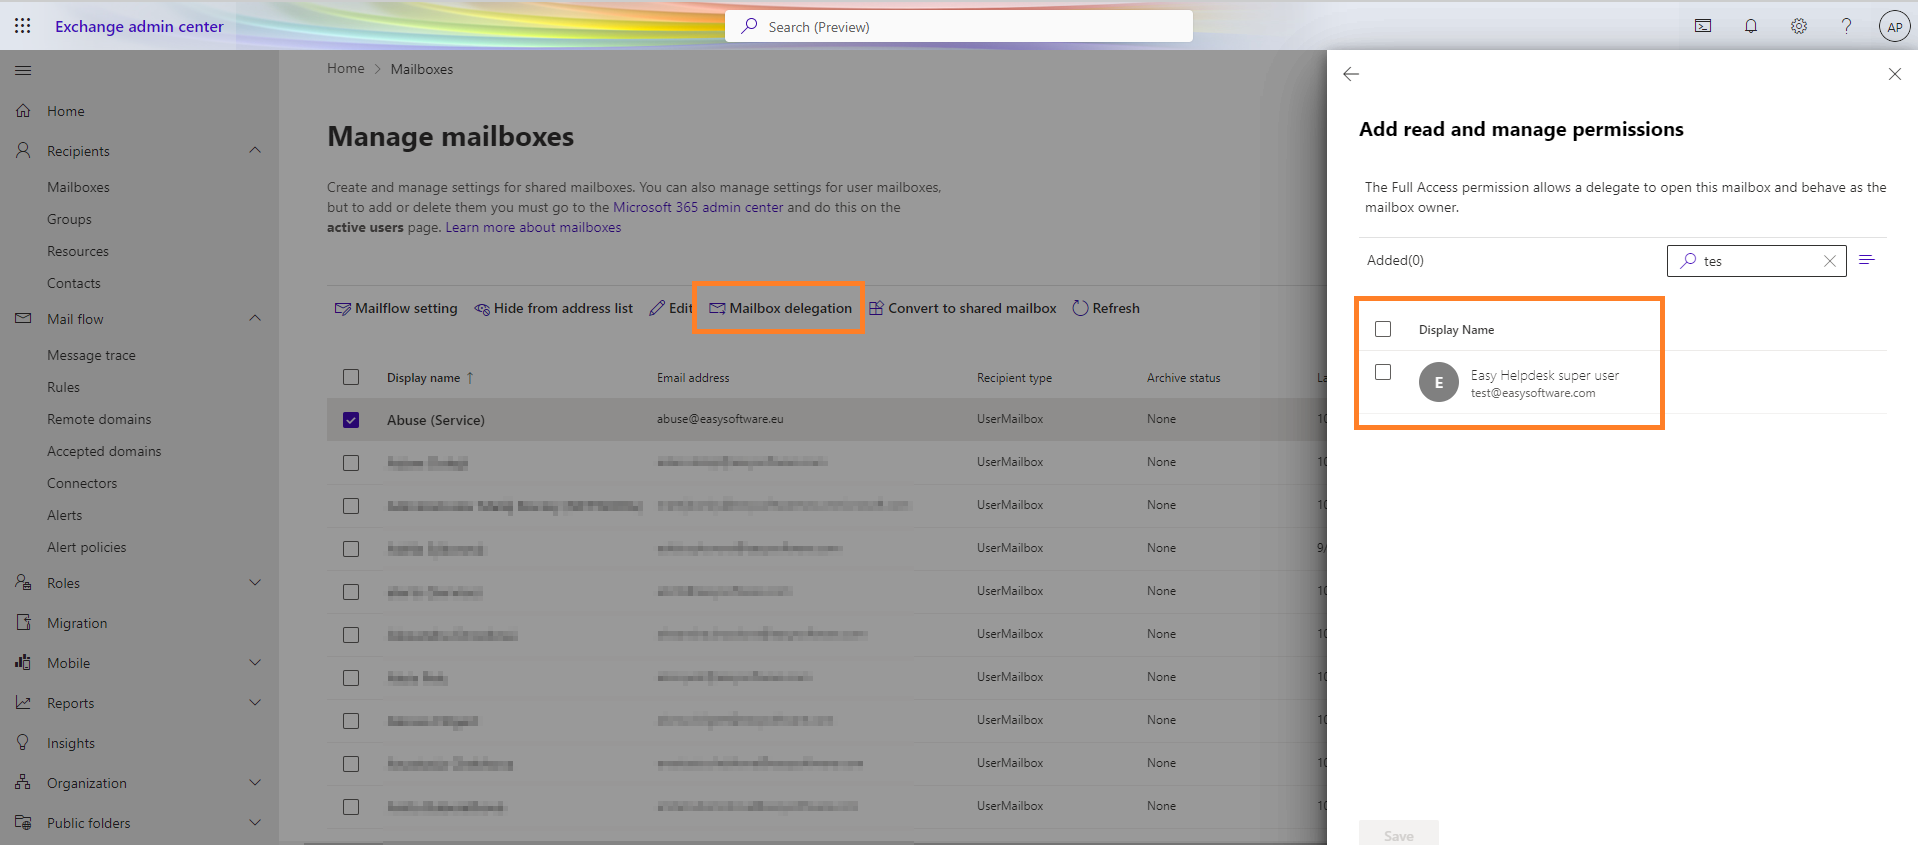
The user you select must have Help Desk administrator rights on the Easy Redmine side.
2.2.2 Enabling OAuth 2.0 Authentication with Azure Active Directory
When you use OAuth 2.0 authentication, you get access to a web service from a client application. The way you do this depends on the grant you use. In this tutorial, you will learn how to configure the client credentials grant type for applications in Azure Active Directory.
2.3 Configure frequency of mailbox scanning
Right click on the mailbox and choose Settings
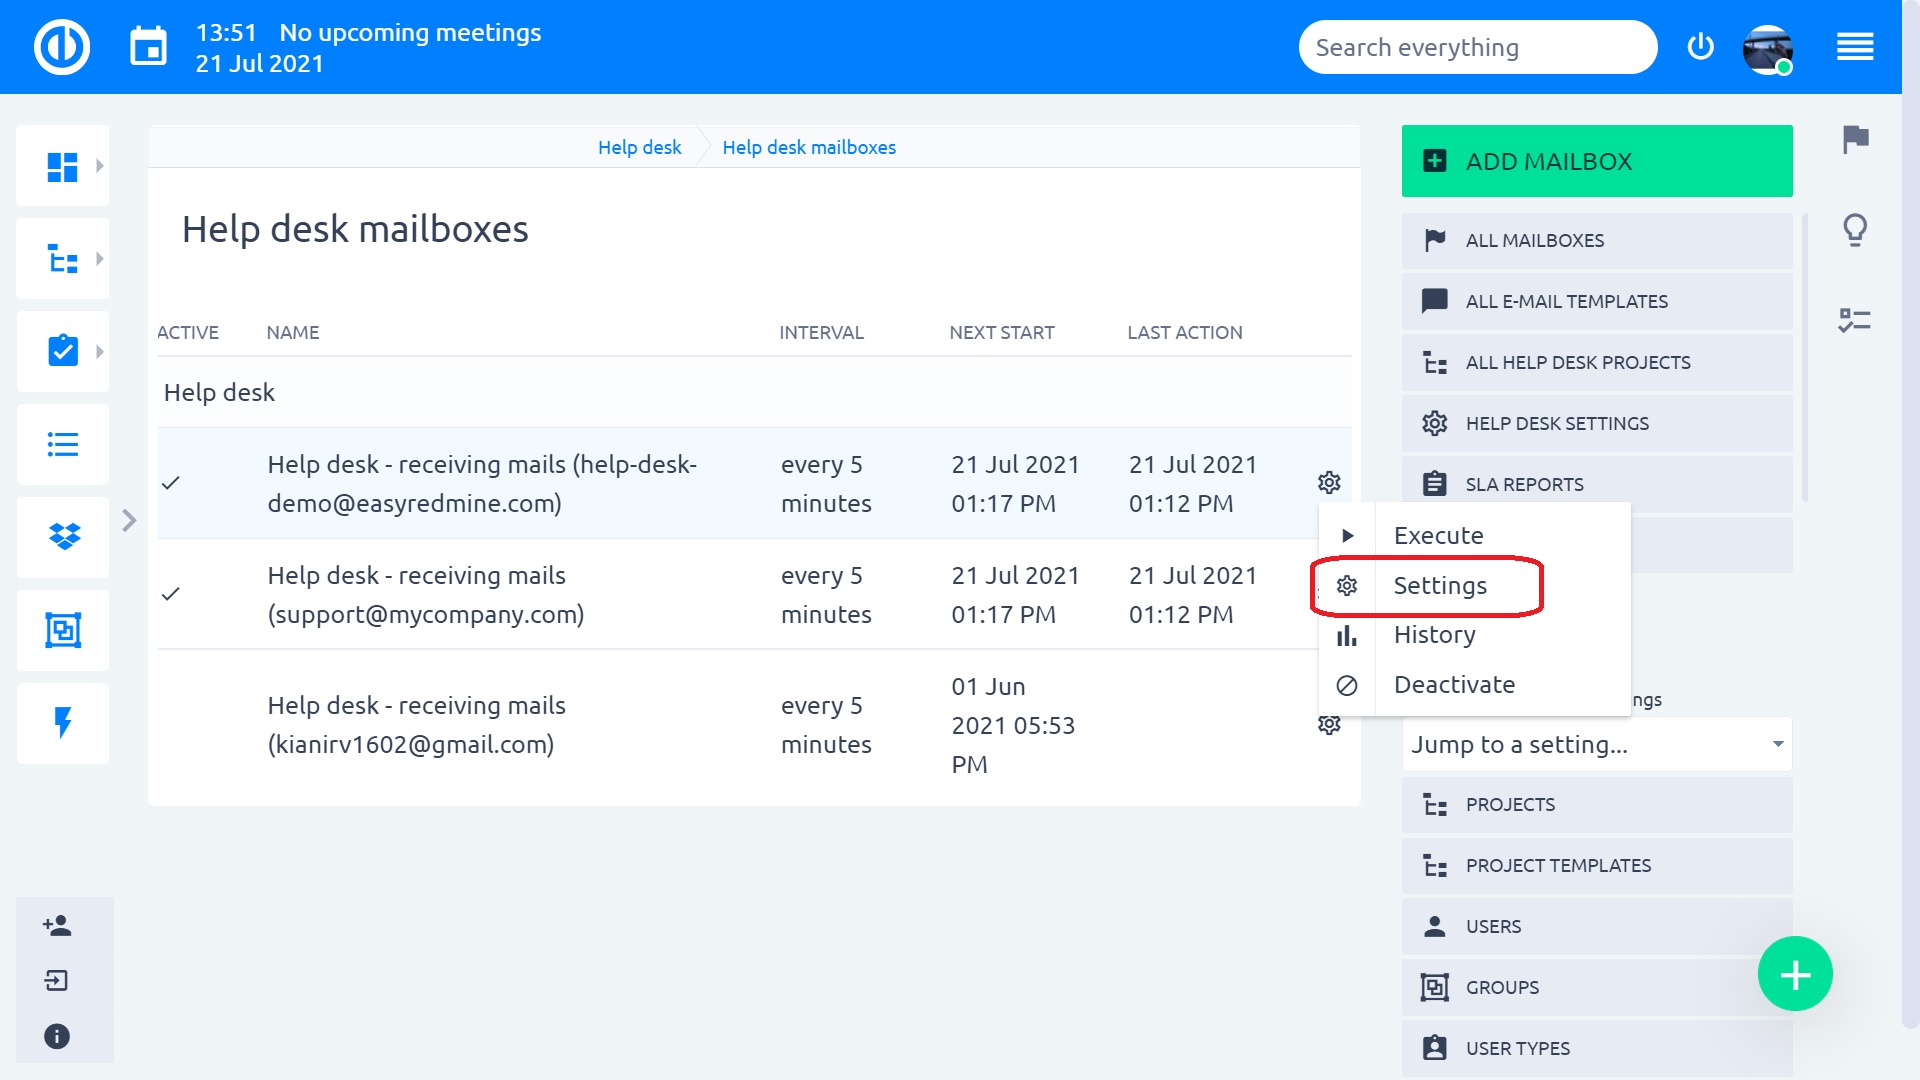
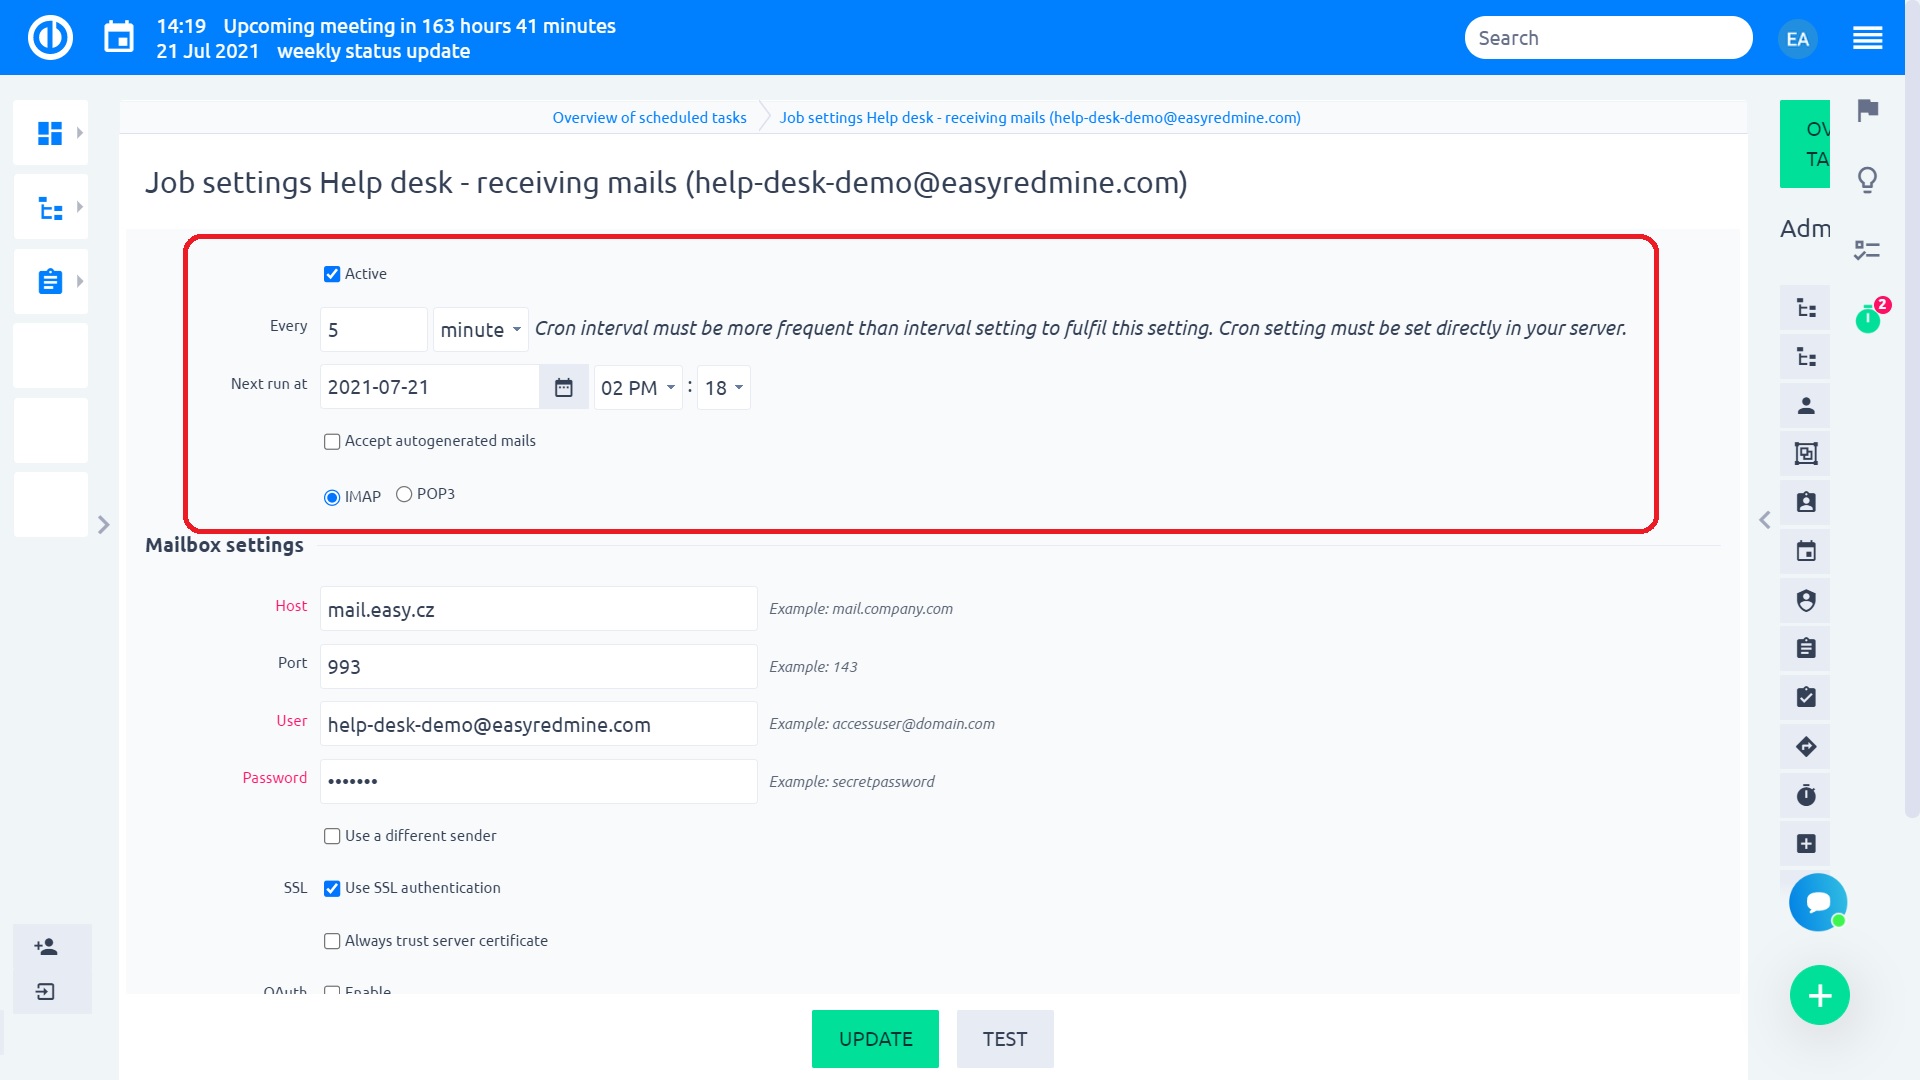
Now you are back to the mailbox settings, but with an additional setting. By default, it is set to Every 5 minutes. But it is generally recommended to have this setting around every 10 minutes. If you have many mailboxes connected to Easy Redmine, this automatic scanning task may take a longer time and overload your server with too frequent scans, which will slow down the whole application.
Button notes:
- Execute – manually start the mailbox scanning
- History – view past mailbox scanninngs
- Delete – remove mailbox from Easy Redmine scanned mailboxes
- Deactivate – deactivate automatic mailbox scanning
2.4 Automatic disable
Processing mailbox in regular intervals takes server resources, especially if you have multiple mailboxes. For this reason, we have implemented a mechanism that automatically disables processing of mailbox after 3 times it failed to authenticate and download emails. Disable means that the field Active will be switched off. You will still be able to verify the settings, test and activate.
Why? To save your resources. Why should server keep pinging an unfunctional mailbox?
3 Project configuration
Mailbox is connected and scanned by Easy Redmine, but so far we haven't set where should the tickets be created. Before a project is connected to HelpDesk, tickets can not be created because, in general, every task requires a project.
This part is going to be split to different scenarios, according to the aim of each project.
3.1 Default project for mailbox
In the past chapter examples, this would be the projects Default HelpDesk, INFO – general, IT – general, SUPPORT – general, i.e not restricted to a particular domain of the sender.
- Click the "Add to HelpDesk" option on a Project overview page of the selected project.
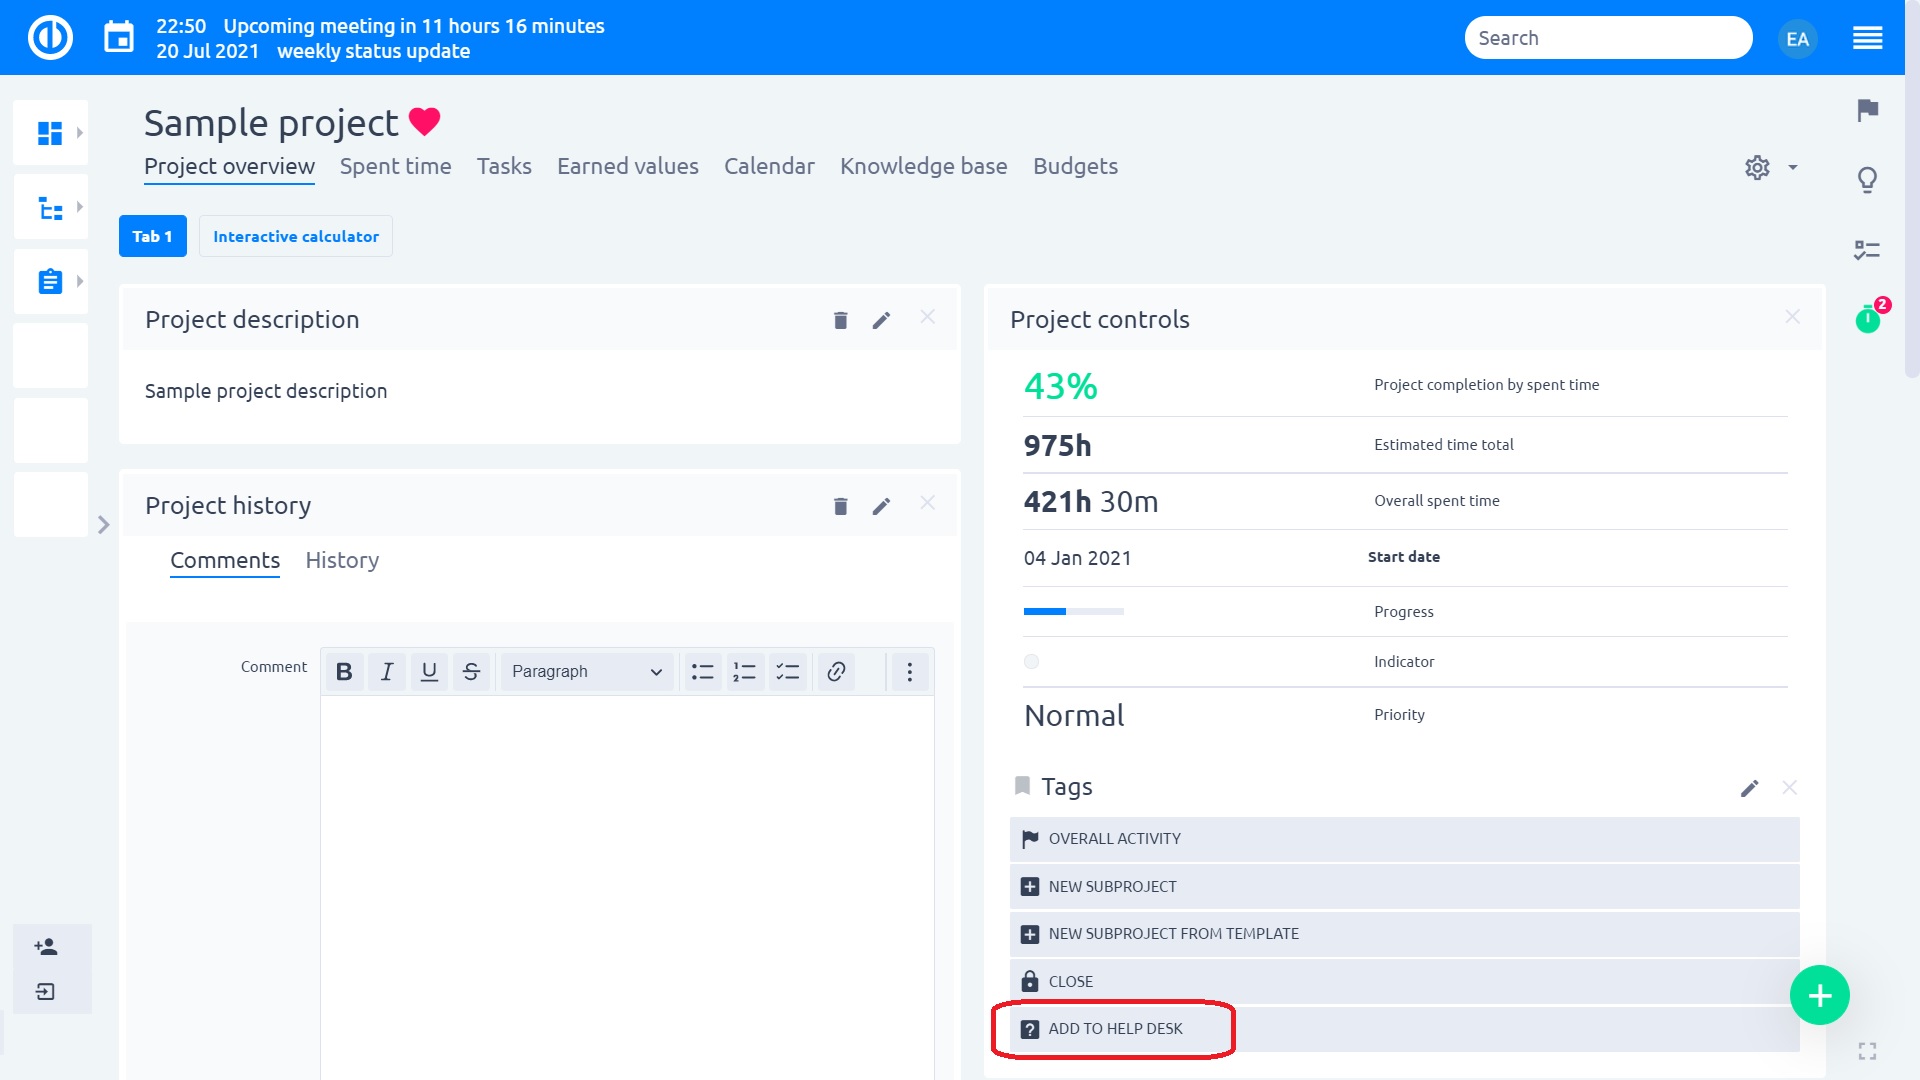
- Select the mailbox for which the project will be default
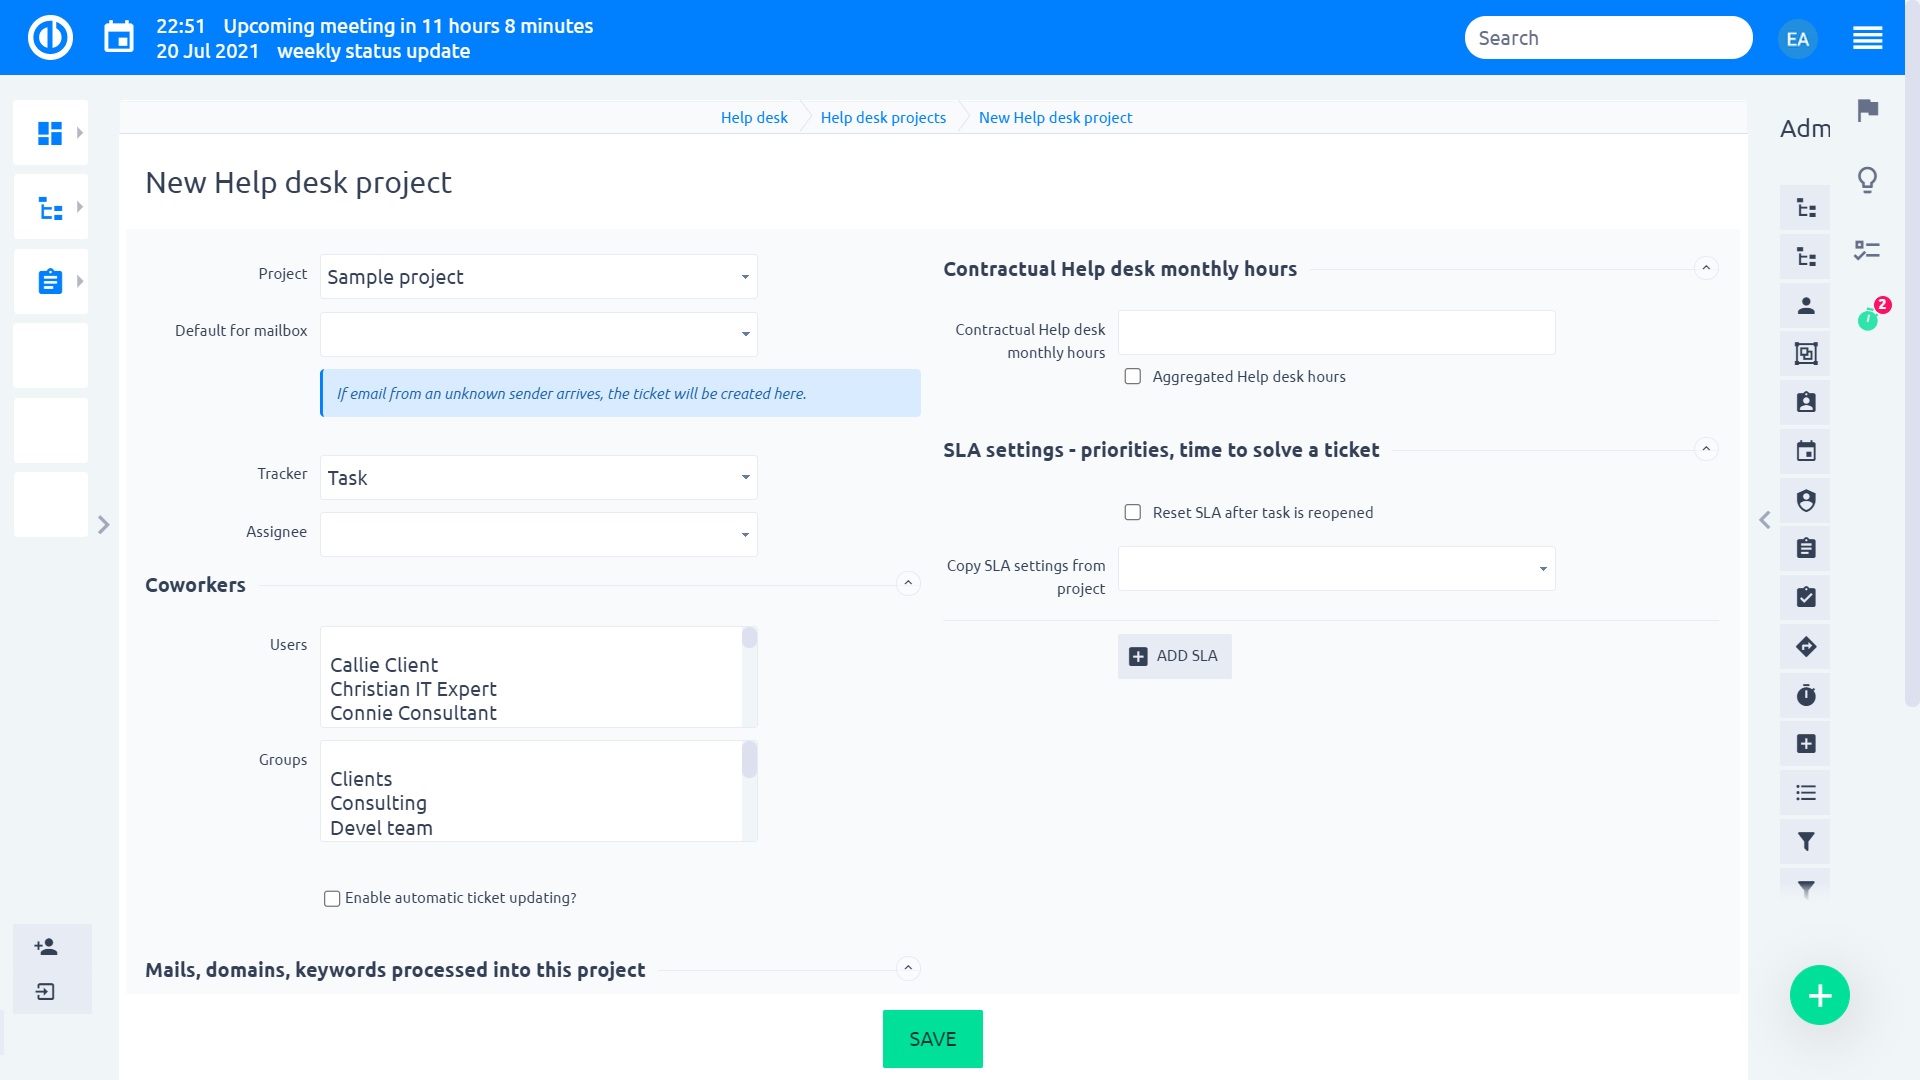
- Scroll down and Save
A complete explanation of all HelpDesk project settings will follow further in this chapter.
3.2 Special client project
From the examples in Chapter 1, these would be the projects: Bohemia Sun, Trains Francais, Client 123, Client ABC, Client XYZ, Client 1>>Project for HelpDesk, Client 2>>Project for HelpDesk
- Select project
- Fill in the fields highlighted below. Setting notes are under the screenshot
- Scroll down and Save.
Setting notes:
- Default for mailbox - DO NOT select any mailbox if you want to set this project as a special client project
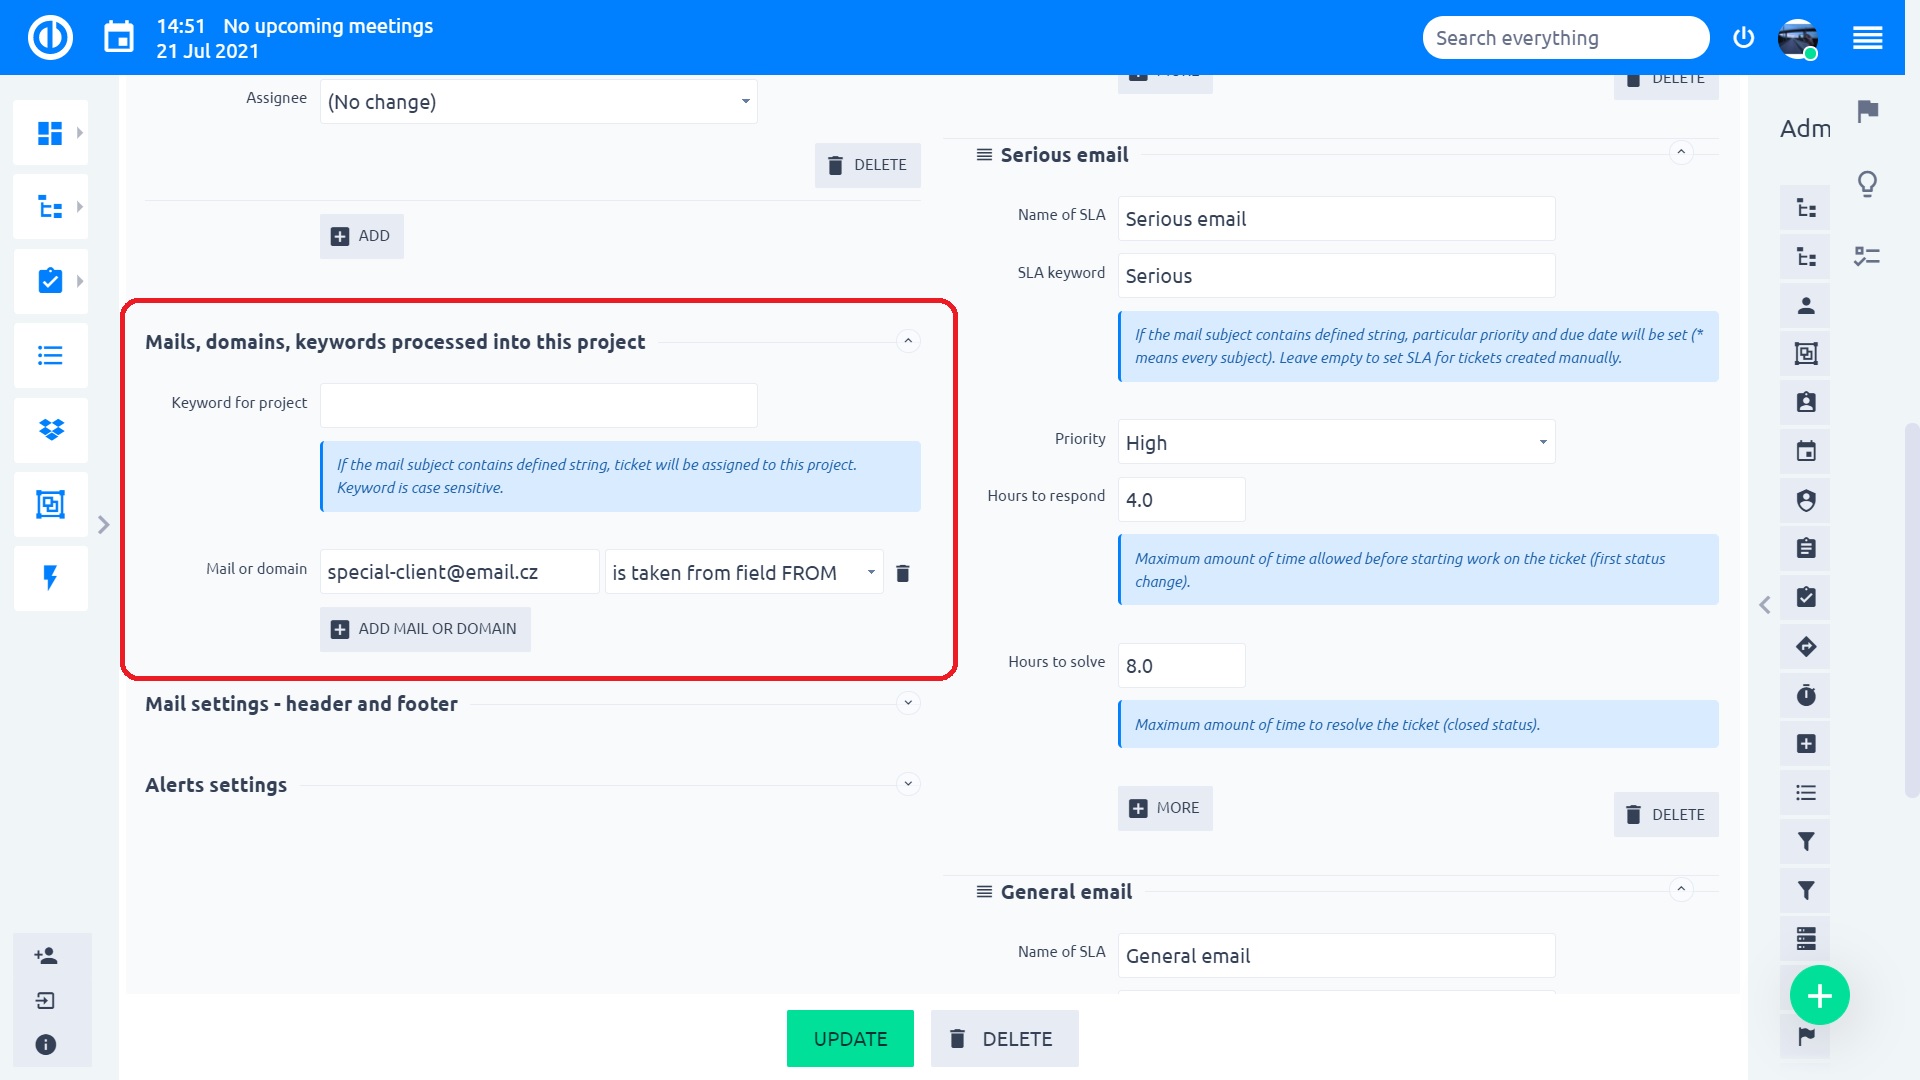
- Mails, domains, keywords processed into this project – all the settings in this section are with OR operator, which means that if at least one condition is met, ticket is created in this project
- Fill email to from - When this option is selected, the author's email will be automatically filled in new ticket.This option is useful when you have projects where tickets are created by real users, instead of via processing incoming emails.
- Keyword – In this example, if an email received in ANY HelpDesk mailbox contains the whole string I am from company Client ABC, ticket will be sorted into this project. Do not use the same keyword string for more projects, only the first record in database with the string will use the designated keyword string
- Mail or domain – incoming emails are scanned for these values in FROM field of the email. In this example, the sender can be anyone with mailbox ending with clientABC.com or it can also be a specific person with a different email, but we want his tickets to be sorted in this project
Complete explanation of all HelpDesk project settings will follow further in the next chapter.
IMPORTANT: It is not the best practice to have one project set both as Default for mailbox AND specified for a certain mail or domain. Any sender will have their tickets created in this project, so you don't need to specify them. This kind of setting may cause confusion.
3.2.1 Closing and archiving special client project
When such a project is closed (in effect becoming read-only), tickets will not be possible to create within. Therefore, this project will cease to be a special client project and emails coming from domains set in the HelpDesk settings will be processed as unknown and fall in a general HelpDesk project.
The same goes to archived projects.
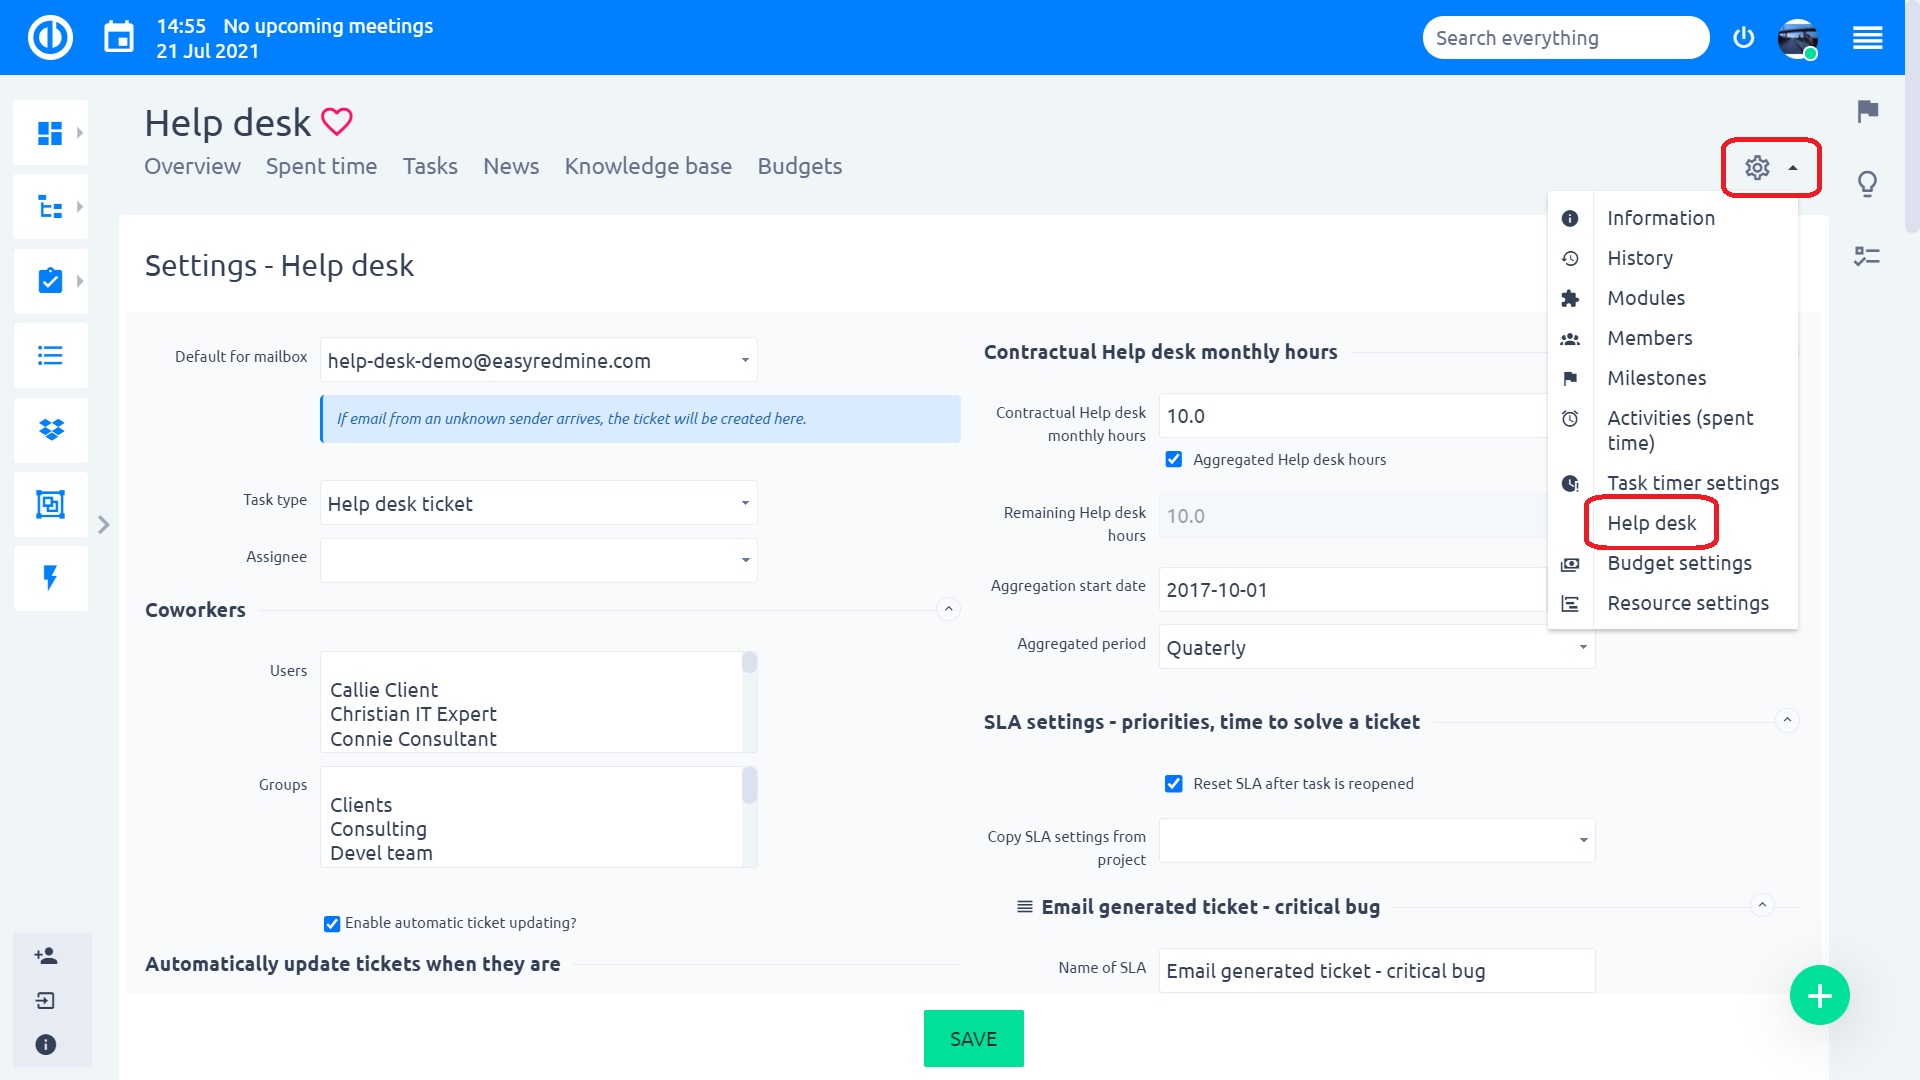
4 Project configuration – details
Now that we differentiated types of projects which can be used in HelpDesk, we can continue to explain the rest of the project settings. Once a project is connected to the HelpDesk, there are two ways to get into the project HelpDesk configuration page.
- Adminstration >> HelpDesk >> All HelpDesk projects >> Edit
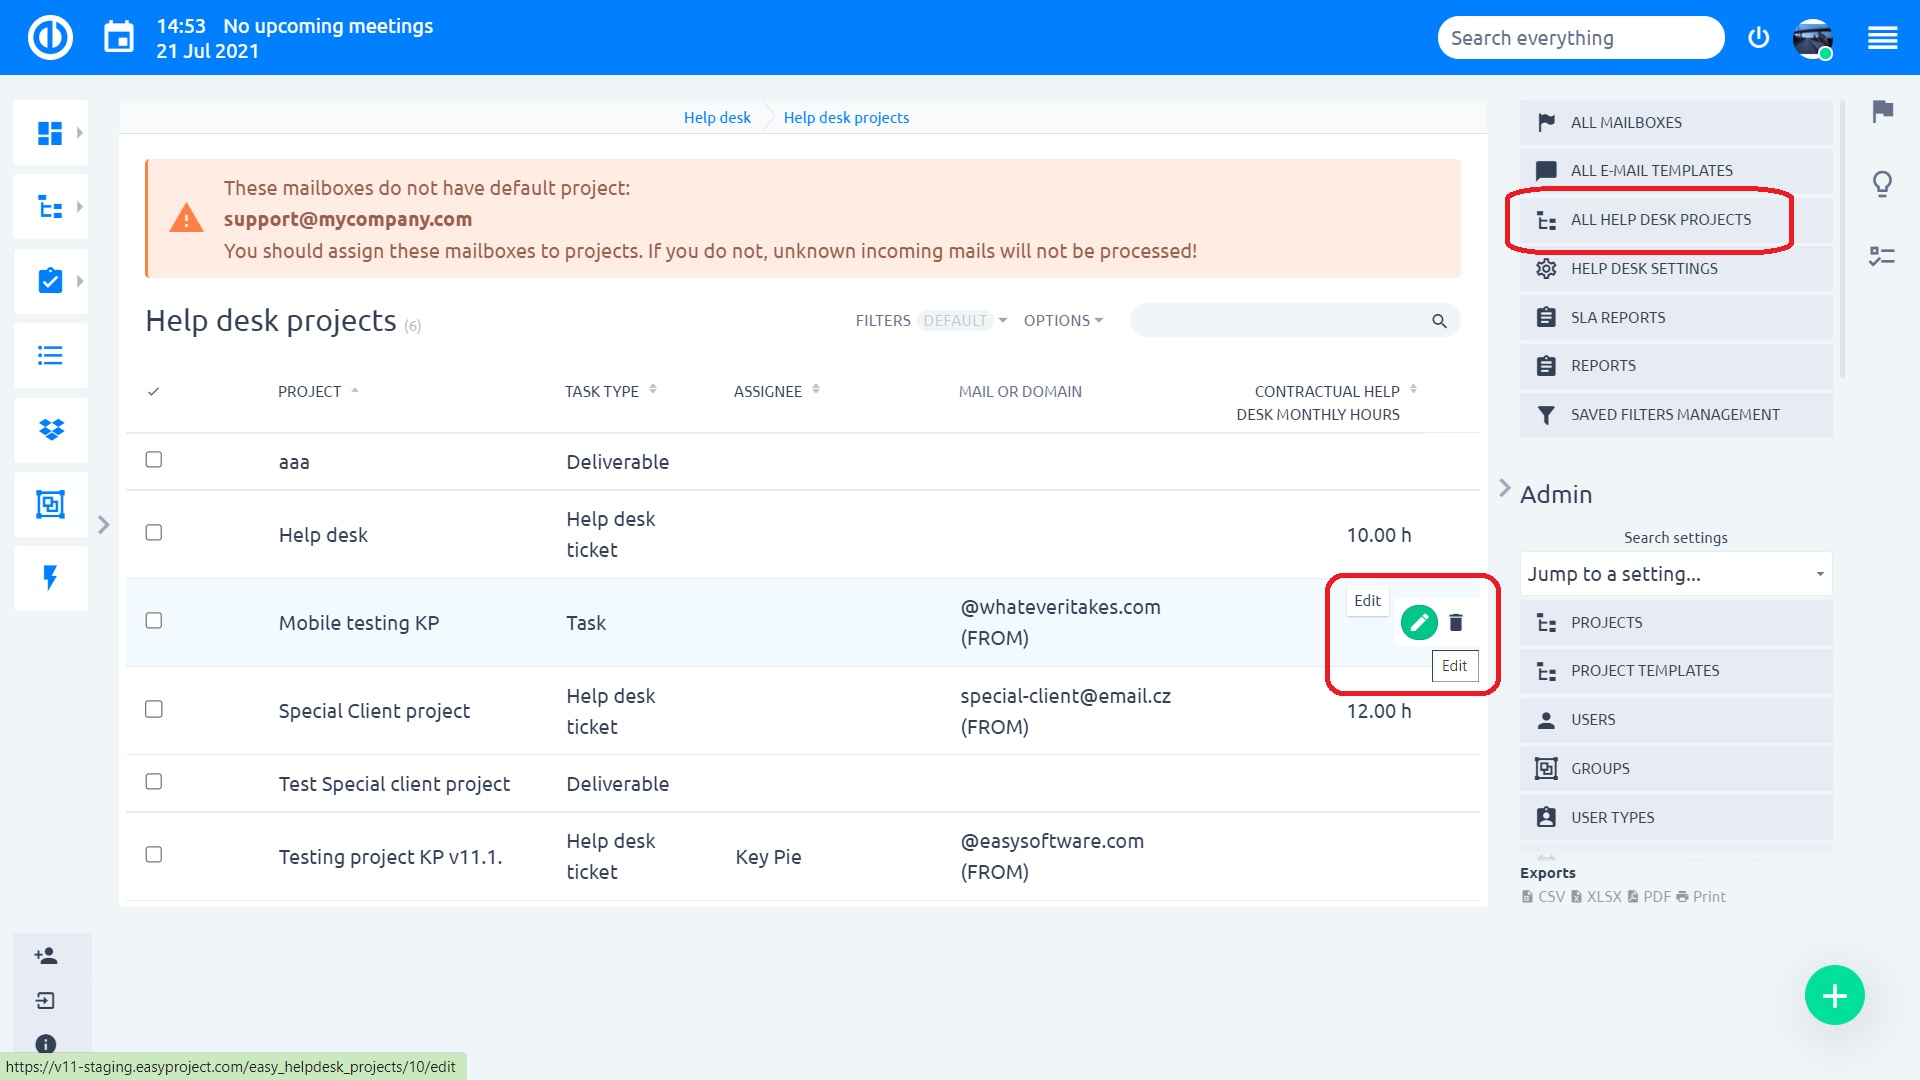
- Project settings >> HelpDesk
4.1 Basic settings
Setting notes:
- Tracker – new tickets in this project will be created with this tracker
- Assignee – new tickets in this project will be assigned to this user
- Coworker – new tickets in this project will have these coworkers (multiple selection possible)
- Automatic ticket updating – depending on your workflow, there may exist some tickets which are factually resolved, being kept open. For such cases, you can set automatic closing according to the status and duration of non-update. In addition to closing the ticket, a follow-up e-mail from template can be sent automatically such as for the purpose of informing the sender that his ticket has been closed or asking him about his satisfaction with the ticket resolution.
- Contractual hours monthly – this is setting should be used only for special client projects, where clients have prepaid a certain number of hours of support per month
- Aggregated hours – the contract with the client may have the option of transfering unused hours from previous month to the next one. If client has 10 prepaid hours, but used only 7 of them during May, 3 hours will be transfered to June
- Remaining hours – how much is left. The pencil button allows to manually clear remaining hours – set to 0
- Aggregated start date – when the prepaid period begins; must be selected a day which is common for all calendar months, i.e. day 1-28
- Aggregated period – for what time period are the hours aggragated before they are reset to the original Contractual hours. If there are still 13 hours remaining by the end of the quarter (end of the quarter is determined by Aggregated start date), they will not be transfered to the new quarter. The hours will be reset to 10
The hours at hand are spent time entries in the project. Which exact entries will be explained further in this manual.
4.2 SLA
This is an important metric of any HelpDesk project, but especially for special client projects where SLA violation may be sanctioned. As was mentioned before, tickets may be created by email or directly from within the system by clients with specially restricted access to a HelpDesk project. Both cases have a slight nuance in the SLA setting.
4.2.1 SLA for email generated tickets
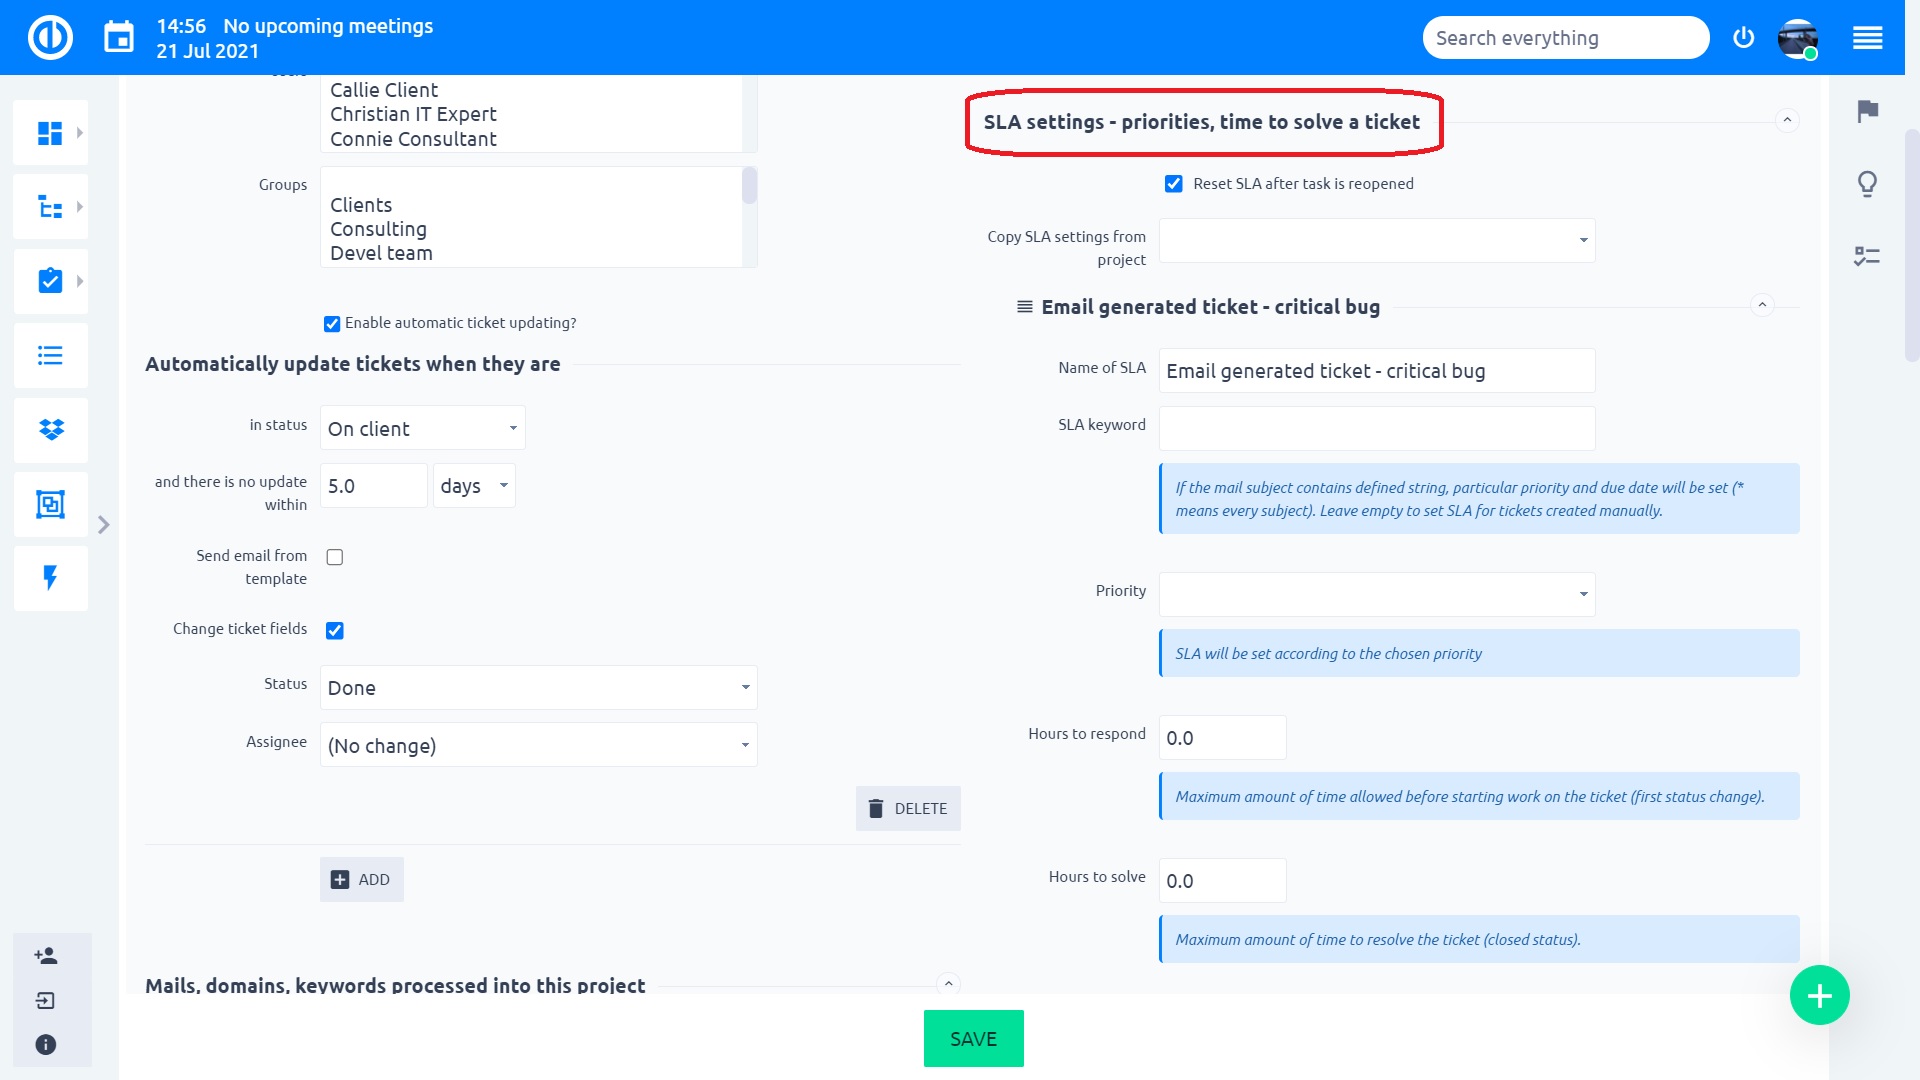
Setting notes:
- Name – Title of the SLA (for better SLA administration in the HelpDesk project)
- Keyword - must be filled if SLA is being set for email-generated tickets. In this case there is a specific keyword, which if is contained in the subject of the email, ticket will be given the specifications of the SLA (hours, priority, tracker)
- Hours to response – deadline until which the first status change of the ticket must take place. Status change indicates that ticket has been acknowledged and client has been informed about it
- Hours to solve – deadline to close the ticket >> put it into a closed status
- Priority – new ticket from email contaninng the keyword will have this priority
- Tracker – new ticket from email contaninng the keyword will have this tracker. This is helpful for example, if the client has found a defect in the product and wants to report it directly as a defect and not as a standard request for support. The client would therefore write with subject for example Defect – and the ticket won't have to be classified by the HelpDesk manager.
- Count SLA based on working time – SLA deadlines will not be set for non-working days or hours of the day. Some SLA may be limited only to working hours, but others can be set to 24/7
- SLA working hours – time frame for SLA
- Working days – working calendar where weekends, holidays and other non-working days are registered
4.2.2 Ordering of SLAs
With more levels, keywords and keyword strings, it is important to keep order correctly. The mail subjects are checked for keywords according to the order in the HelpDesk settings.
Example: You have contractually defined keywords for "Critical" and "Critical bug", each of them has a different SLA. You need to make sure the two subjects will be differentiated when the emails are processed.
In this case you need to put the SLA "Critical bug" above "Critical". The mechanism of the mailsubject processing is simple:
- Search for "Critical bug" in the mail subject
- If the above string is not in the subject, search for the next one, in our case "Critical"
- If the above string is not in the subject, continue searching for further keywords
- The last SLA must be the general (for unspecified level) keyword using the * mark for all subjects
If you put "Critical" before "Critical bug", it would mean that emails with "Critical bug" in the subject will be processed incorrectly, because they would fall under the "Critical" SLA.
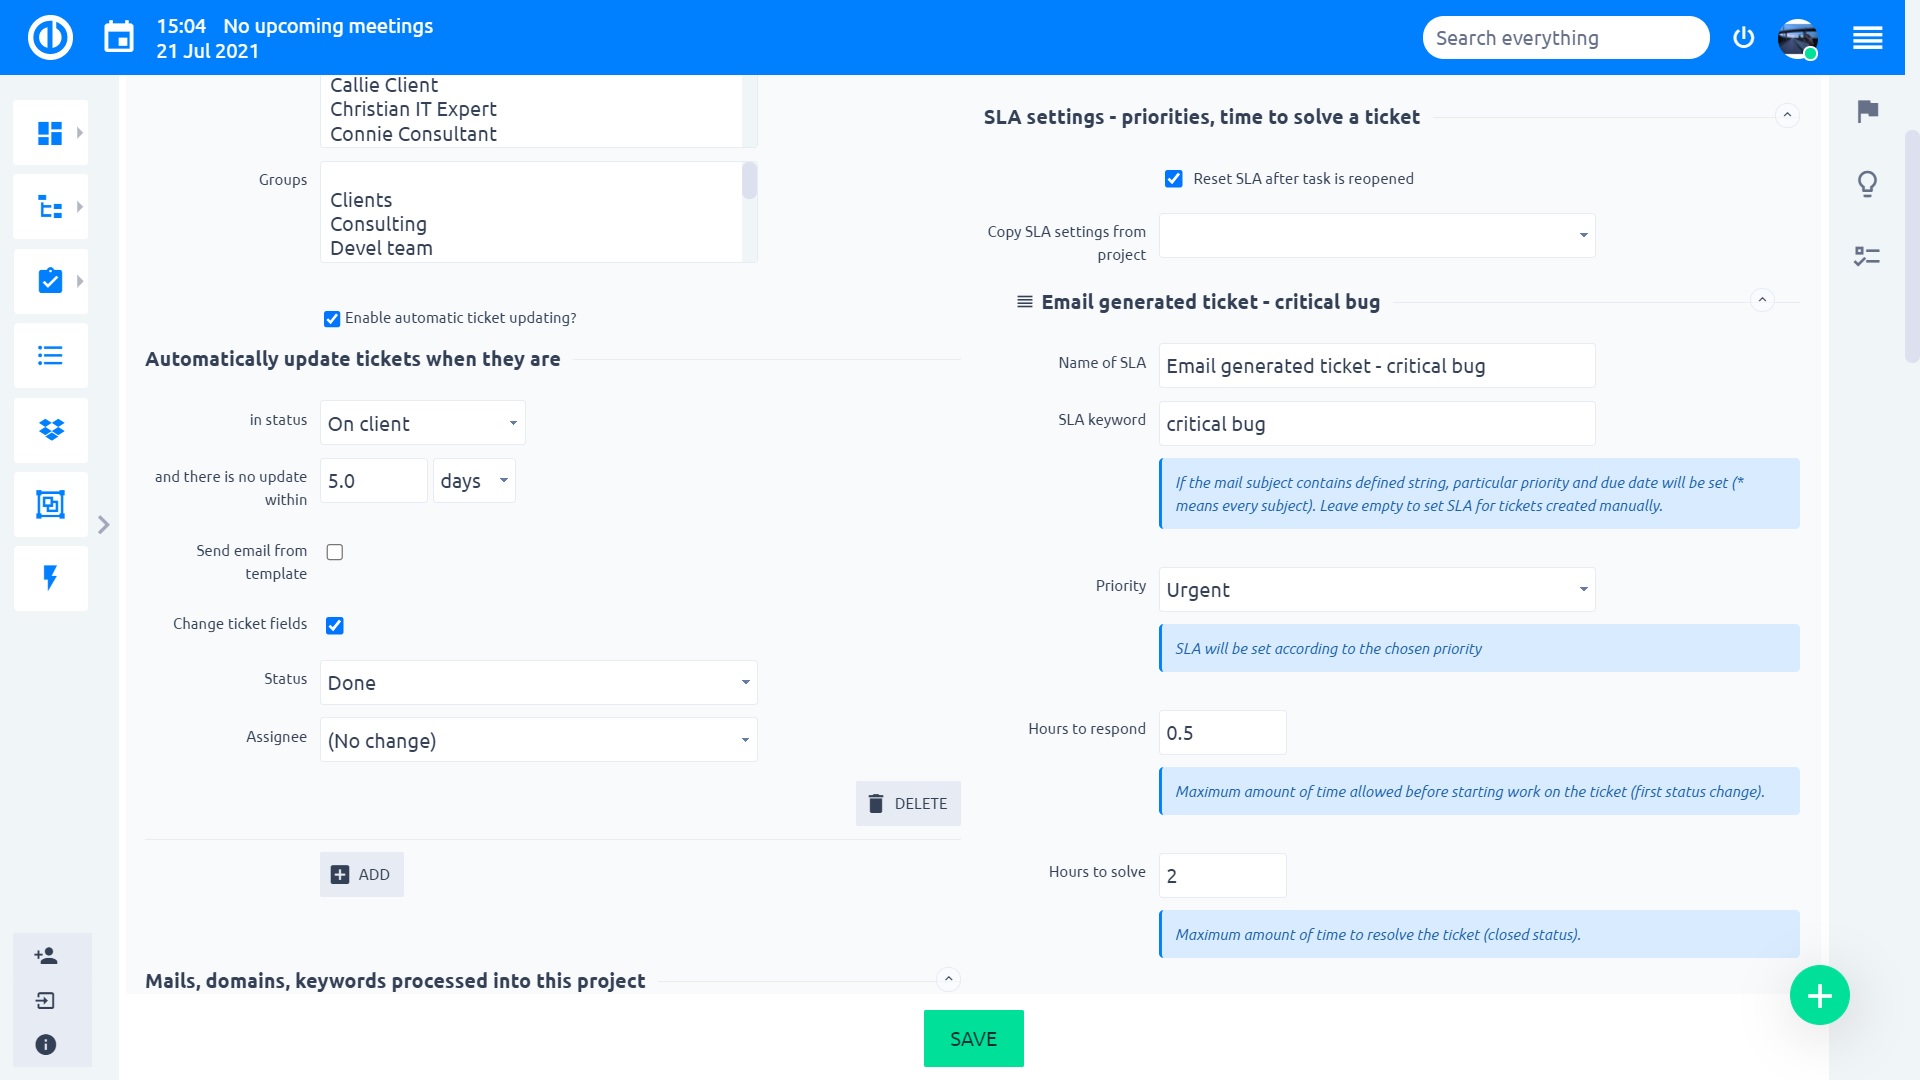
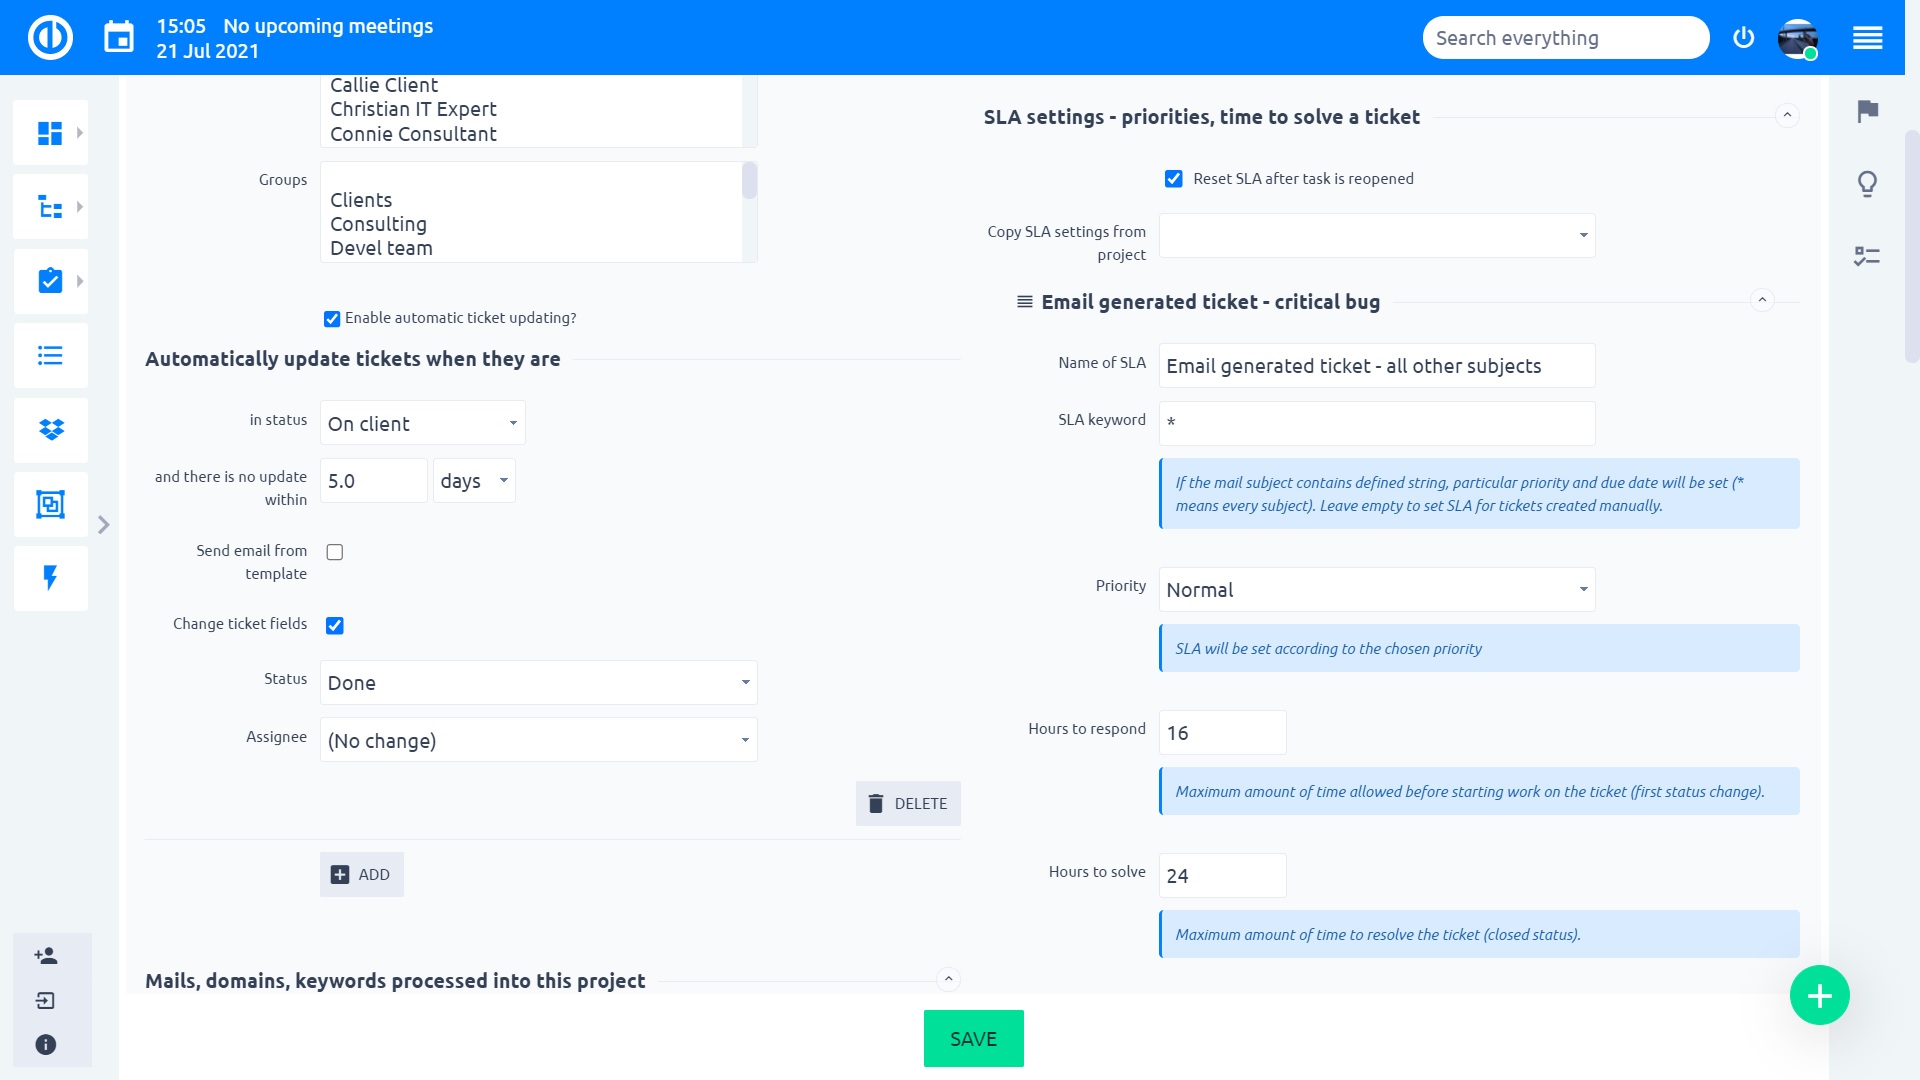
In general, the more specific keyword string, the higher its position should be.
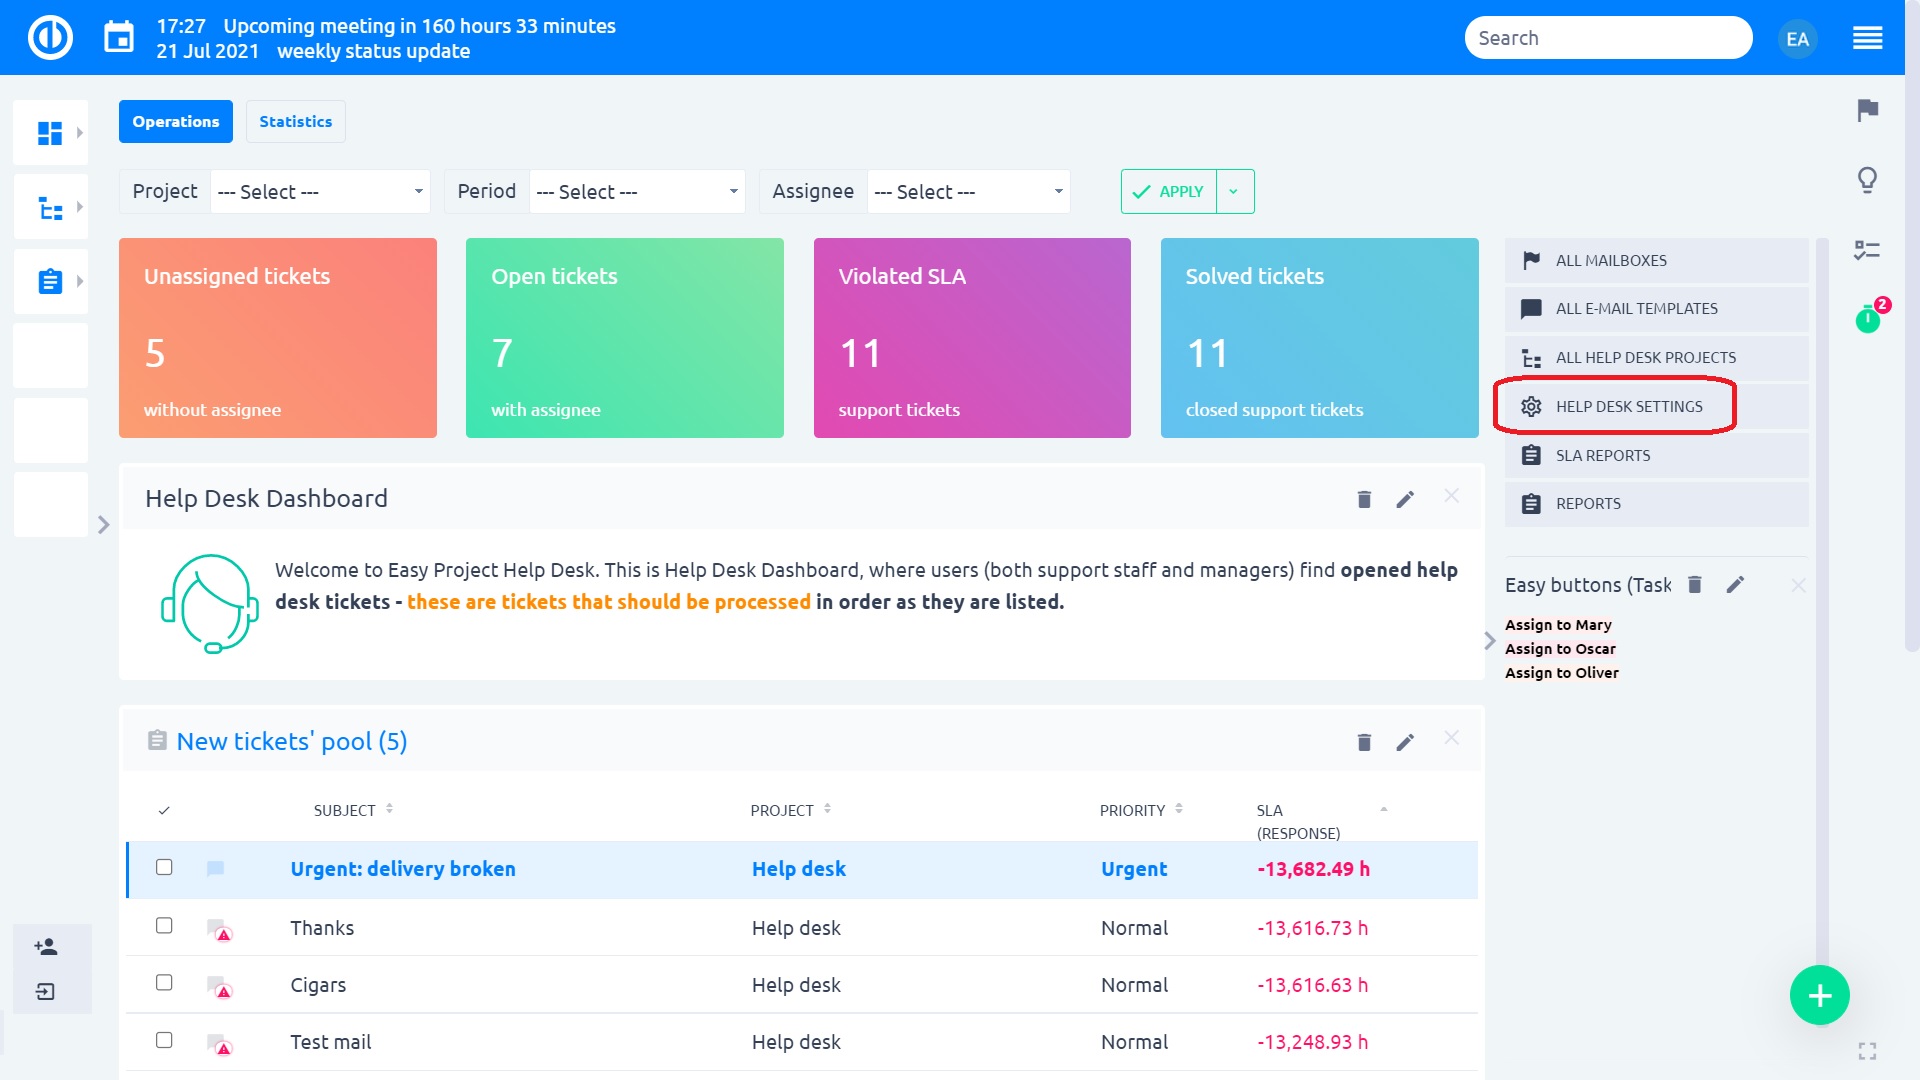
The SLA on a client ticket has been breached. What do you do to make sure you got this under control? In this case, go to projects Settings >> HelpDesk a scroll all the way down
4.2.3 Resetting SLA for closed tickets
You will also notice a setting right at the top of SLA section.
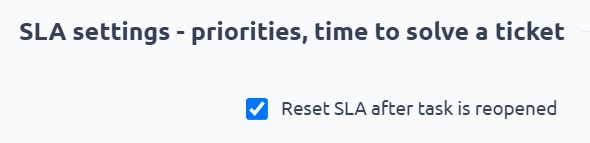
When enabled, tickets which were once closed and are reopen by another reply from the client, will have SLA counted as if they were new – from time of the client's reply which reopened the ticket.
Example: Ticket #1234 was open on Monday at 16:00. SLA is 48 hours => time to resolve is until Wednesday 16:00. The ticket was closed by an operator on Tuesday at 10:00. The client replied again that he needs more information on Tuesday at 14:00. Ticket #1234 now has new SLA set for Thursday 14:00.
When disabled, SLA will always by counted from the original time when the ticket was created.
Example: In the scenario from the first case. After client's reply on Tuesday at 14:00, SLA will not be reset and would remain on Wednesday 16:00. The same goes when the client reopens the ticket on Thursday. The ticket would now be highlighted as overdue.
From the last note, it is evident that this setting should only be disabled on projects, where the tickets are simple and resolving can be strictly defined, so there is no reason to reopen the tickets from the client's side.
4.2.4 SLA for internally created tickets
As was mentioned before, tickets may not be created only from emails. Easy Redmine has an advanced access level control, which allows providing your clients direct access to the system with restricted permissions (to create tickets, edit tickets, read news,...).
Tickets created like standard tasks by logged-in users have a slightly different way of determining SLA. Because there are no emails processed, you can't determine the SLA by keywords. Let's explain on the image below.
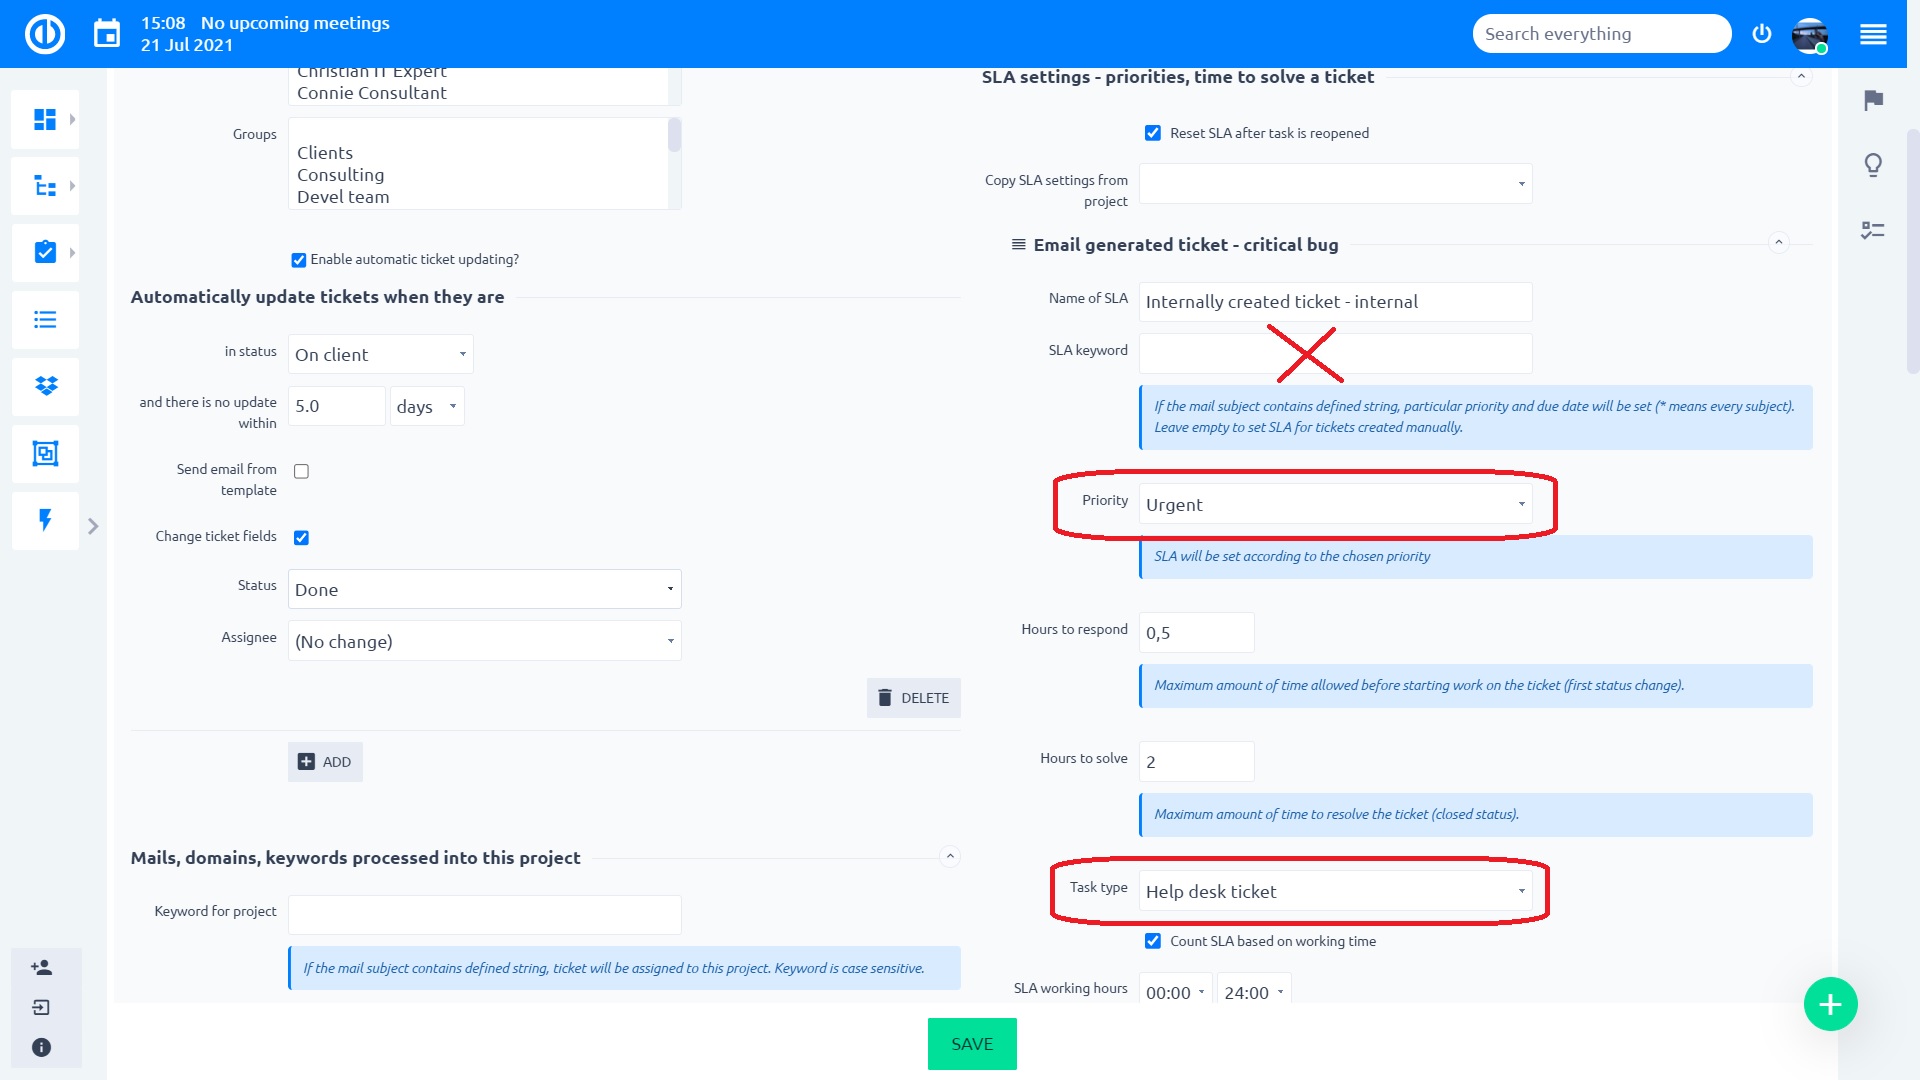
When creating SLA for internally created tickets, leave the Keyword blank. SLA will be then determined by a combination of Priority and Tracker. When you save the settings, the Keyword will disappear, indicating that this SLA is used for internally created tickets. If you leave Tracker empty, only keywords will be considered.
By configuring workflow effectively, you can restrict clients to only create tickets in certain trackers, even if the project contains more of them. You can for example only allow clients to only use tracker HelpDesk Ticket and Bug, so you can only set SLA for these trackers. All other trackers wouldn't require SLA setting because they would not be submitted by clients and therefore would not be considered HelpDesk tickets.
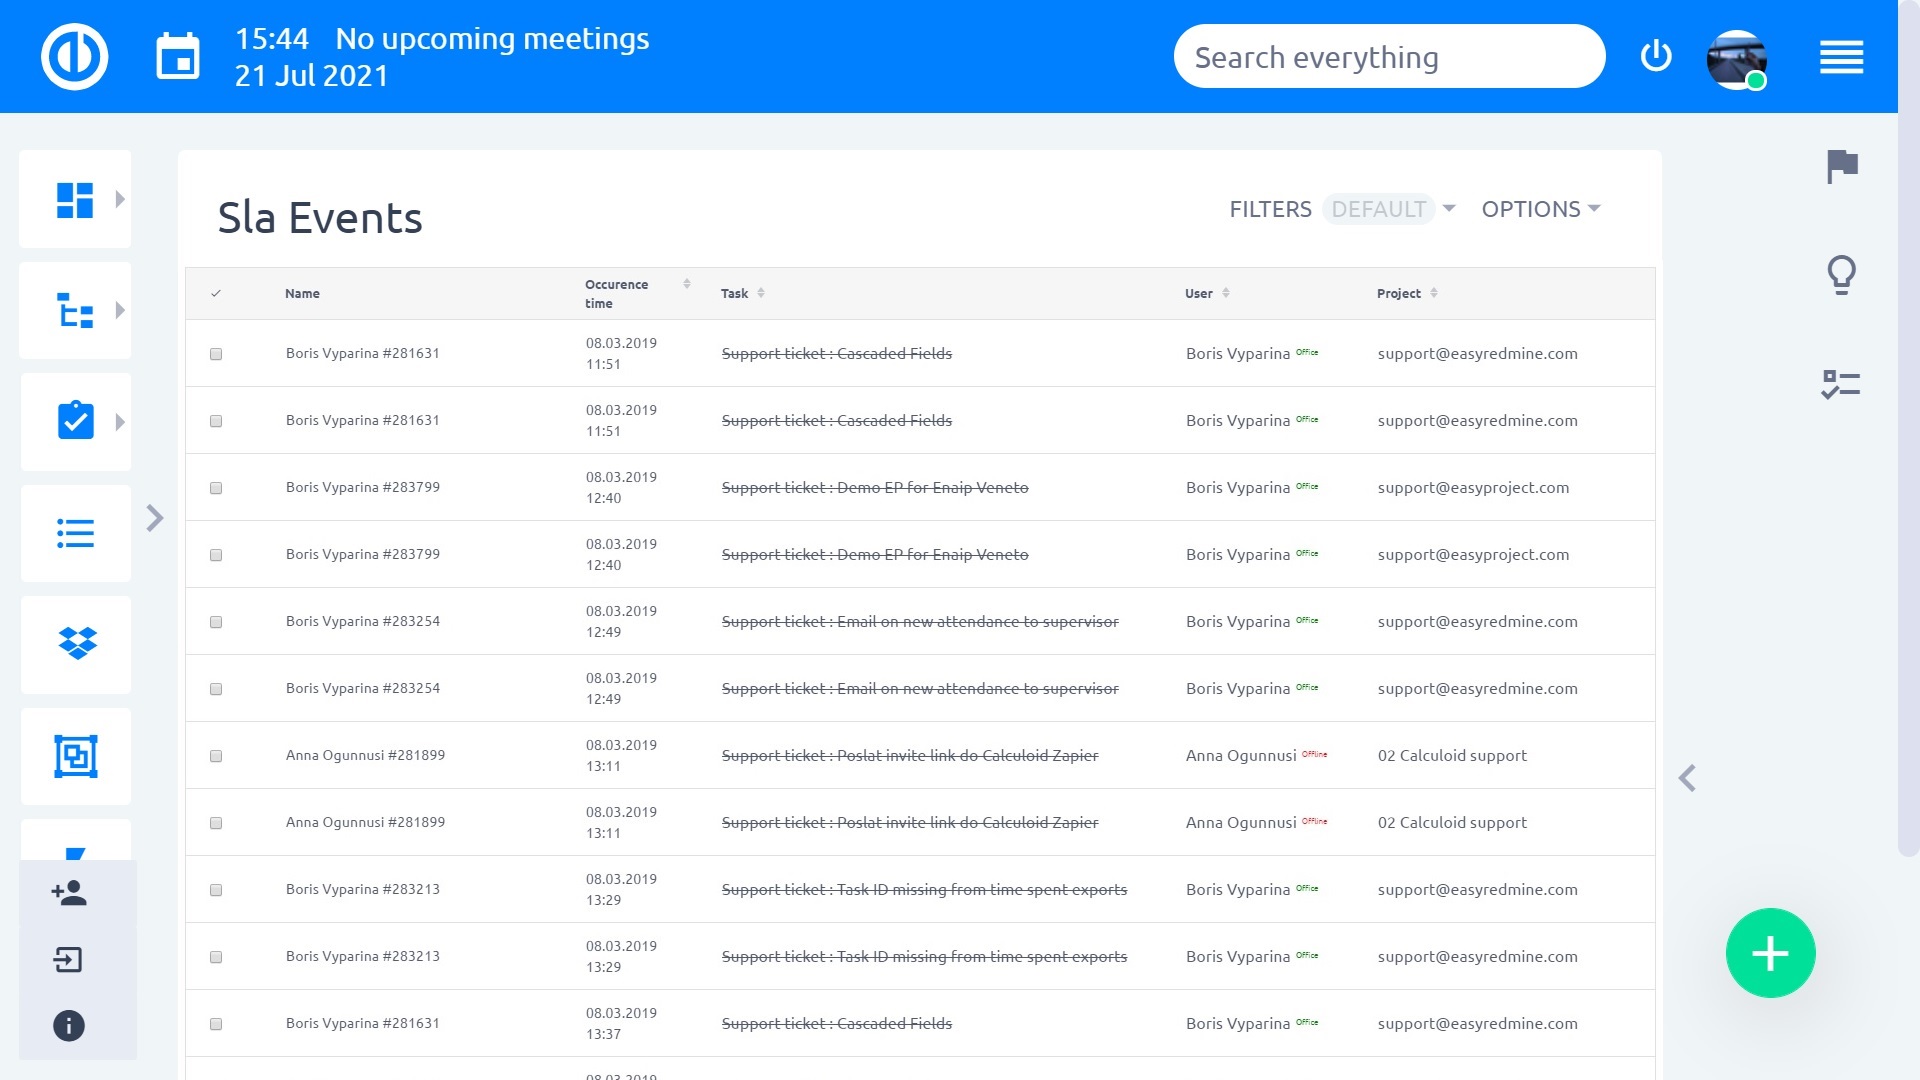
4.2.5 SLA Events and Reports
SLA Reports are based on individual SLA Events. These events can be viewed per each HelpDesk ticket, simply check out SLA Events in the bottom menu of any HelpDesk ticket. When a ticket is responded/solved, you may check out its SLA event here, which tells you, amongst other information, how long time (in hours) had actually passed until the first response took place, and you can directly compare the value with SLA response fulfillment (i.e. time required for the first response) and SLA resolve fulfillment (i.e. time required for the ticket resolution) according to your SLA settings on that particular HelpDesk project. In addition to that, you instantly see who and when responded/resolved the ticket and which project this ticket belongs to. Time records are shown with a positive or negative symbol (+/-), resp. in green/red color to highlight whether or not the SLA has been compiled.
SLA event is only created when a support ticket is actually responded by sending an e-mail to a customer, not before. Adding a comment to a ticket does not lead to SLA event creation because it is not clear whether such a comment is just an internal message or a response to the customer's request.
When a support ticket is moved from one project to another, the SLA event does not recalculate. The SLA of the ticket remains from the original project, where such a ticket was created. SLA recalculation is triggered by a change of tracker or priority only.
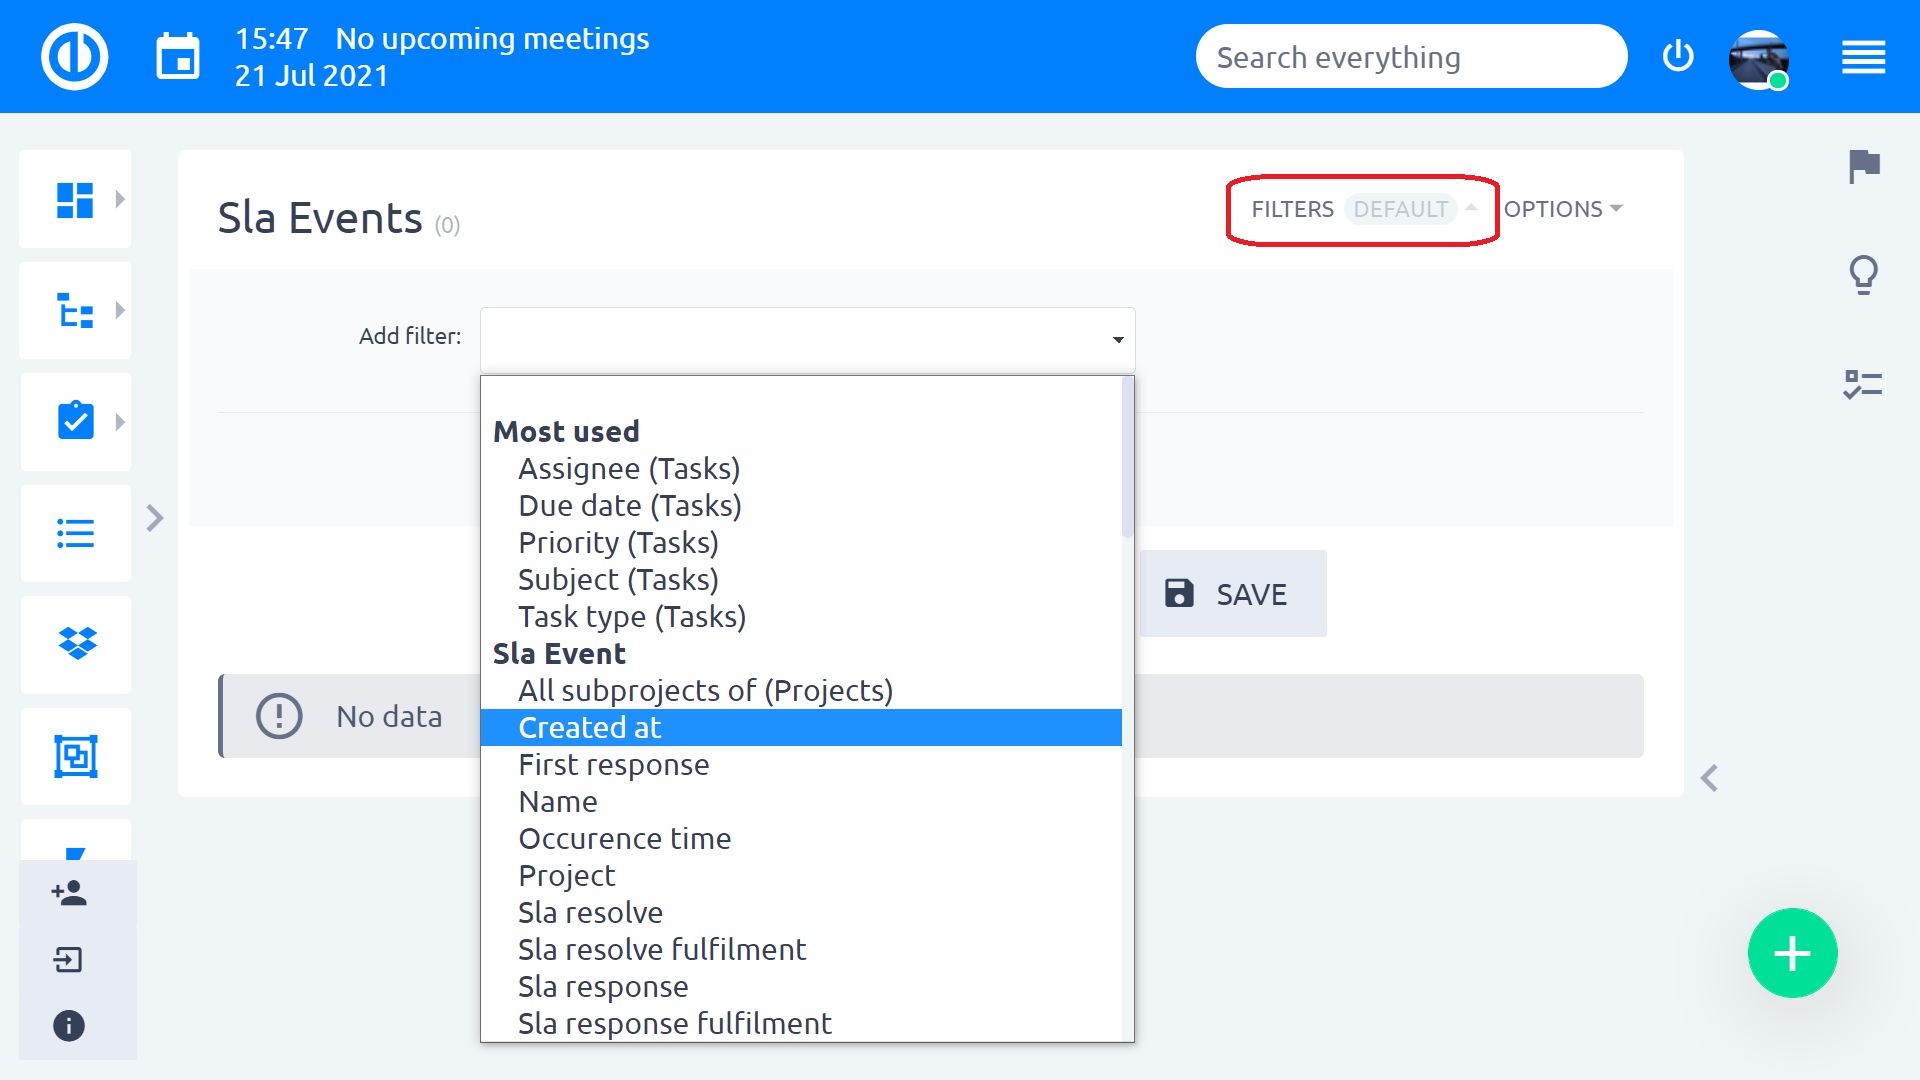
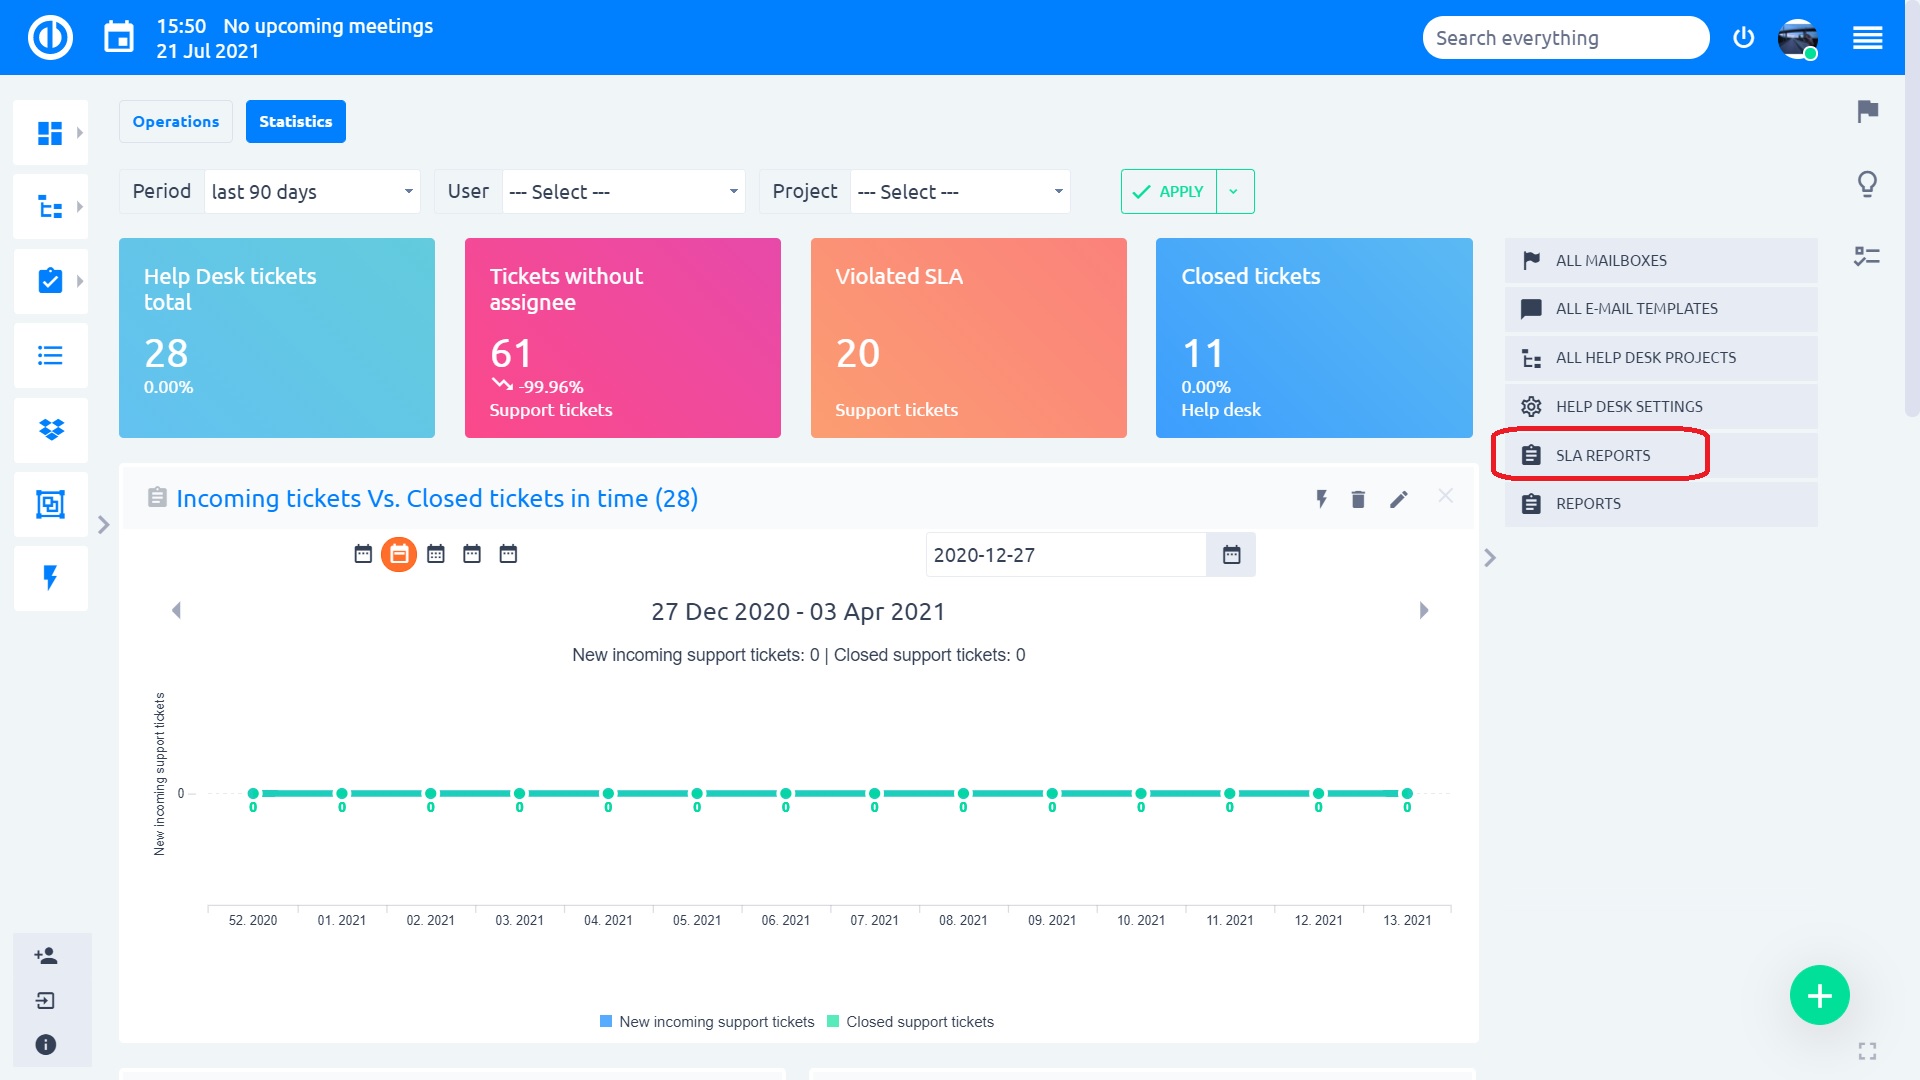
To see the list (an overview) of all SLA Events, go to /easy_sla_events or click SLA Reports menu item in the sidebar menu of the main HelpDesk dashboard (/easy_helpdesk).
SLA events can be easily filtered according to various SLA, custom fields or other criteria.
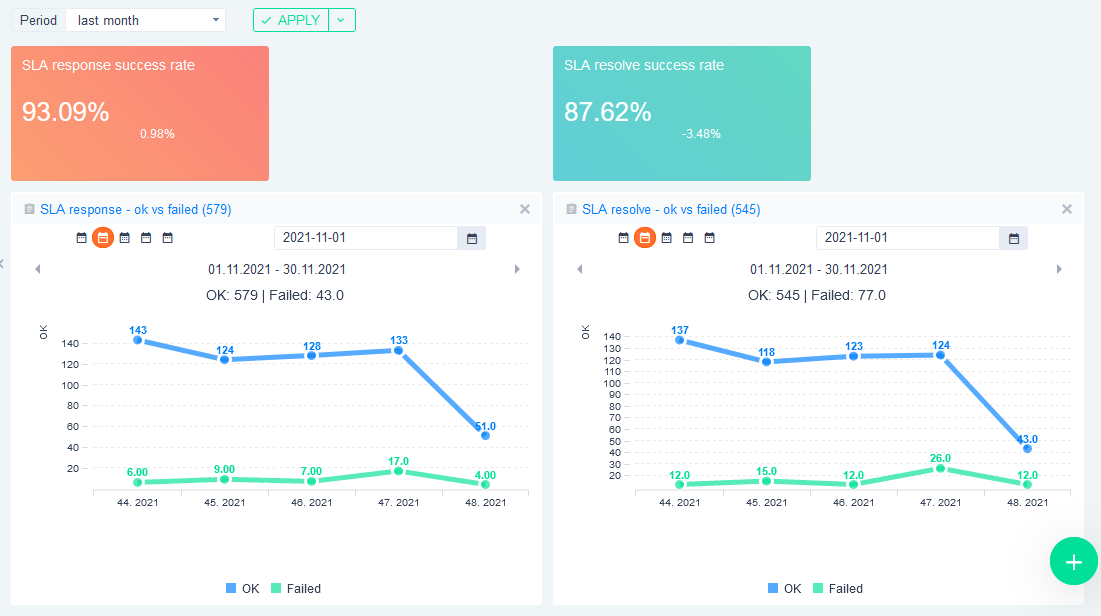
All SLA Events summarized into overall SLA statistics can be found on SLA reports dashboard. By default, this dashboard is available in the top menu of the main HelpDesk dashboard. Using the dashboard, you instantly see the overall percentage of failed SLA response, failed SLA resolve, and average first-time response. Since the dashboard is a standard personalized page like many others, you can customize all the modules shown in the dashboard to make them better suit your needs.
4.2.6 Ticket SLA reports
In addition to the above, it is also possible to do SLA reports above tickets.
From version 11plus.2.0, tickets have two new fields:
- First SLA response fulfilment - taken from the first SLA event on the ticket
- Last SLA resolve fulfilment - taken from the last SLA event on the ticket
How it works
Ticket is created -> Help desk operator responds-> SLA event is created -> values from this SLA event are copied into the aforementioned attributes of the ticket -> client replies back -> operator replies to client -> new SLA event is created -> value of SLA revolve fultilment it copied into the ticket attribute.
Where is the value
Since the ticket itself contains the most crucial SLA reporting data, you can make reports on SLA satisfaction directly above tickets.
Some examples:
- Ticket resolution success rate
- Line chart of absolute number of tickets with failed SLA response/resolve in time
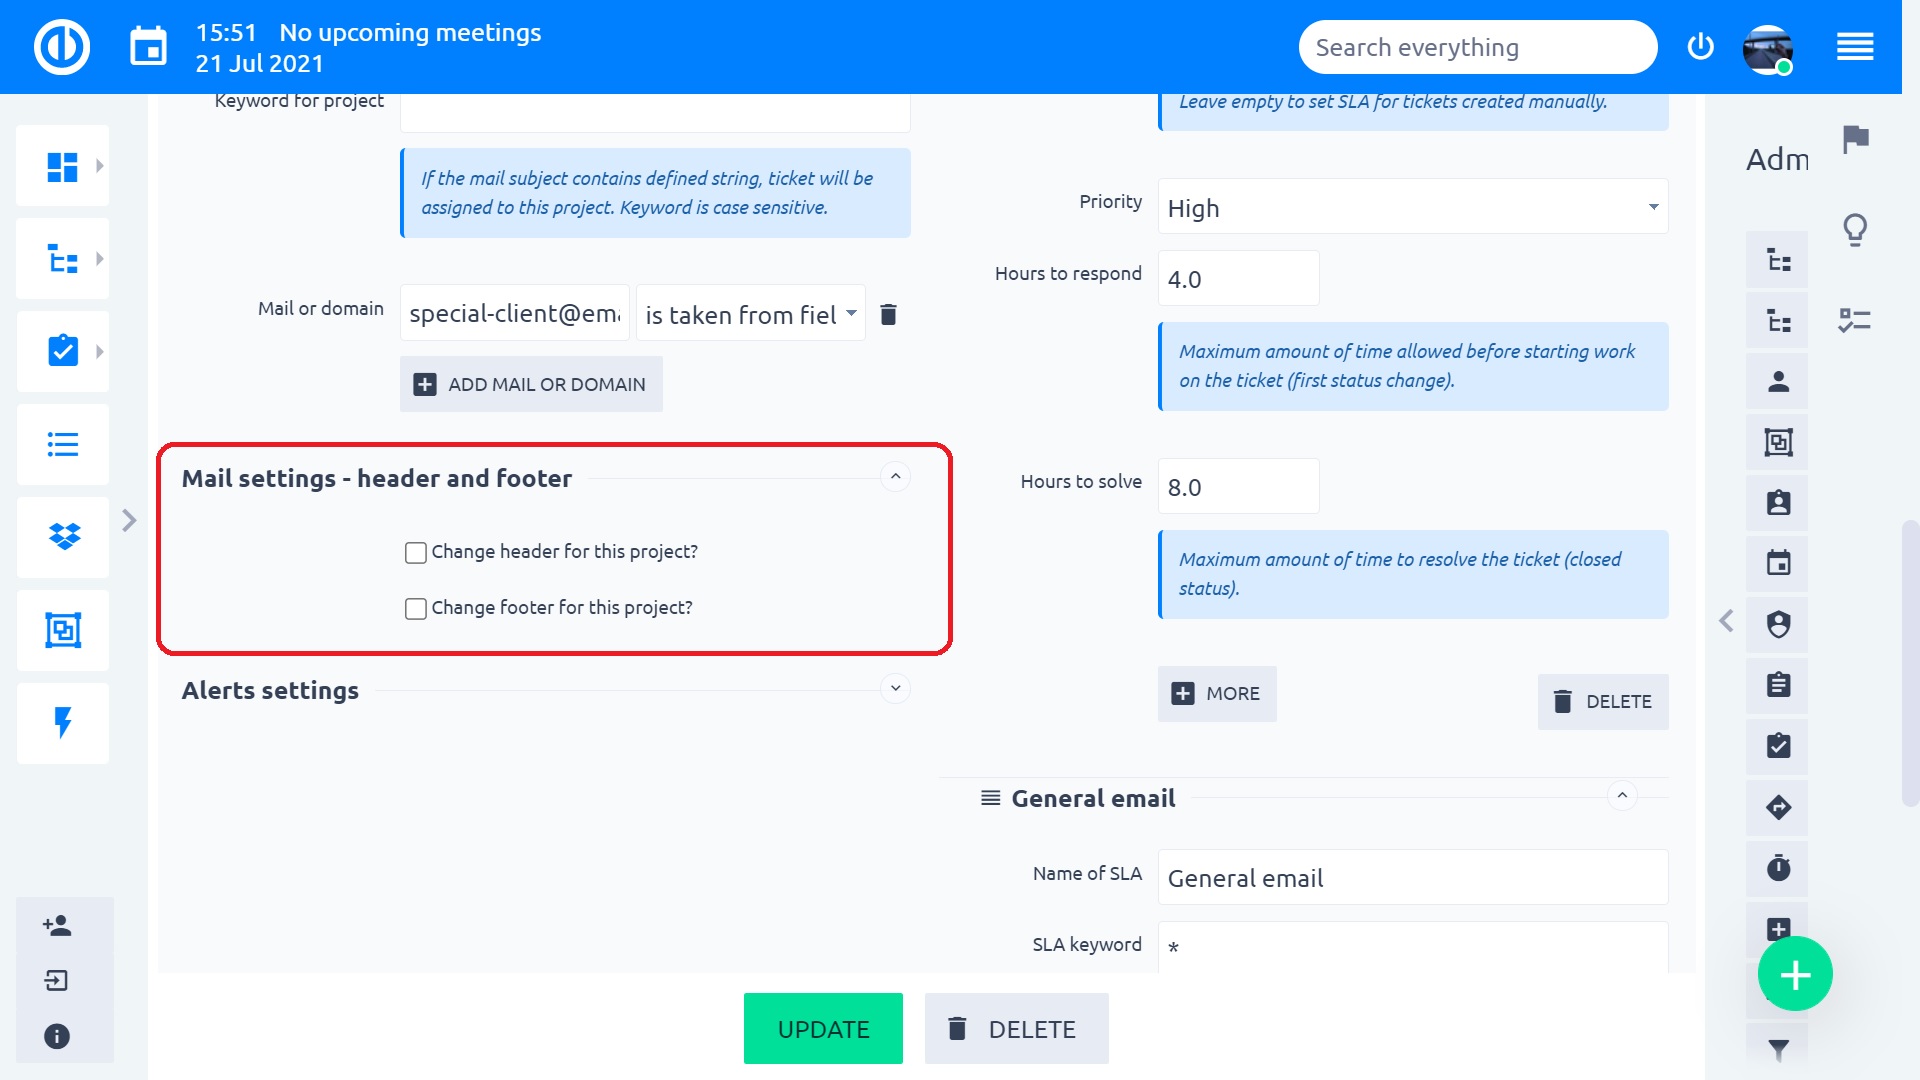
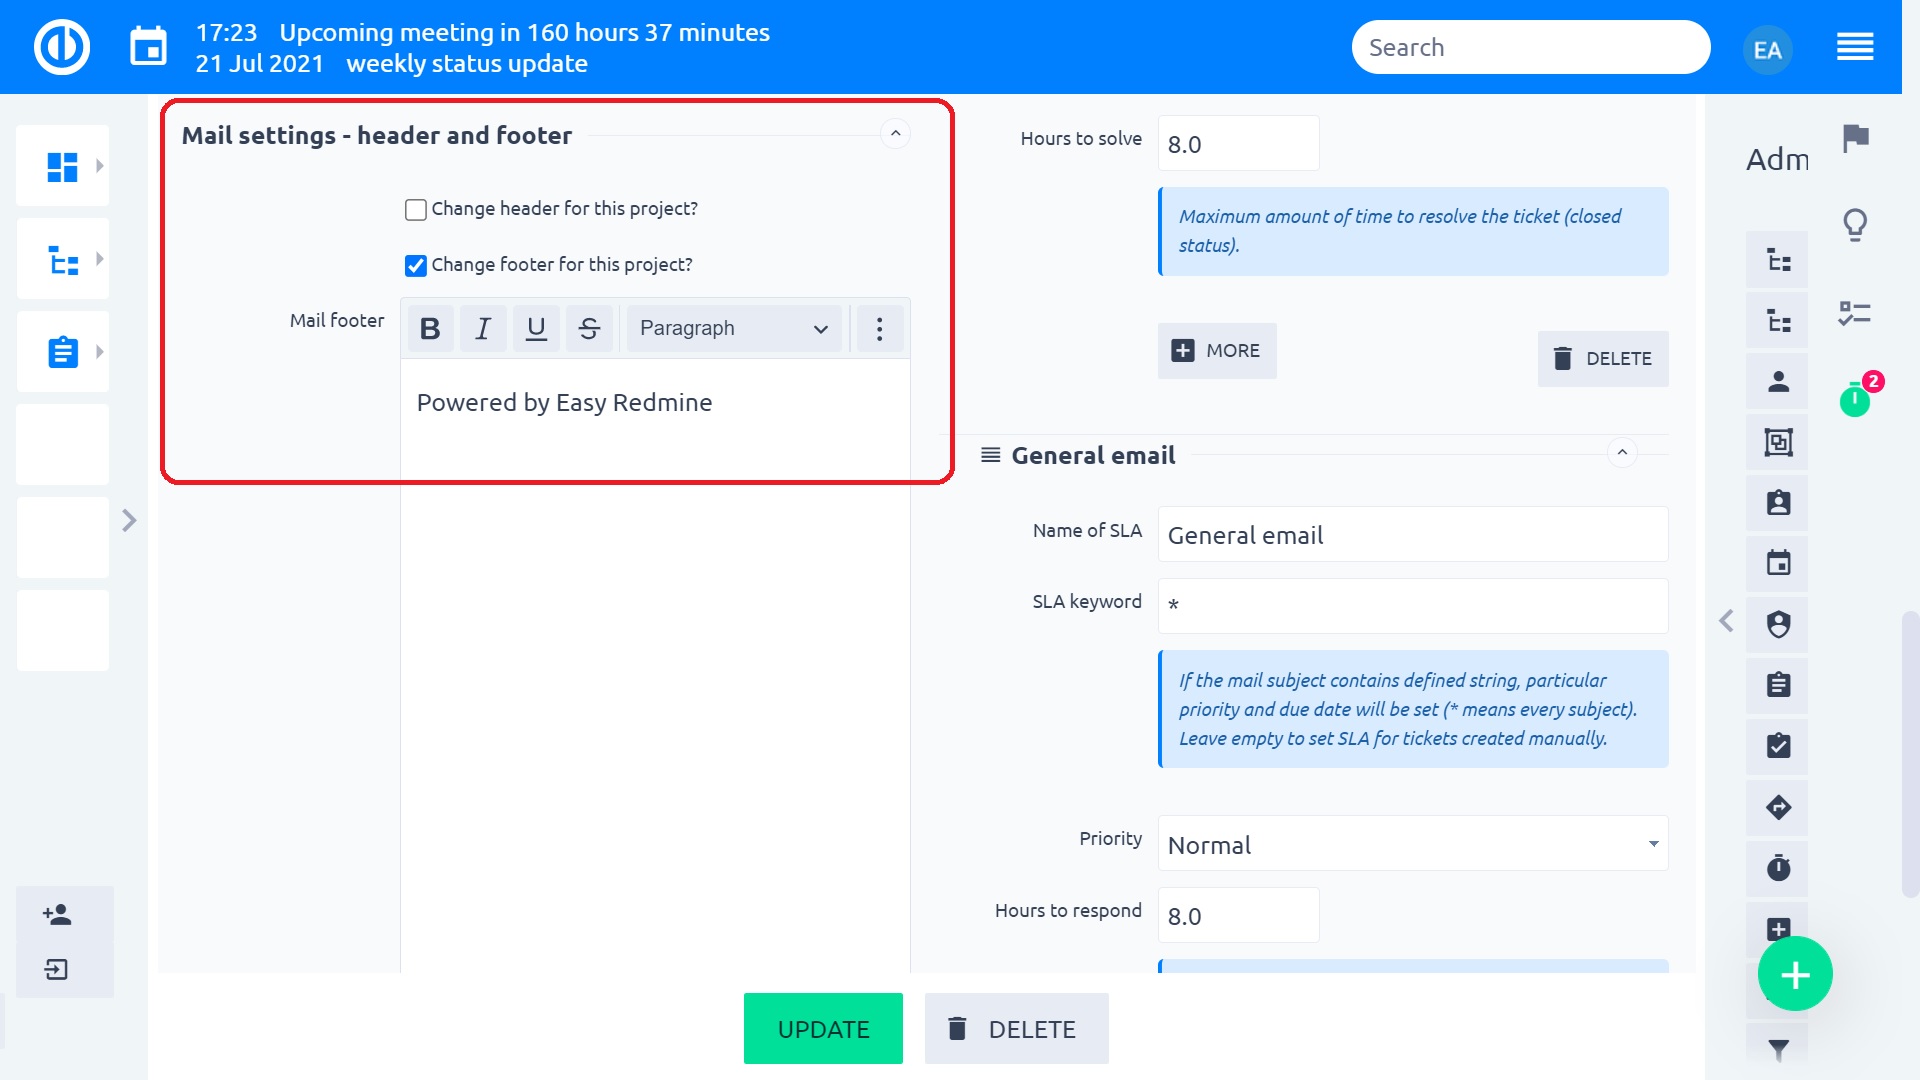
4.3 Custom header and footer
This setting concerns HelpDesk email communication, i.e. communication in email generated tickets. You may customize emails from different HelpDesk projects, whether it is for corporate identity use, for terms specifications or even confidentiality disclamers.
4.4 Alerts
In order to prevent SLA from being violated, there is the possibility to use automated alerts, which notify concerned personnel about looming problems in the form of delayed tickets.
Another type of Alerts watches spent time in projects, where clients have prepaid a specific amount of hours of support (as explained in chapter 4.1).
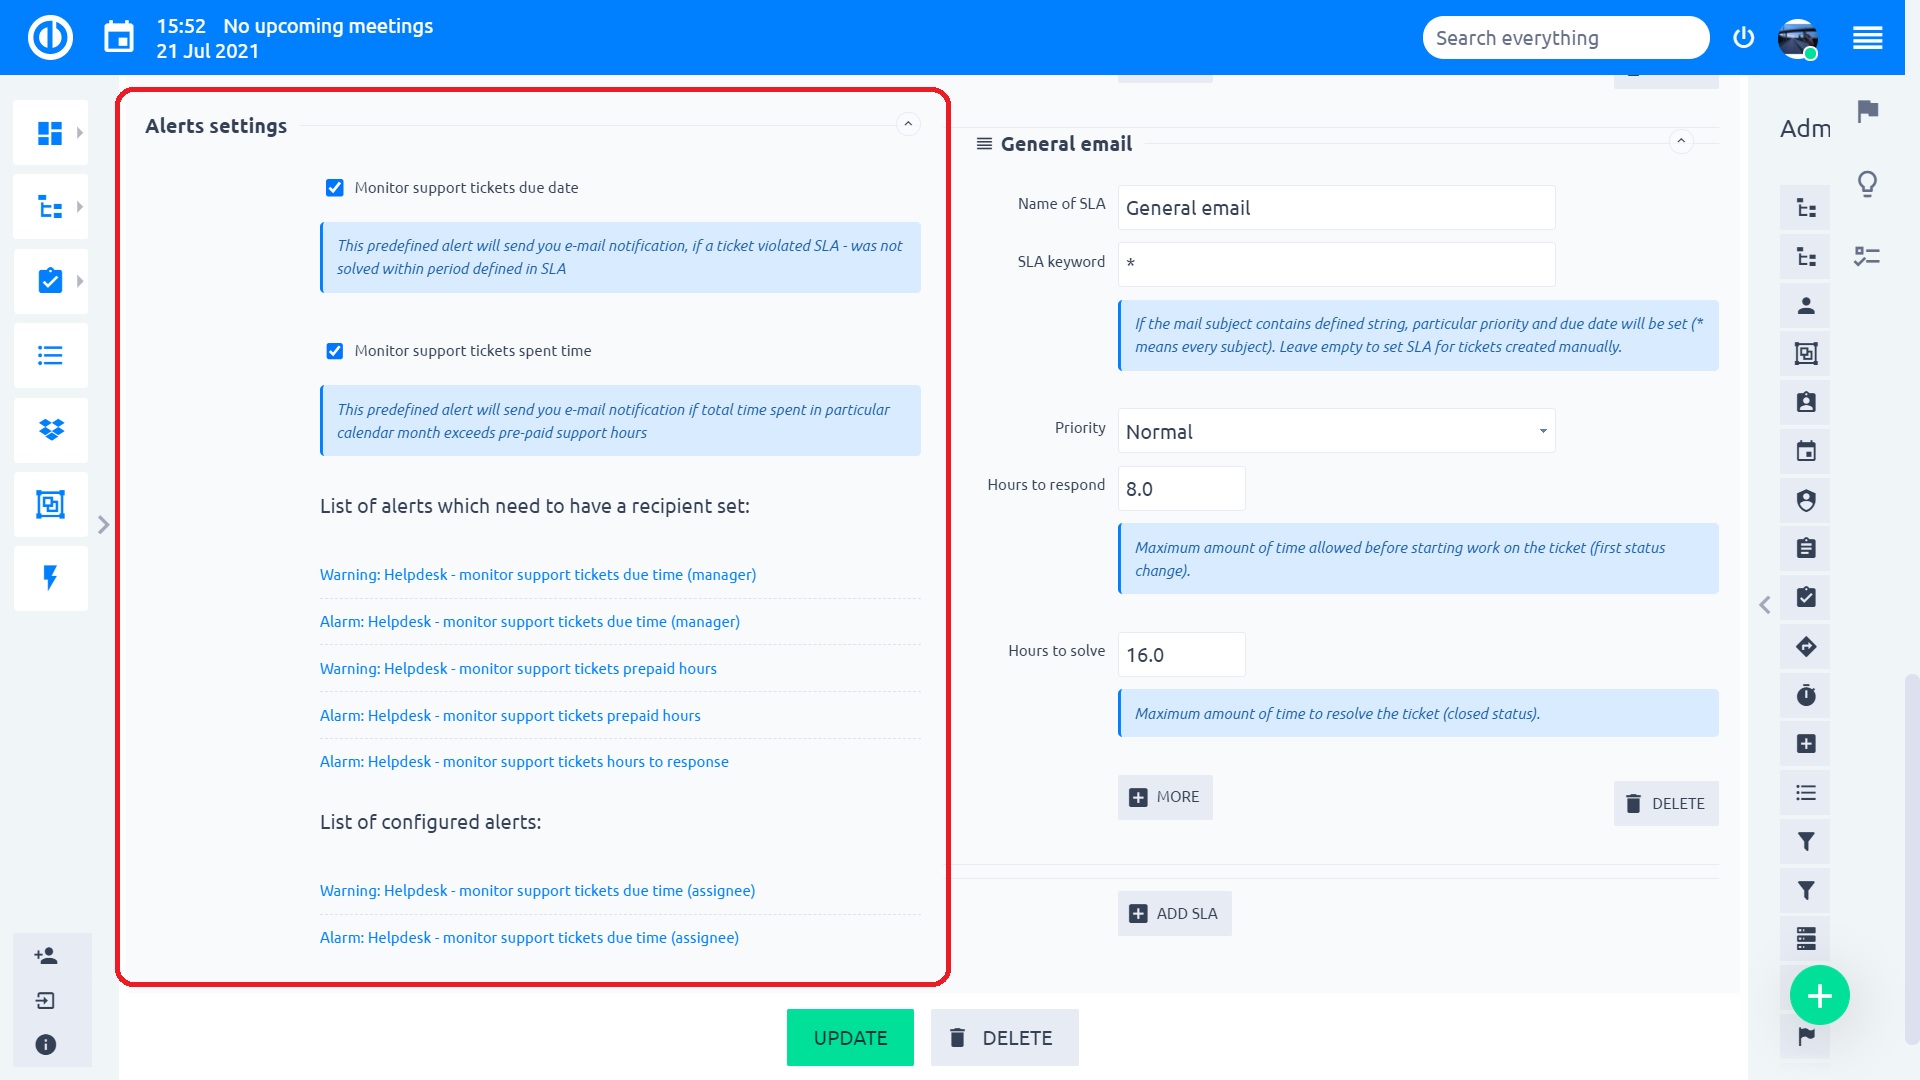
Setting notes:
- Monitor support tickets due date – to be more precise Due Time according to SLA. If enabled, alerts will be generated when SLA deadline is nearing. Further settings explained below
- Monitor support tickets spent due time – watching of spent time on projects with specified prepaid monthly hours
- List of alerts which need to have a recipient set – these are preconfigured alerts, which only need to enter an email address, where the notifications should be sent
- List of configured alerts – alerts with no missing parameter
- By clicking on each alert, you will see the preconfigured parameters with possibility to edit them
- Warning/Alert: severity of the notice
- Support tickets due time – alert watches SLA resolve deadline (ticket closing)
- Support tickets hours to response – alert watches SLA response deadline (first change of status)
- Support tickets prepaid hours – alert watches spending of prepaid monthly hours on the project
Hours watched in the last alert are those which are logged on tickets, which are in trackers mentioned in the project HelpDesk settings.
Example: Default tracker for the project is HelpDesk Ticket. Some SLA is configured for the tracker Bug. The project contains other trackers (Task, Feature development), which are not used on tickets. In such case, the prepaid hours are only valid for HelpDesk Ticket and Bug. Spent time on other trackers is not taken into account for this alert.
4.5 Update/delete
Update – save changes made in the HelpDesk settings of the project
Delete – remove the project from HelpDesk. This doesn't mean deletion of the project as a whole, it will only remove connection of the project to HelpDesk.
5 Ticket processing
After the huge amount of settings explained until now, it is time to look at some practical implications, before we get back with another set of settings. We will start with a simple use case to demonstrate how the ticketing works and skip some features. They will be explained later on.
5.1 Email generated tickets
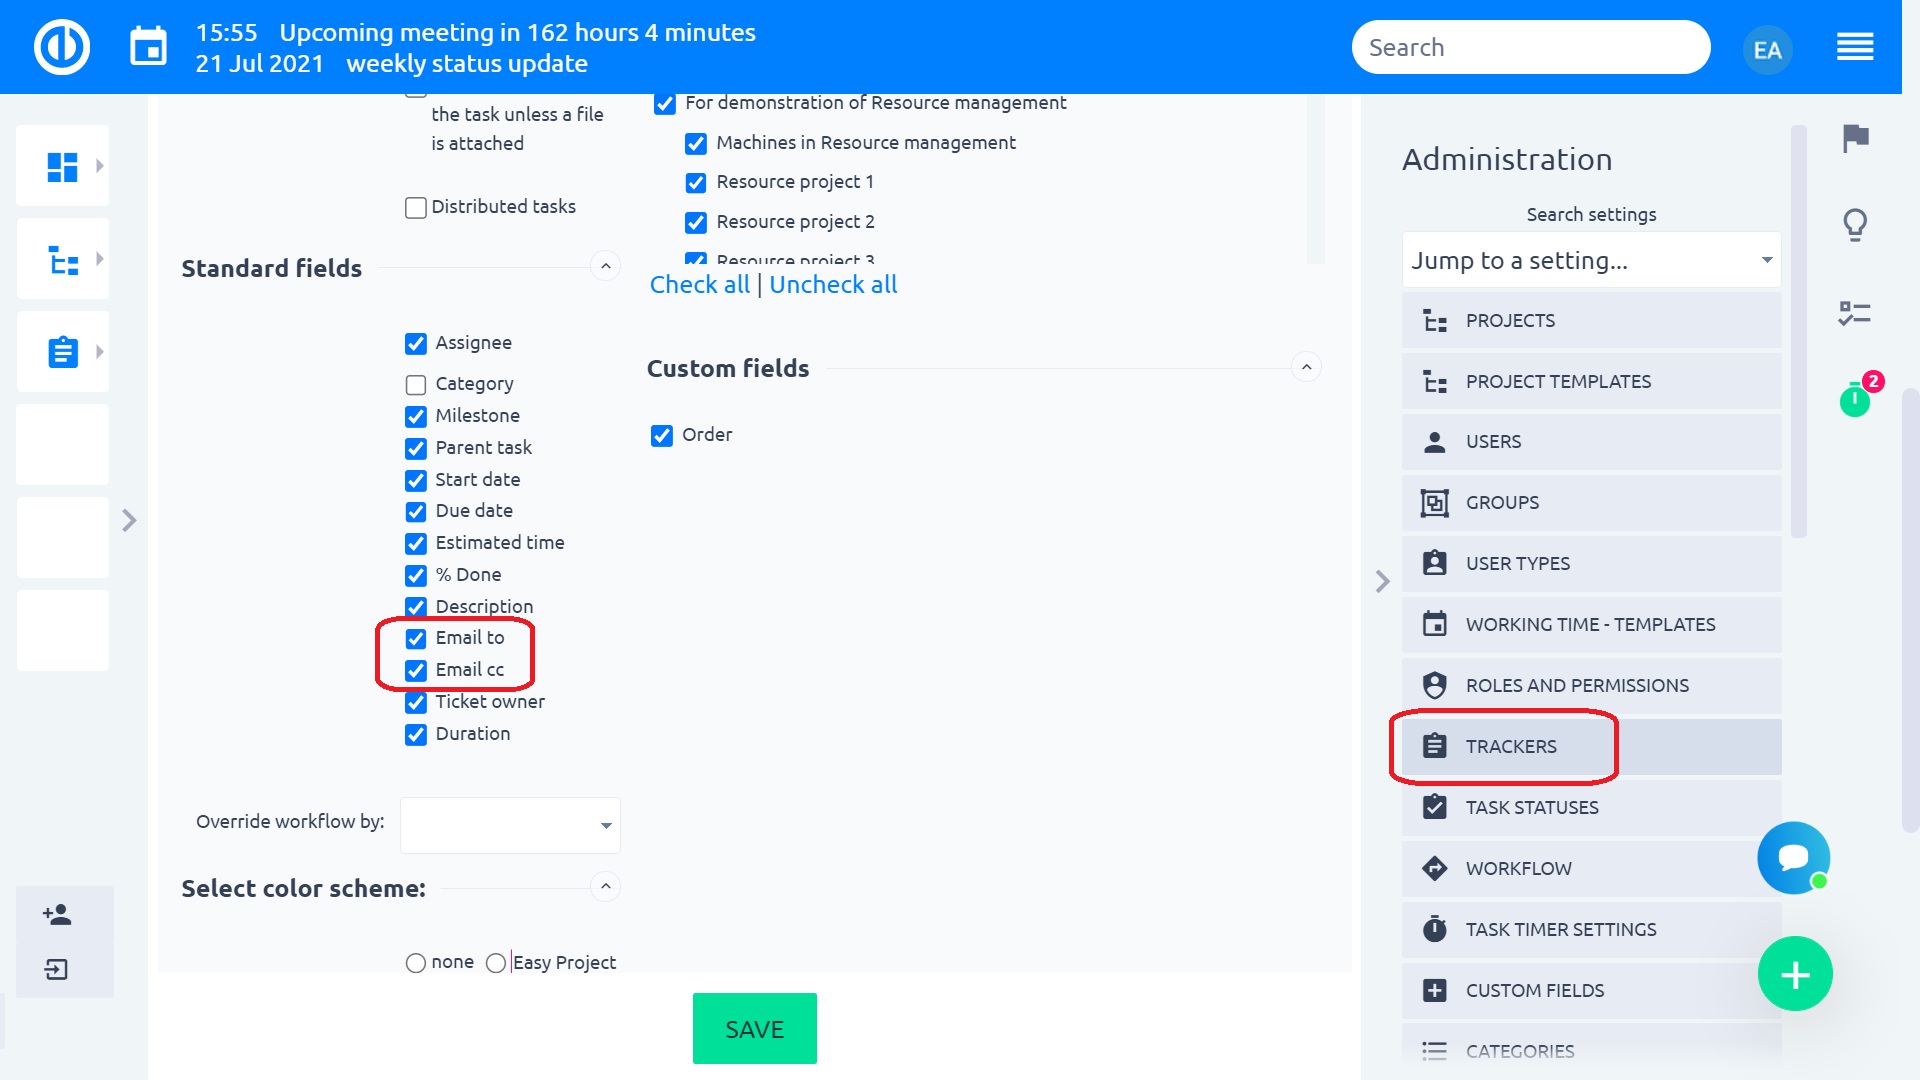
For correct handling of tickets created by email, you need to check that standard fields "email to" and "email cc" are active. You can check it in More » Administration » Trackers » HelpDesk ticket » Standard fields. If these standard fields are missing, they must have been disabled by administrator.
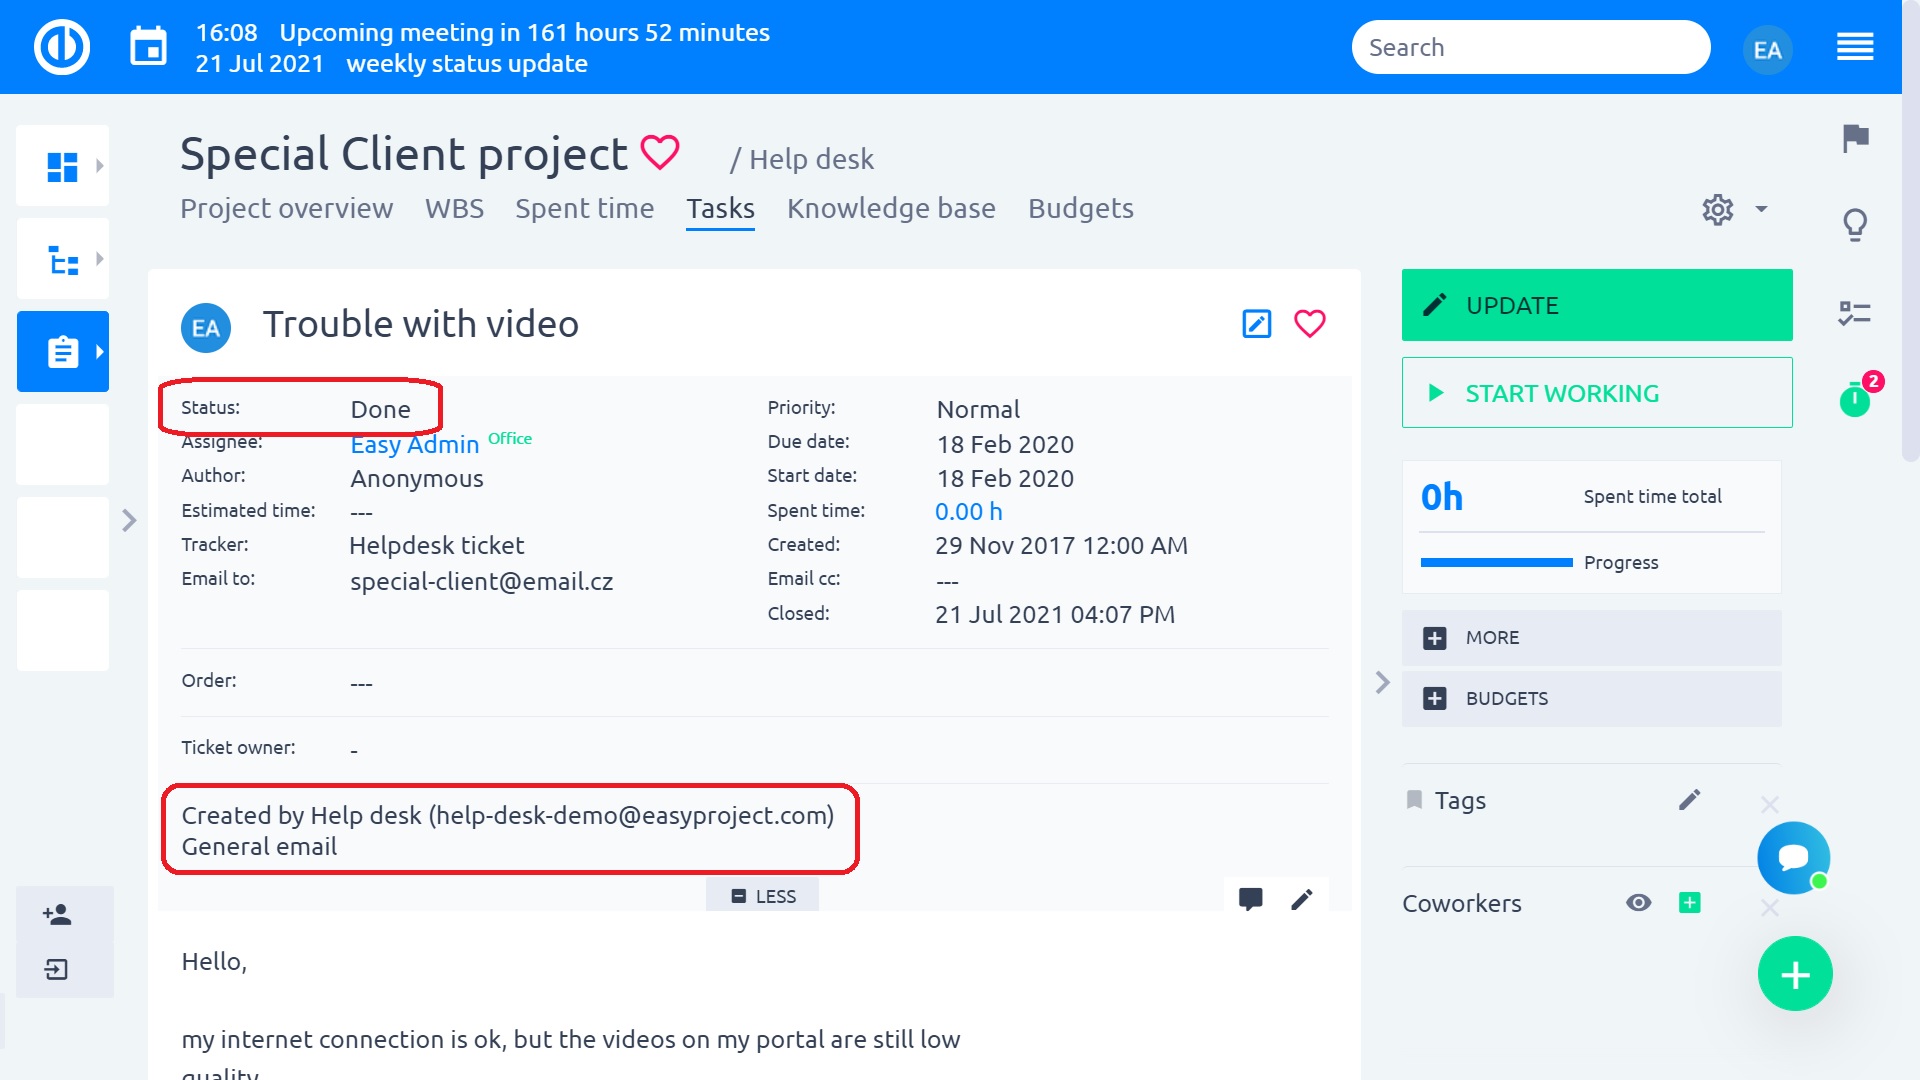
5.1.1 Email is processed by Easy Redmine and ticket is created in the determined project

Notes:
- email to: The sender of the email from which the ticket was created
- Specification of the mailbox, from which the task was created
- SLA values – if violated, they are highlighted in red
- Parsed email – This is the text content of the email. Images are not shown directly in this view, due to performance optimization (especially when the ticket has a lot of replies and each one contains a signature with company logo, the ticket would take painfully long to load due to the increasing size of each of the next reply)
- Full email available as an attachment – if the original email contains images, you can view it directly in Easy Redmine.

5.1.2 Write a reply and update the ticket
To meet the SLA response, we need to change the status and reply to the client for the first time. For the following examples, keep an open mind about the ticket communication, it is just to demonstrate how the communication works technically.
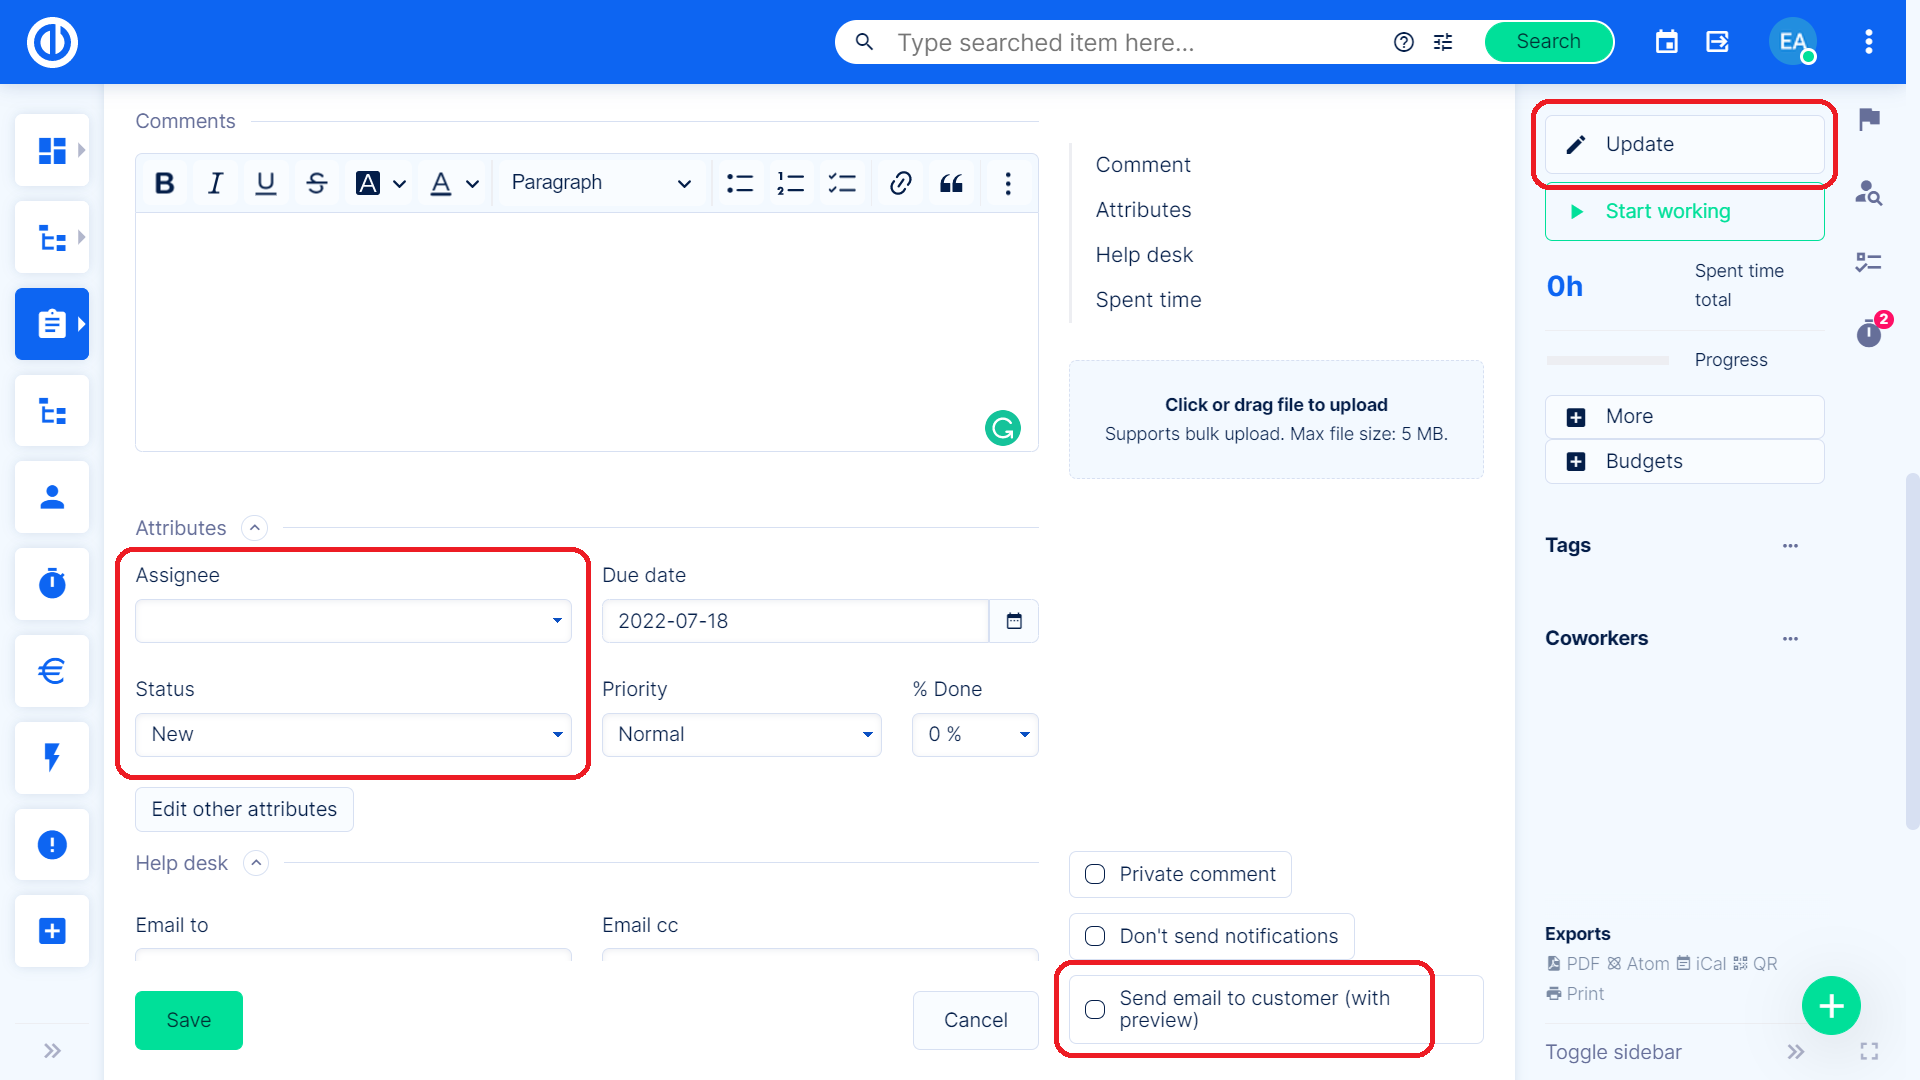
The manager wrote a reply to the customer about receiving the ticket, assigned it to an operator and changed the status. The reply will be sent to the client (email to) when you check the box.
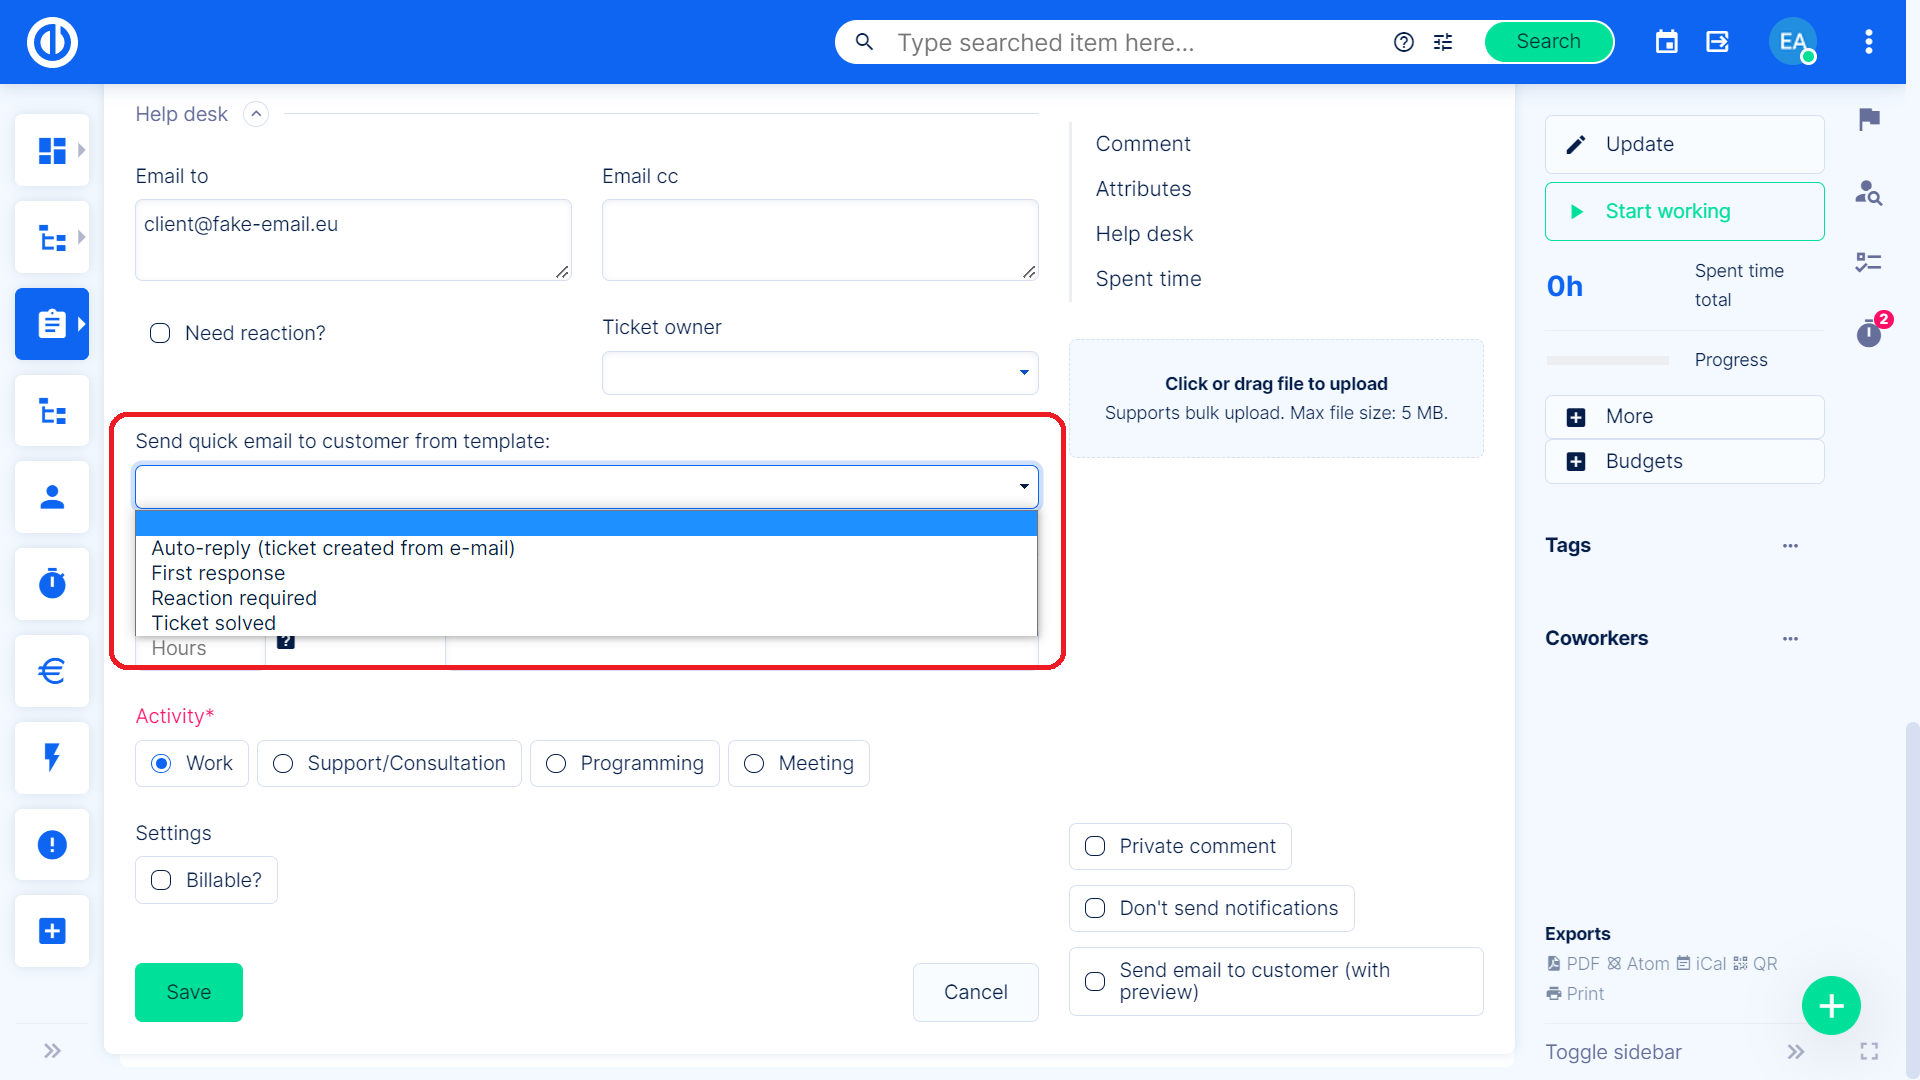
Send quick email to customer from template
You have two options to send an email to the client. When updating a HelpDesk ticket, there is an option "Send quick email to customer from template" allowing you to choose an e-mail template of your answer for the ticket sender. When a template is selected, the e-mail is sent instantly and thus no more actions are required. When no template is selected, you still have the option to choose the template and confirm sending e-mail in the next step as usually (tick "Send email to customer (with preview) checkbox in the bottom and save). The purpose of this feature is mainly to save your time when sending emails to customers.
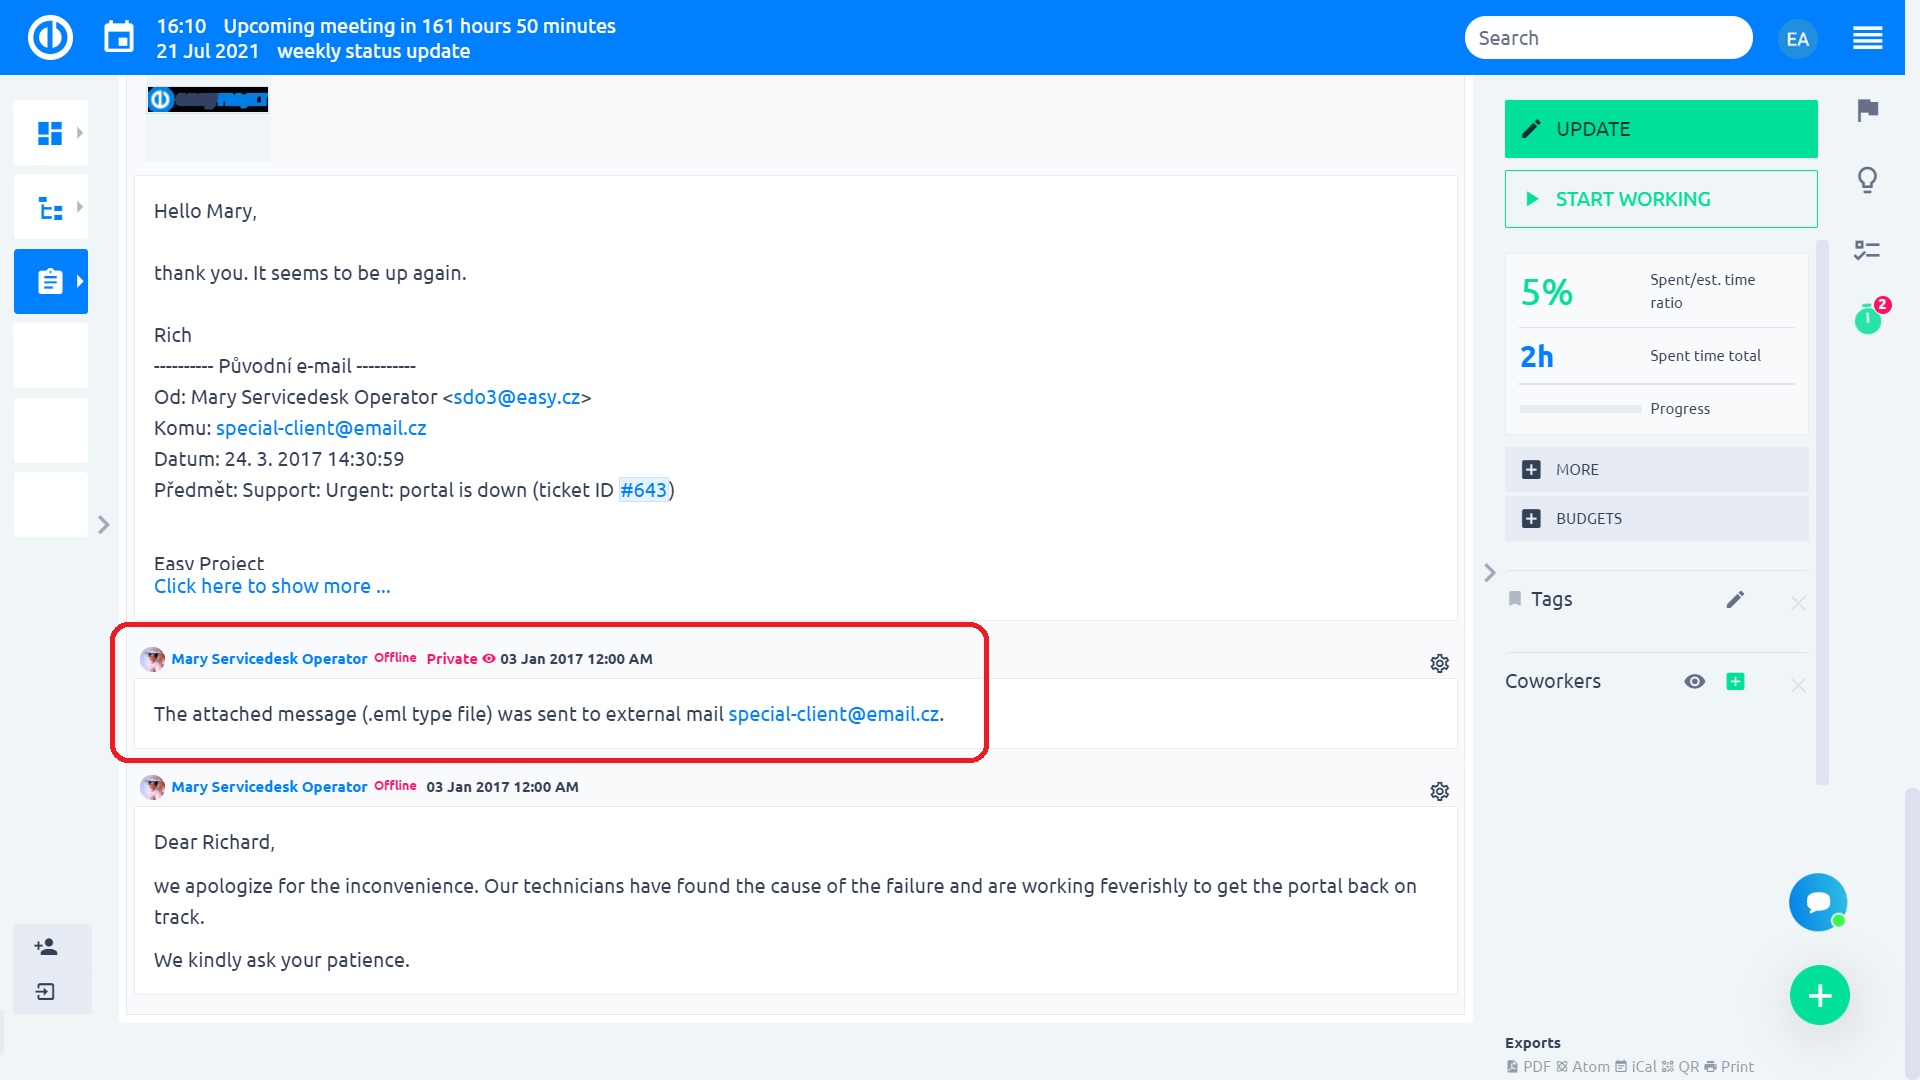
5.1.3 Send an update to external email (email to)
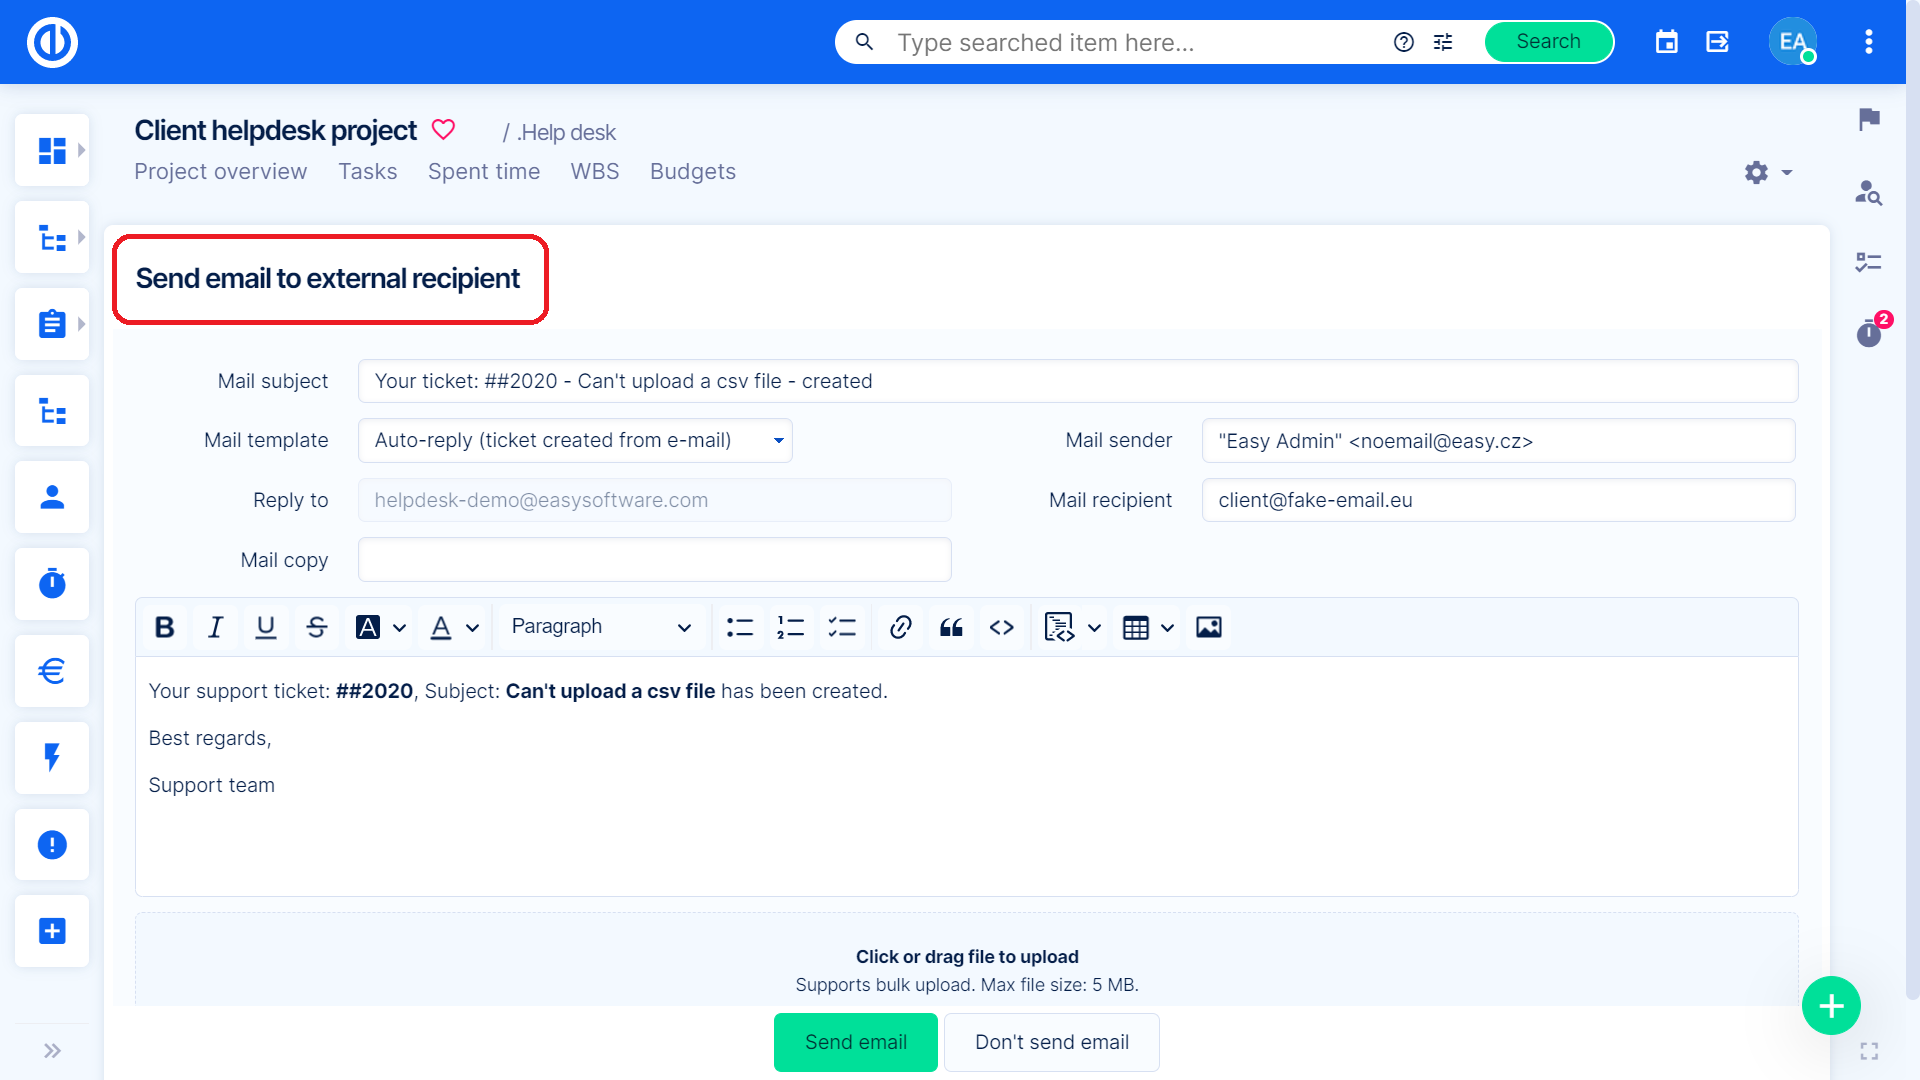
By hitting Save, you will save the updates made on the ticket and you will get to the dialogue of sending the reply to the client.
Notes:
- Mail template – if you have email templates configured, you can choose one. Or a template will be preset according to status. This feature will be explained in further chapters
- Mail sender – this will be shown to the client as FROM. The setting of the population of this field will be explained in further chapters
- Mail subject – custom or preset according to the mail template. By default, it is populated by the ticket Subject
- Mail recipient – sender of the original email. If there were other recipients of the original email in the CC or TO, they will also be added into this field.
- Mail reply to – this is always the HelpDesk mailbox to which the original email was sent
- Mail copy – you can add other recipients
- Mail body – if a template was not chosen, it will consist of the last comment on the ticket and the original email text. The content is editable.
- Attachments – you can choose attachments to send with the email. It may be some more recent emails or new files you uploaded when updating the ticket
- Send mail – email is sent to all recipients
- Don't send mail – you will return to the detail of the ticket
When we look back at the ticket detail, we see that SLA response has disappeared, because it was made.
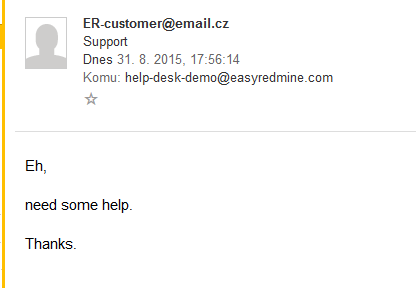
5.1.4 The client replies back – how the emails are paired with a ticket
The client has received your reply and replies back. The reply will be added as a comment from an anonymous user ( a user who is not registered in the system).
Let's explain here how did the client's reply find its way to the correct ticket.
When, in the previous step, the manager sent external mail to the client, the email contained a hidden heading (as all emails do) with the ID of the ticket. By replying to the email, this header was contained also in the client's reply and, therefore, HelpDesk identified it and added the reply to the ticket with the same ID.
Here are all the ways received emails are paired to tickets in the system.
- The hidden heading of e-mail, where the task ID is saved
- The subject of the e-mail, where a combination of "#" and task ID is sought
- If this isn't found, the subject is searched for a number alone
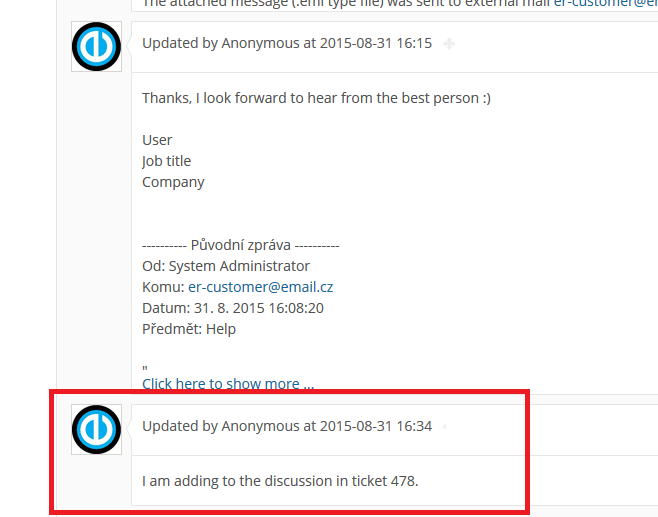
Accordingly, even if the client writes a new email to a HelpDesk mailbox and adds the ticket number (task ID) in the subject it will still be paired. Like in the following example.
New email to a HelpDesk mailbox:
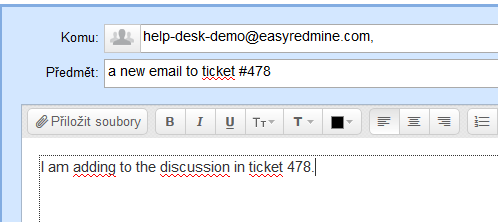
Subsequent note in the ticket:
5.1.5 The last reply – ticket gets closed
One last reply from the operator, with which the ticket is closed. After closing the ticket, SLA for resolve will also disappear from the ticket detail.
If the client replies again, the ticket will be reopened to a defined status (this setting will be explained further).
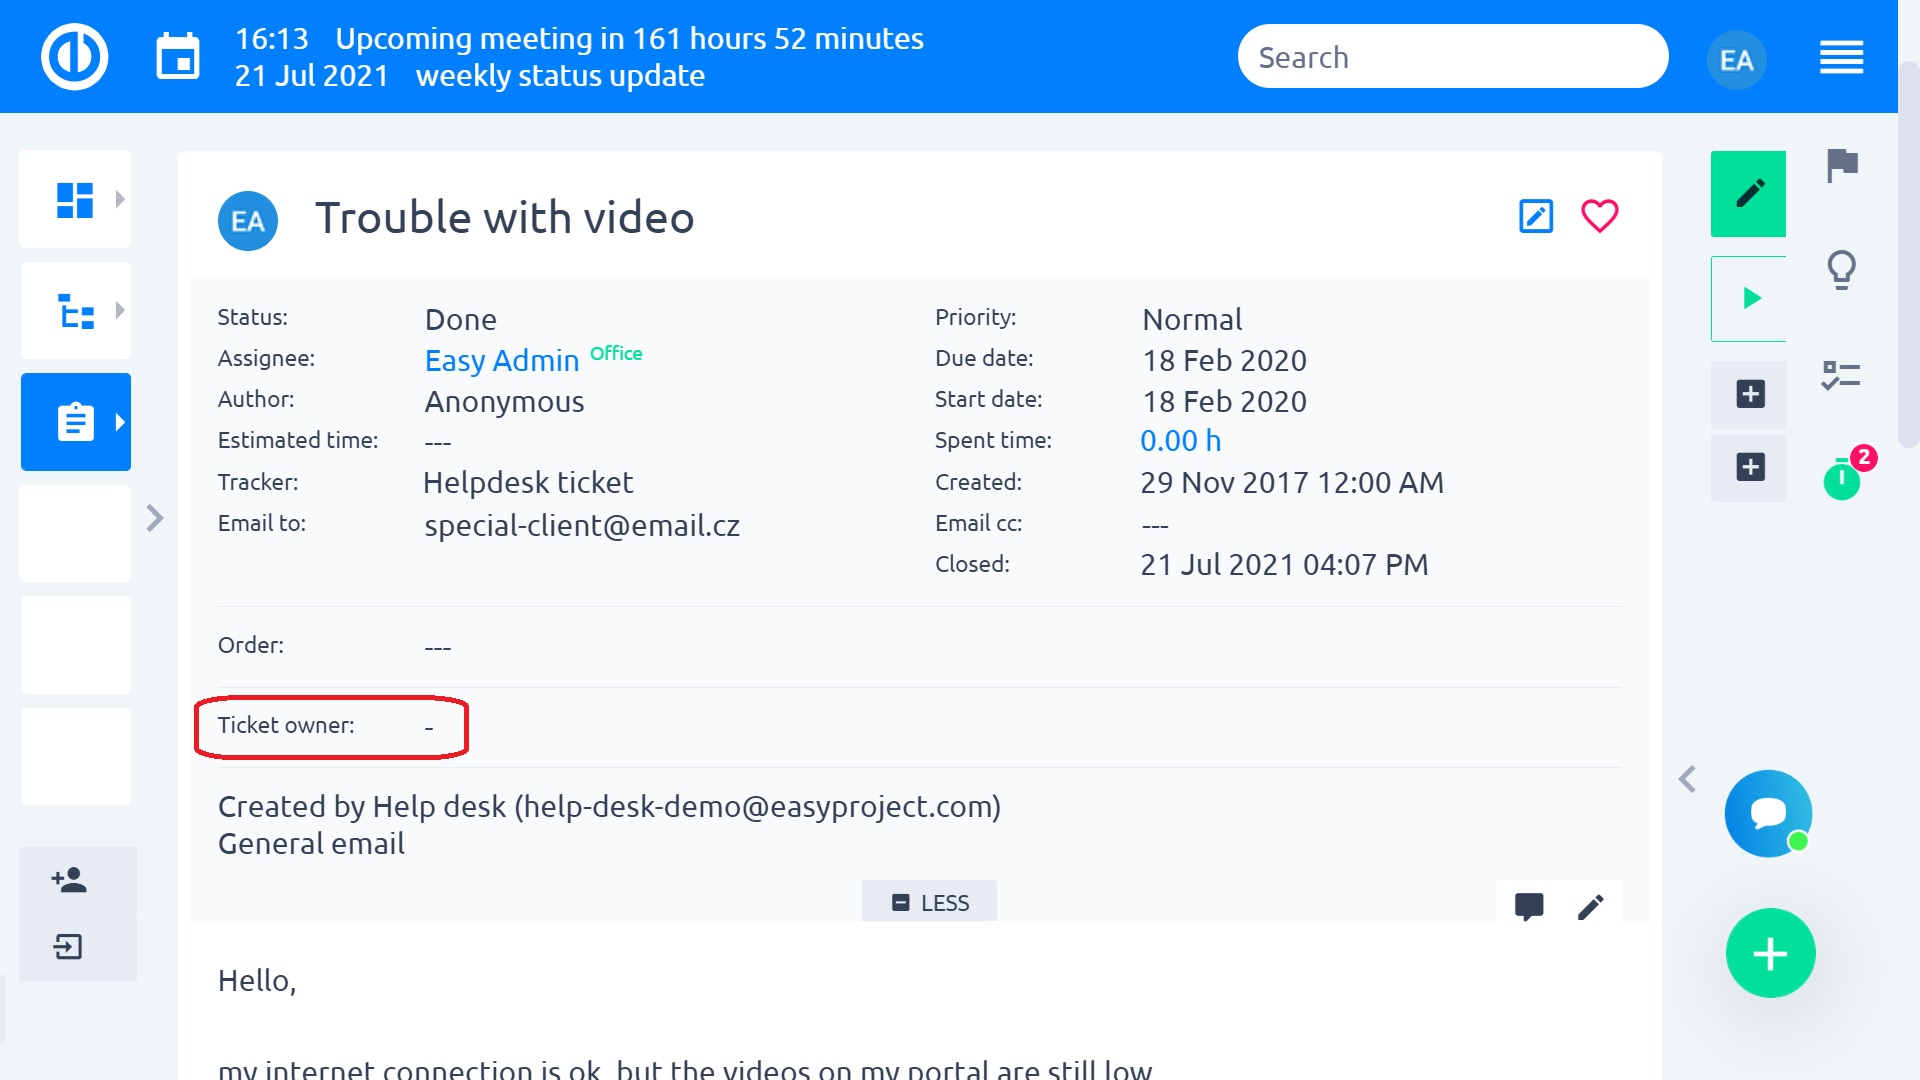
5.1.6 Ticket owner field
The ticket owner field is an optional standard field intended for use with HelpDesk tickets. With its drop-down list, it allows you to select one user out of all internal users already created, and this one user is considered the owner of the ticket. The field can be enabled or disabled for any tracker where you may need to have it (go to Administration » Trackers » HelpDesk ticket » tick the field and save). By default, Ticket owner field is disabled so HelpDesk managers must go to Administration to enable it for a specific tracker. Based on this field on HelpDesk tickets, HelpDesk managers can easily see how many tickets were received, closed/solved or updated according to their ticket owner. So this may significantly improve/simplify HelpDesk insights (dashboards, statistics) and reports for a defined time period. Workflow settings, as well as Action buttons, may be applied to Ticket owner field just like any other standard or custom field.
5.1.7 Email to, cc select from various data sources
In fields Email to and Email cc added ability to search for emails from data sources:
- Personal contacts (CRM)
- Stakeholders
- Accounts (CRM)
- HelpDesk users (Help desk)
This feature is disabled by default. To enable it, go to Administration >> Plugins >> Email field autocomplete - Edit and activate feature Email field autocomplete and needed data resources.
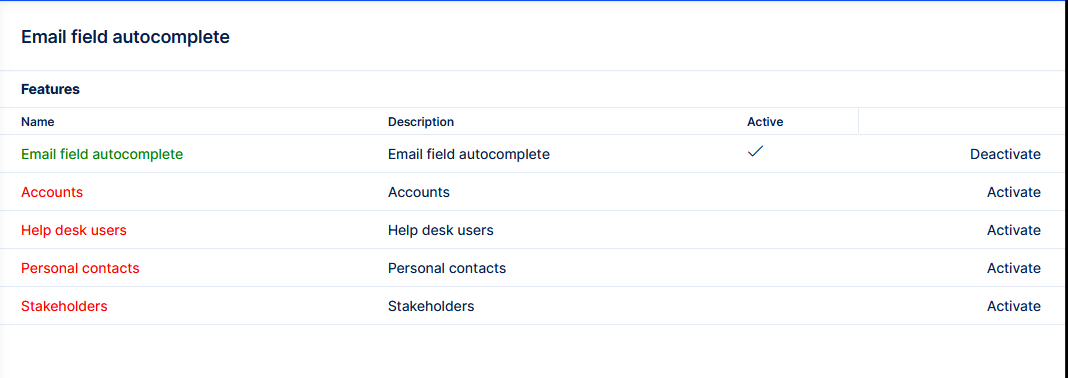
Without enabeling any of the data resources, the feature natively searches through users.
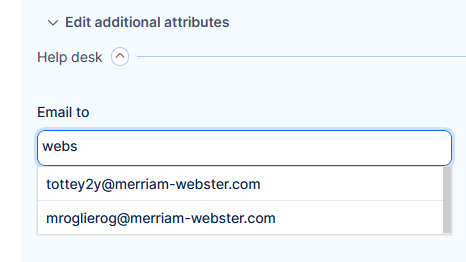
How it works
If enabled the task fields Email to and cc act as autocomplete.
5.2 Internally created tickets
If the client submits tickets by directly within your system, the workflow can be defined as if you were working with any other tasks. You will allow the client to create HelpDesk Ticket or Bug. They will initially be in the default status (most time called simply New). Then communication goes back and forth between client and the operator by series of ticket updates and by changing the assignee, which is necessary to keep all users active in the communication. SLAs are monitored as in the email generated ticket Response: Change of status; Resolve: Closing the ticket.
5.3 Tickets created via the REST API
There is a possibility for tasks/tickets created via the REST API (for example from a web form) to look like HelpDesk tickets created from e-mail. Just send the "easy_helpdesk_mailbox_username" parameter via the API, for example: issue[easy_helpdesk_mailbox_username] = 'support@company.com". This will cause the newly created task to look like a HelpDesk ticket from the given e-mail address, the SLA settings will be applied accordingly and a thank-you message will be sent to the sender.
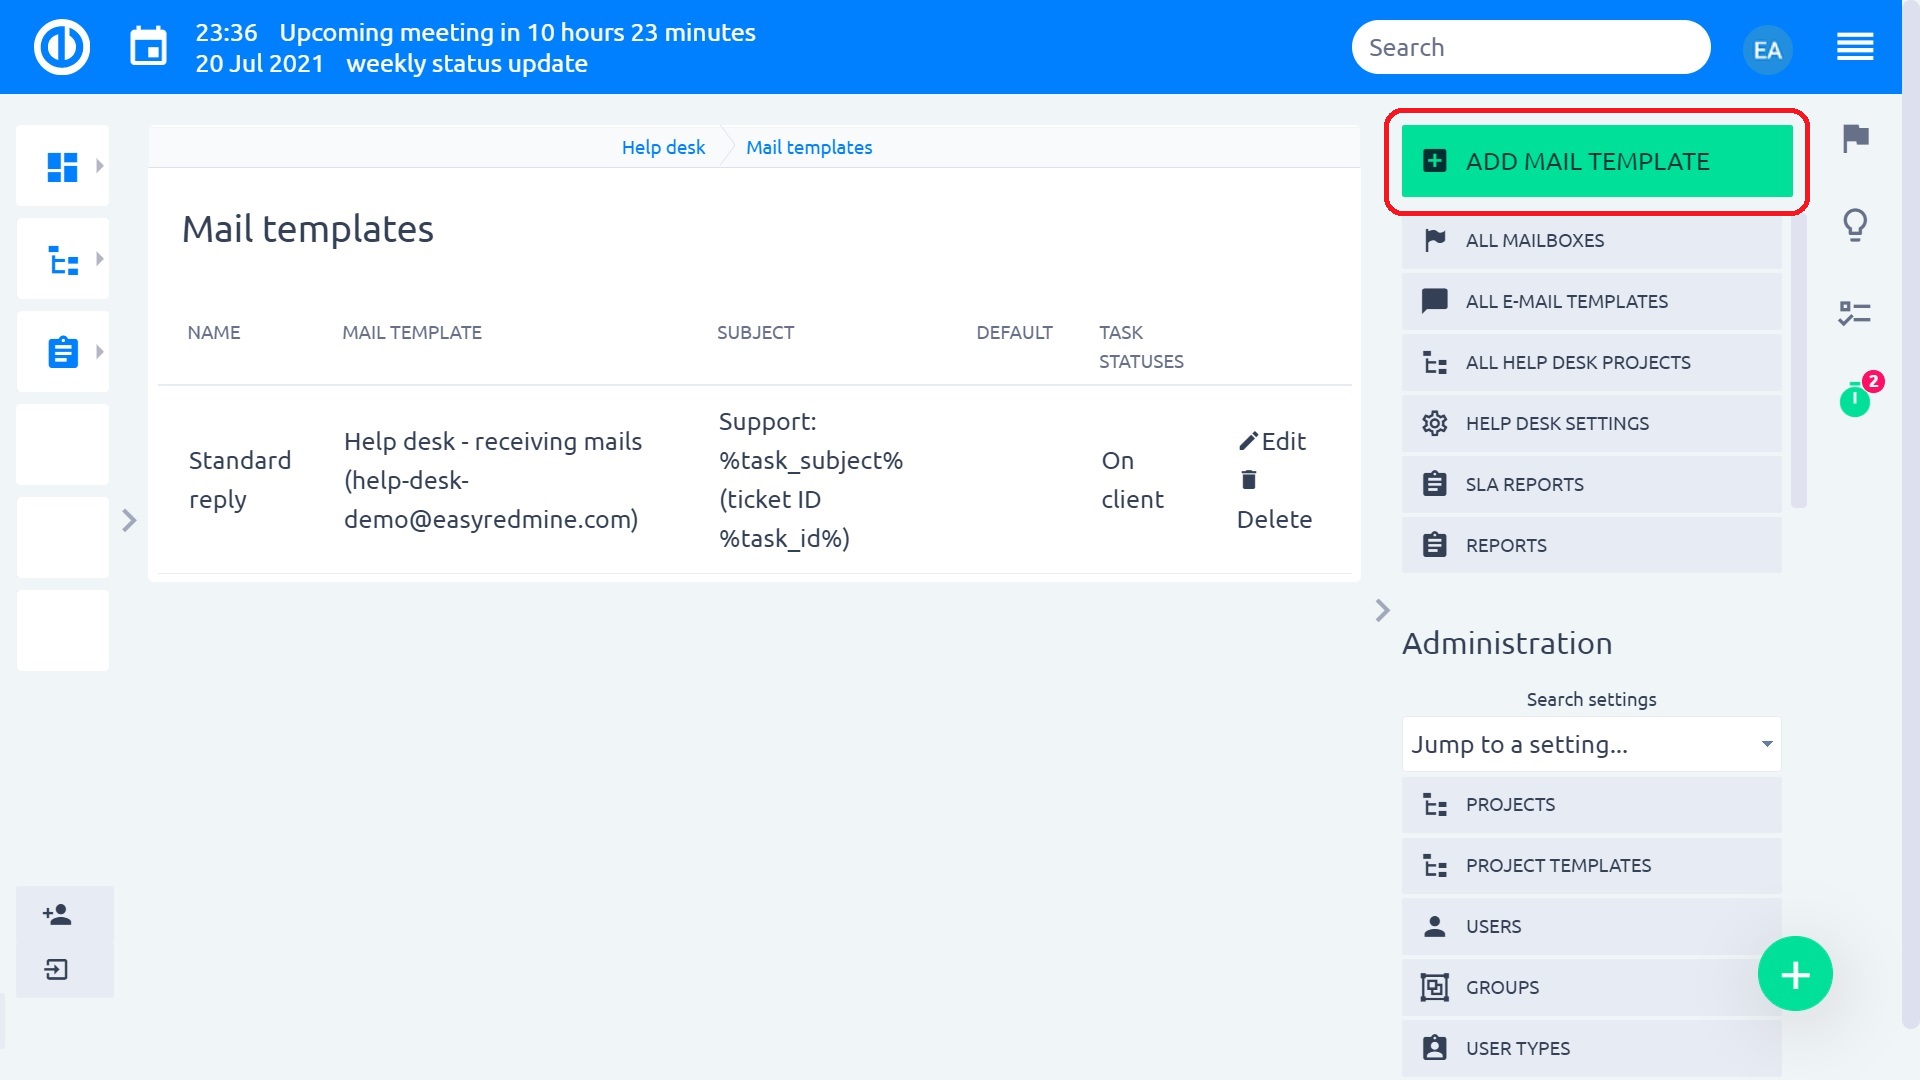
6 Mail templates
It was already foreshadowed during the last chapter, but without a proper explanation of the processing, it would not be as easy to understand as it will be now. The last HelpDesk menu item we haven't introduced.
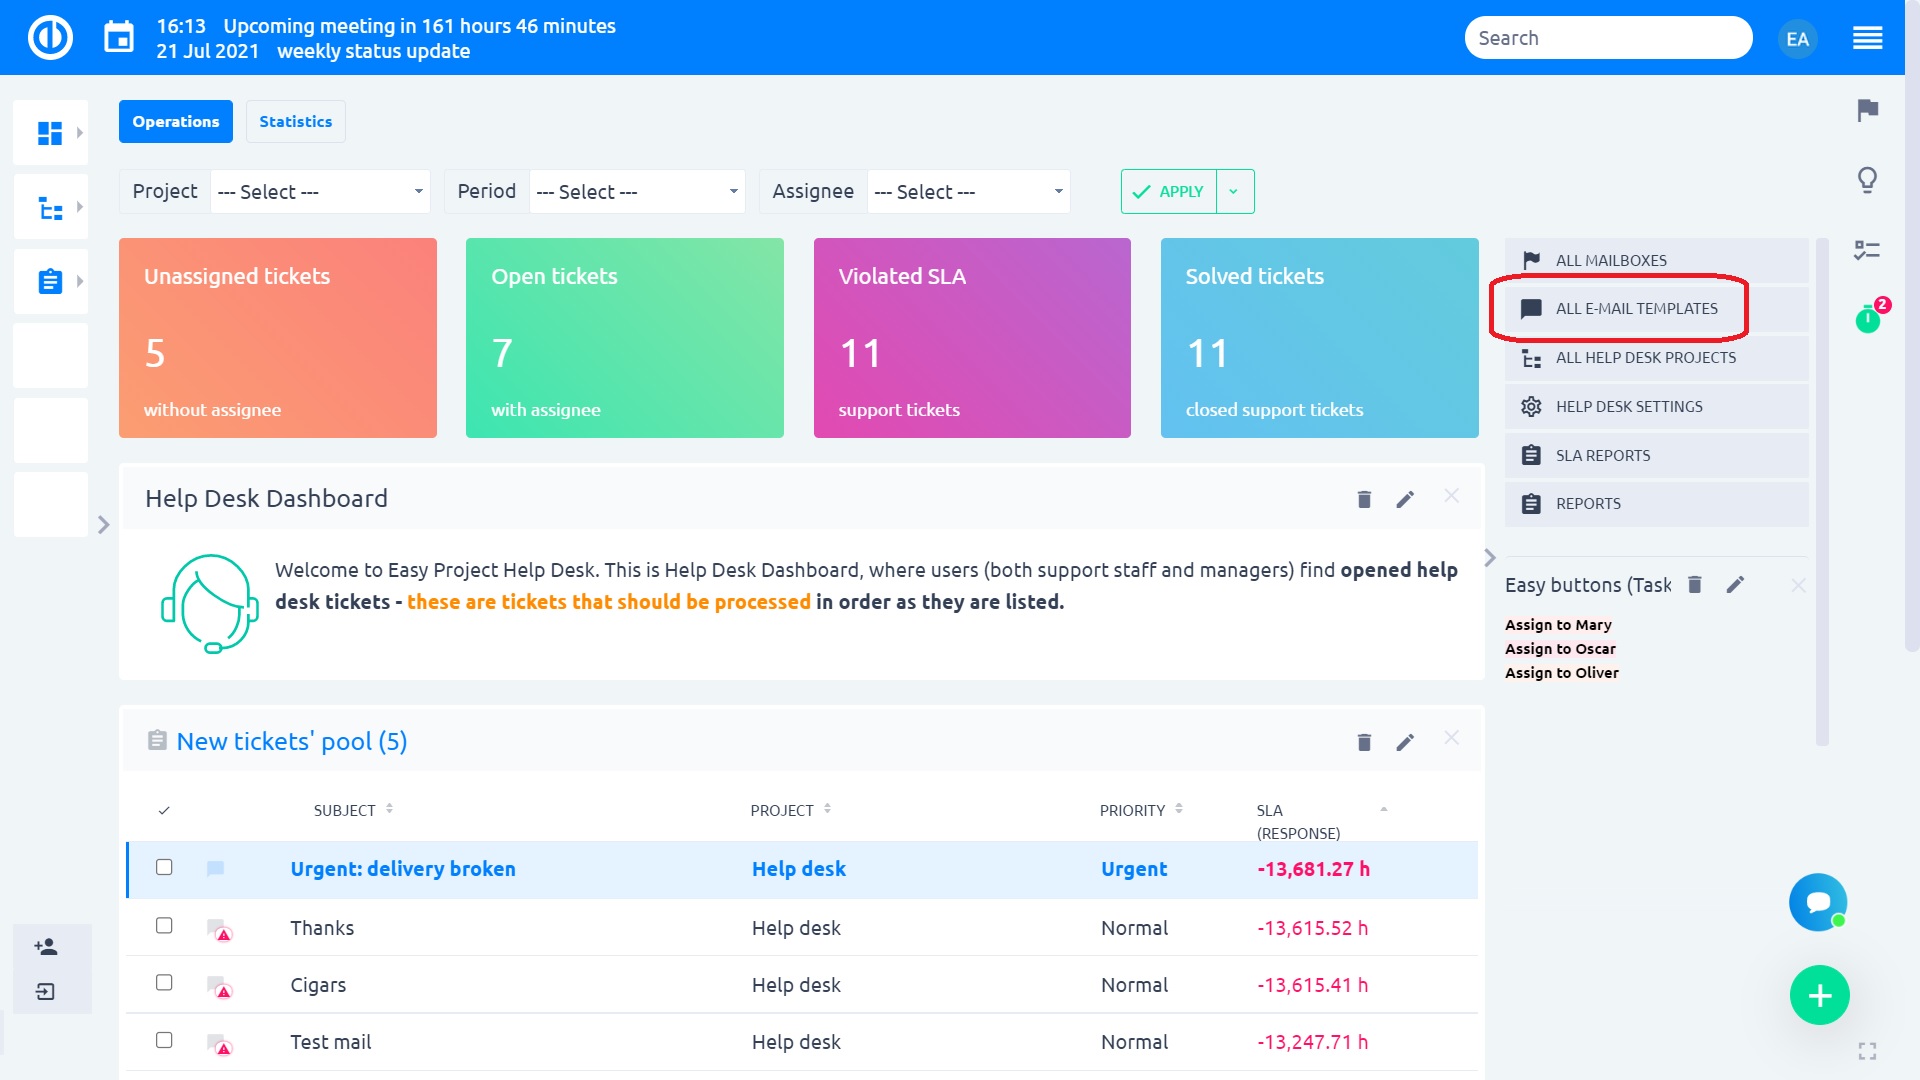
Email templates bring a certain level of automatization and formalization of the communication with clients, by which they recognize your company as a professionally dealing one.
An important property of Mail templates is that they are configured per mailbox, you can't use a template from a mailbox IT@mycompany.com for emails sent to support@mycompany.com.
6.1 Creating a mail template
There are effectively two types of mail templates: autoreply and standard template. Because they are not configured differently, we will explain both cases at once.
6.1.1 Add new template
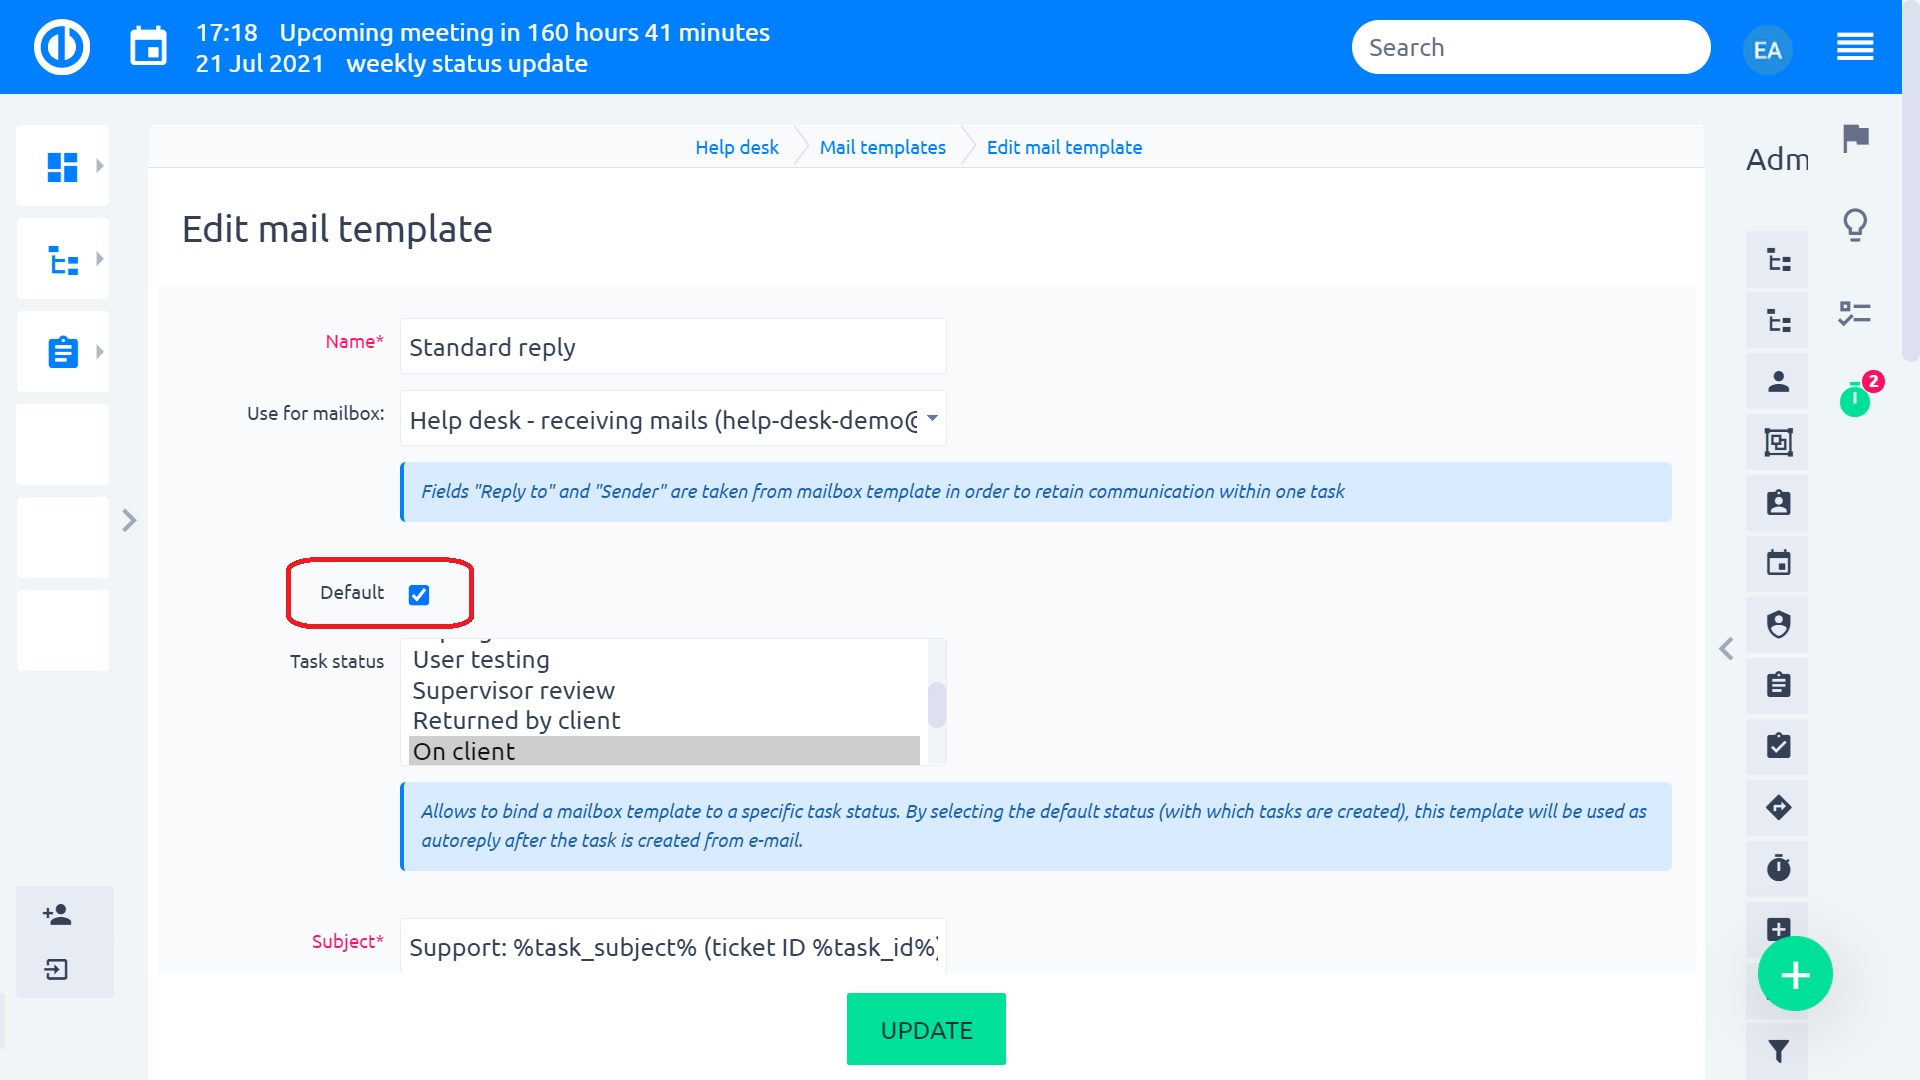
6.1.2 Basic attributes

Setting notes:
- Use for mailbox – which mailbox will have this template available
- Task status – according to this status, the template will be prefilled in the dialogue when sending the reply to an external mail (see chapter 5.1.3.)
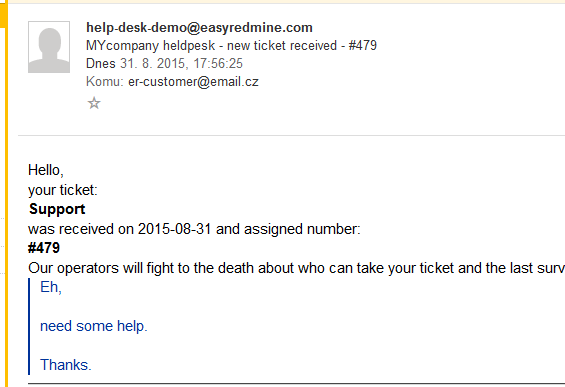
- To use the template as autoreply to newly created tickets from email, set the status to the default one (as configured in administration >> task statuses). In effect, when a ticket is created from an email, the autoreply according to this template will be sent immediately. It can be used to confirm to the client that the ticket was created and what the next steps will be.
- You may leave the status empty, in which case it will never be prefilled automatically in the send mail dialogue, but users will be able to choose it manually
- Subject – what will the subject contain
- It is recommended to include the task ID in the autoreply – if you have many tickets with the same client, you will be better able to distinguish between them, when talking to the client
- You may also use the actual subject used the client's original email
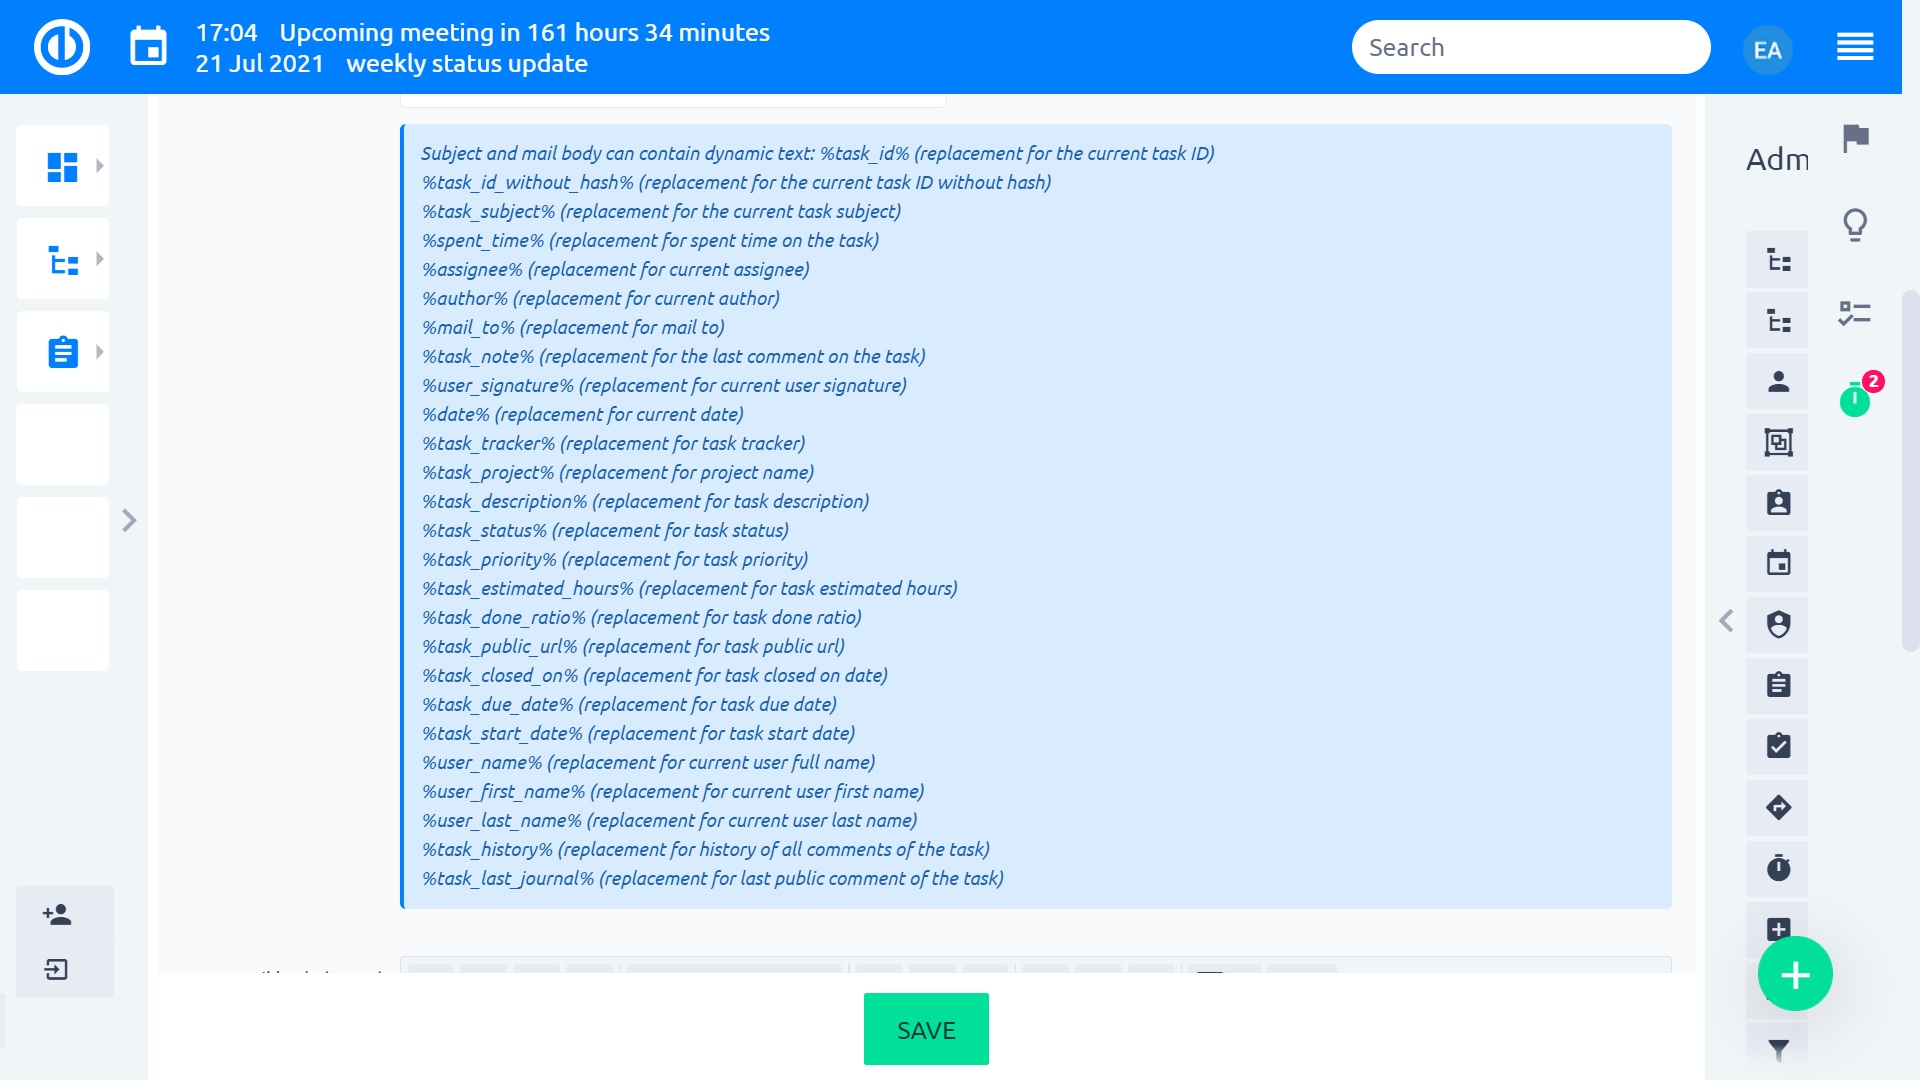
6.1.3 Dynamic tokens and mail body
Dynamic tokens can be used to provide particular ticket information to the client. In a template, they are entered as one of the below, and in the email sent to the client, they will be replaced by the actual value from the ticket.
A simple example of an autoreply.
6.1.4 Important dynamic tokens
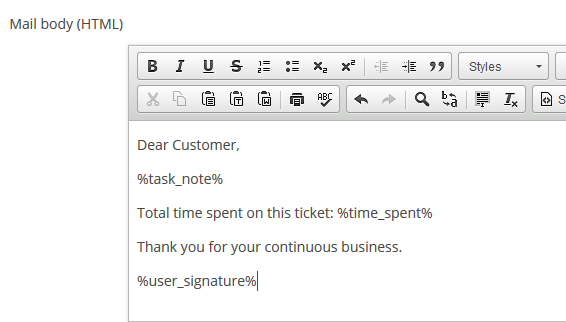
If you are going to use mail templates effectively, it is necessary to include the token %task_note% into the template. It will use the comment you last added to the ticket and surround it by the other text in the template.
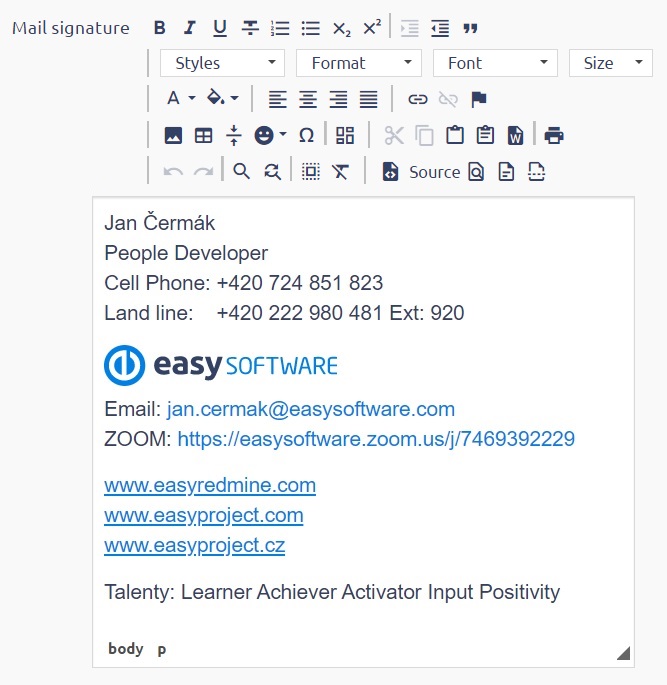
To add a corporate signature into the outgoing emails, use the token %user_signature%. It will use the HTML signature of the current user (who is updating the ticket) that can be set on the user's profile.
Example: Let's devise a simple template containing comment of the support operator, total time spent on the ticket and company signature of the user.
This is how the template looks like.
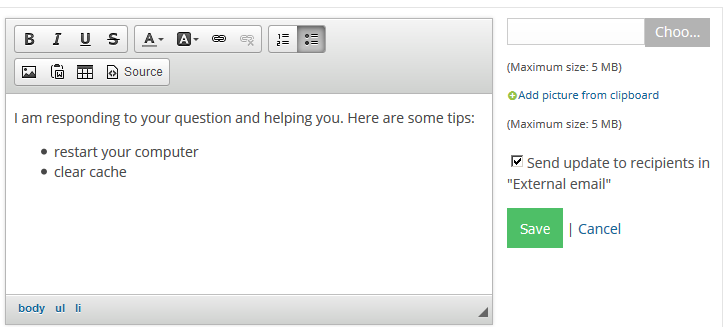
This how the operator writes the comment ticket update.
And this will be the sent email according to the template.
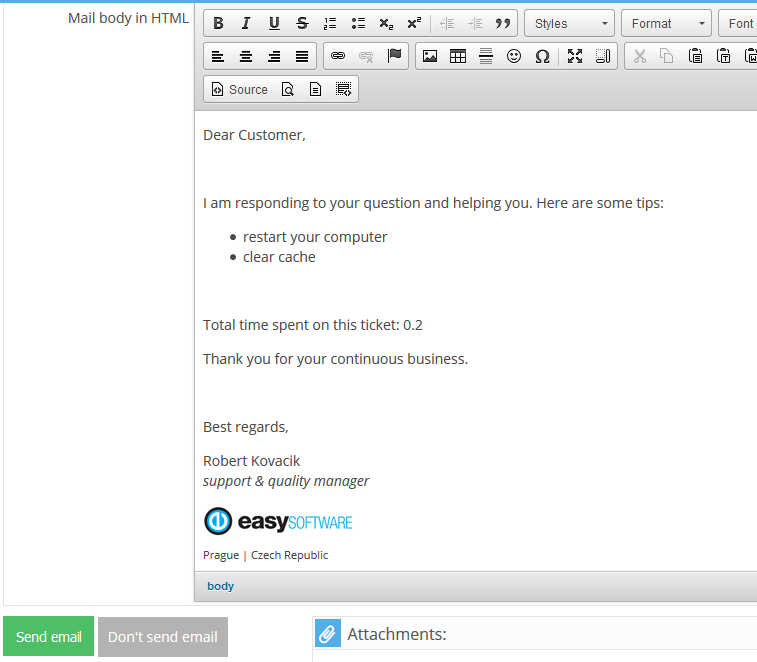
Note: When using email templates together with special heading and footing of emails on a certain project (Chapter 4.3.), the project header and footer wrap the whole email send to the client, not just the email template, or just the part which added by the last comment.
6.2 Default email template
It is possible to select a HelpDesk email template as default. Meaning that when you are sending a comment to a customer, there is a higher chance that a template is preselected (leaving less manual work for the support operator).
The behavior is as follows:
Prerequisites
- one email template can be set as default
- every email template must have a linked mailbox
- you can have more mailboxes in your system
- email template may be (but it is not required) connected to a certain status
Situations
- a ticket is created manually (not from email) - template from a is preselected according to status; if not found, the default template is preselected
- a ticket is created from a different mailbox than the one with which the default email template is used – template with this mailbox is preselected based on the status (same as currently) => no template is automatically preselected if using status for which there is no template assigned
- a ticket is created from the mailbox with which the default template is used – the template is preselected based on the status – if no such template is found, the default template is preselected
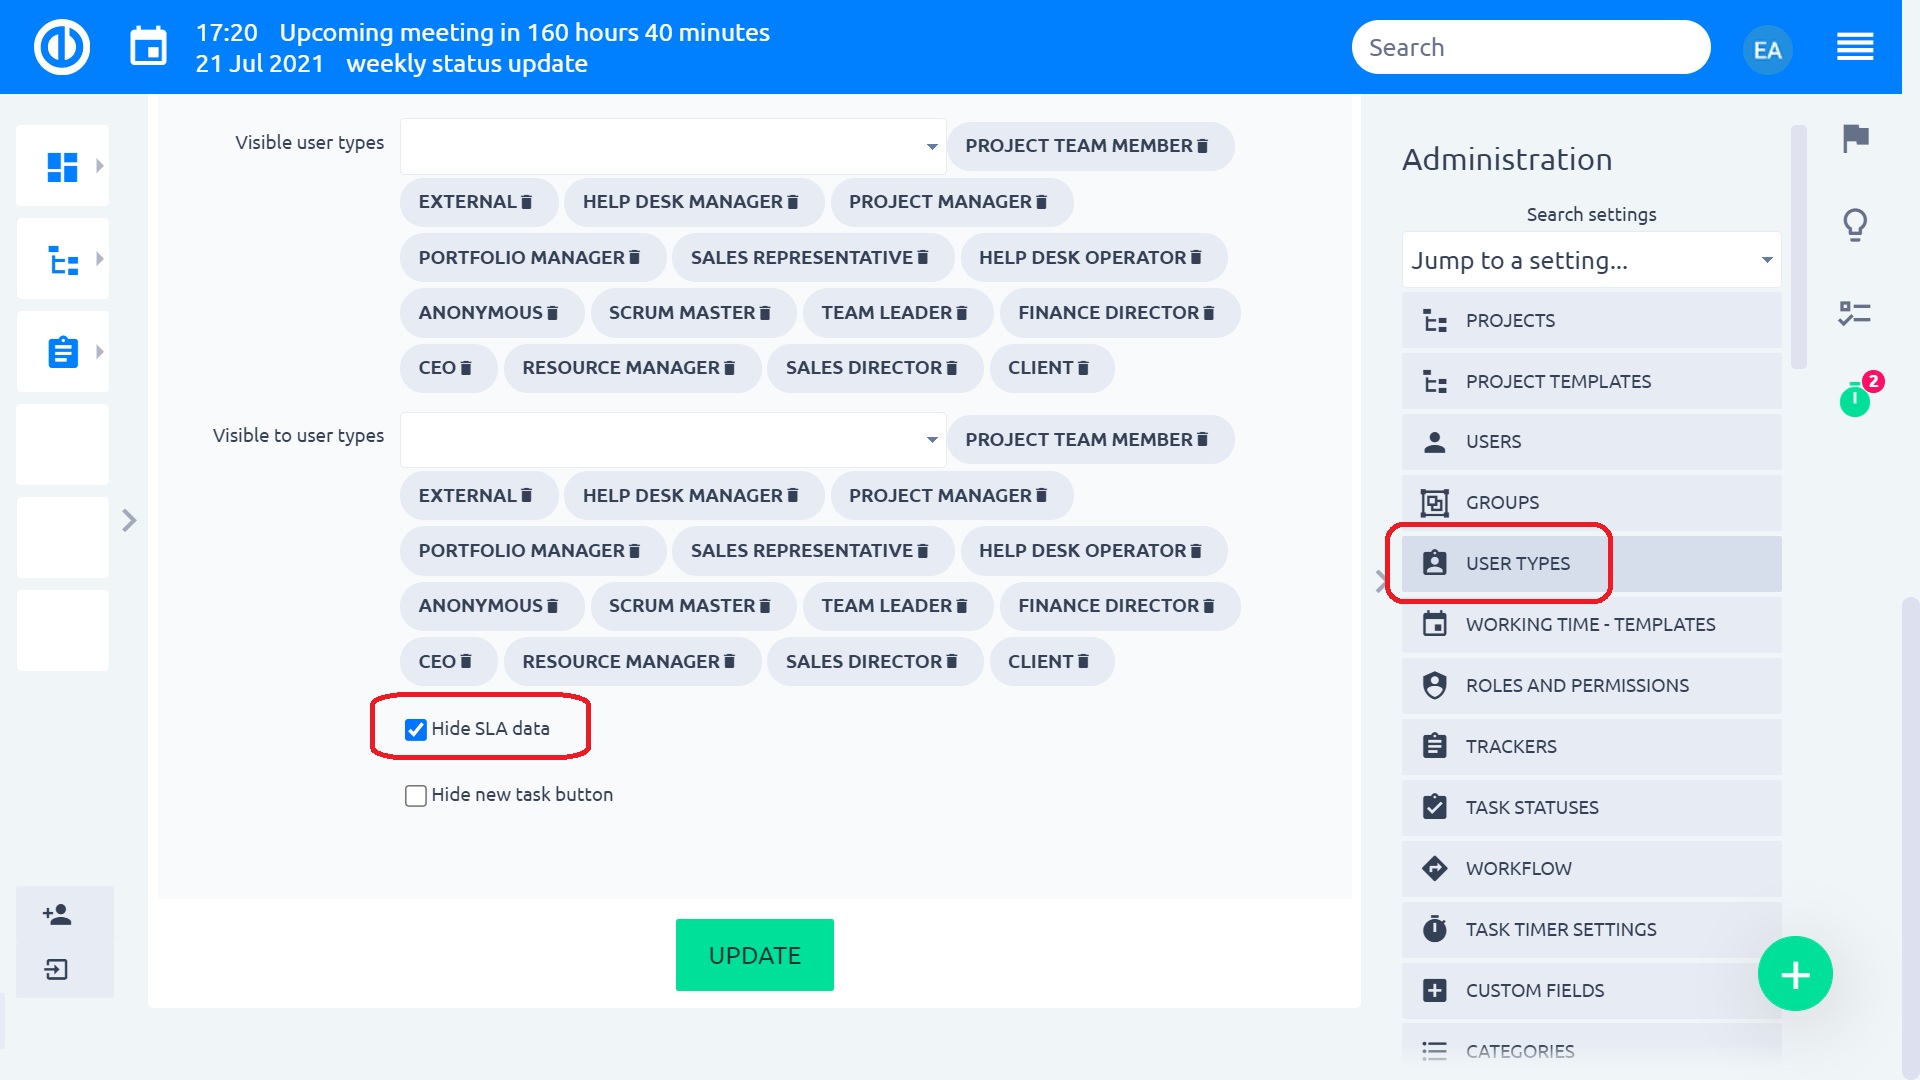
Hide SLA data
Information about SLA response and resolve time on task detail can be hidden for selected user types (Administration >> User types >> Edit).
SLA can also be hidden for specific users (Administration >> Users >> Edit).
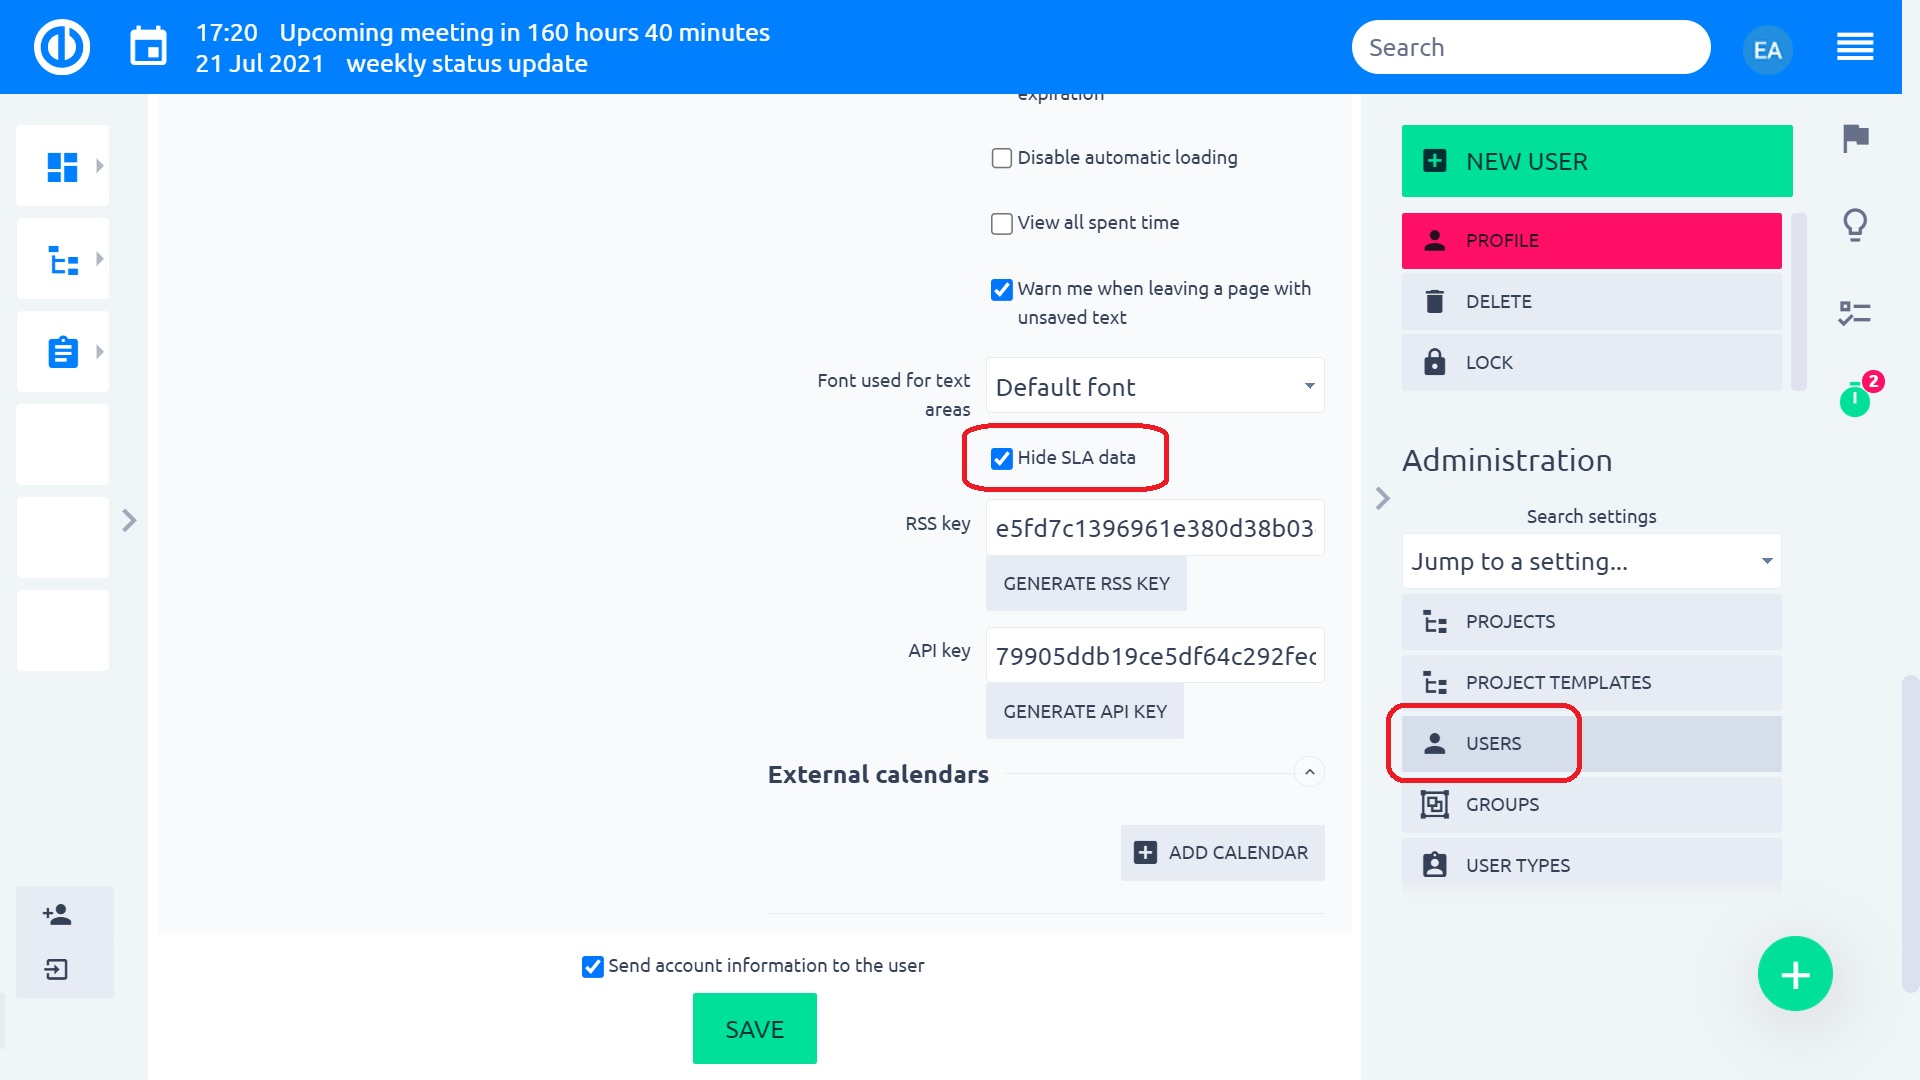
A user will not see the SLAs if at least one of the settings concerning their user or user type is enabled.
Header and footer of HelpDesk emails
Globally set header and footer of email notifications (Administration >> Settings >> Email notifications) will no longer be a part of emails sent from the HelpDesk.
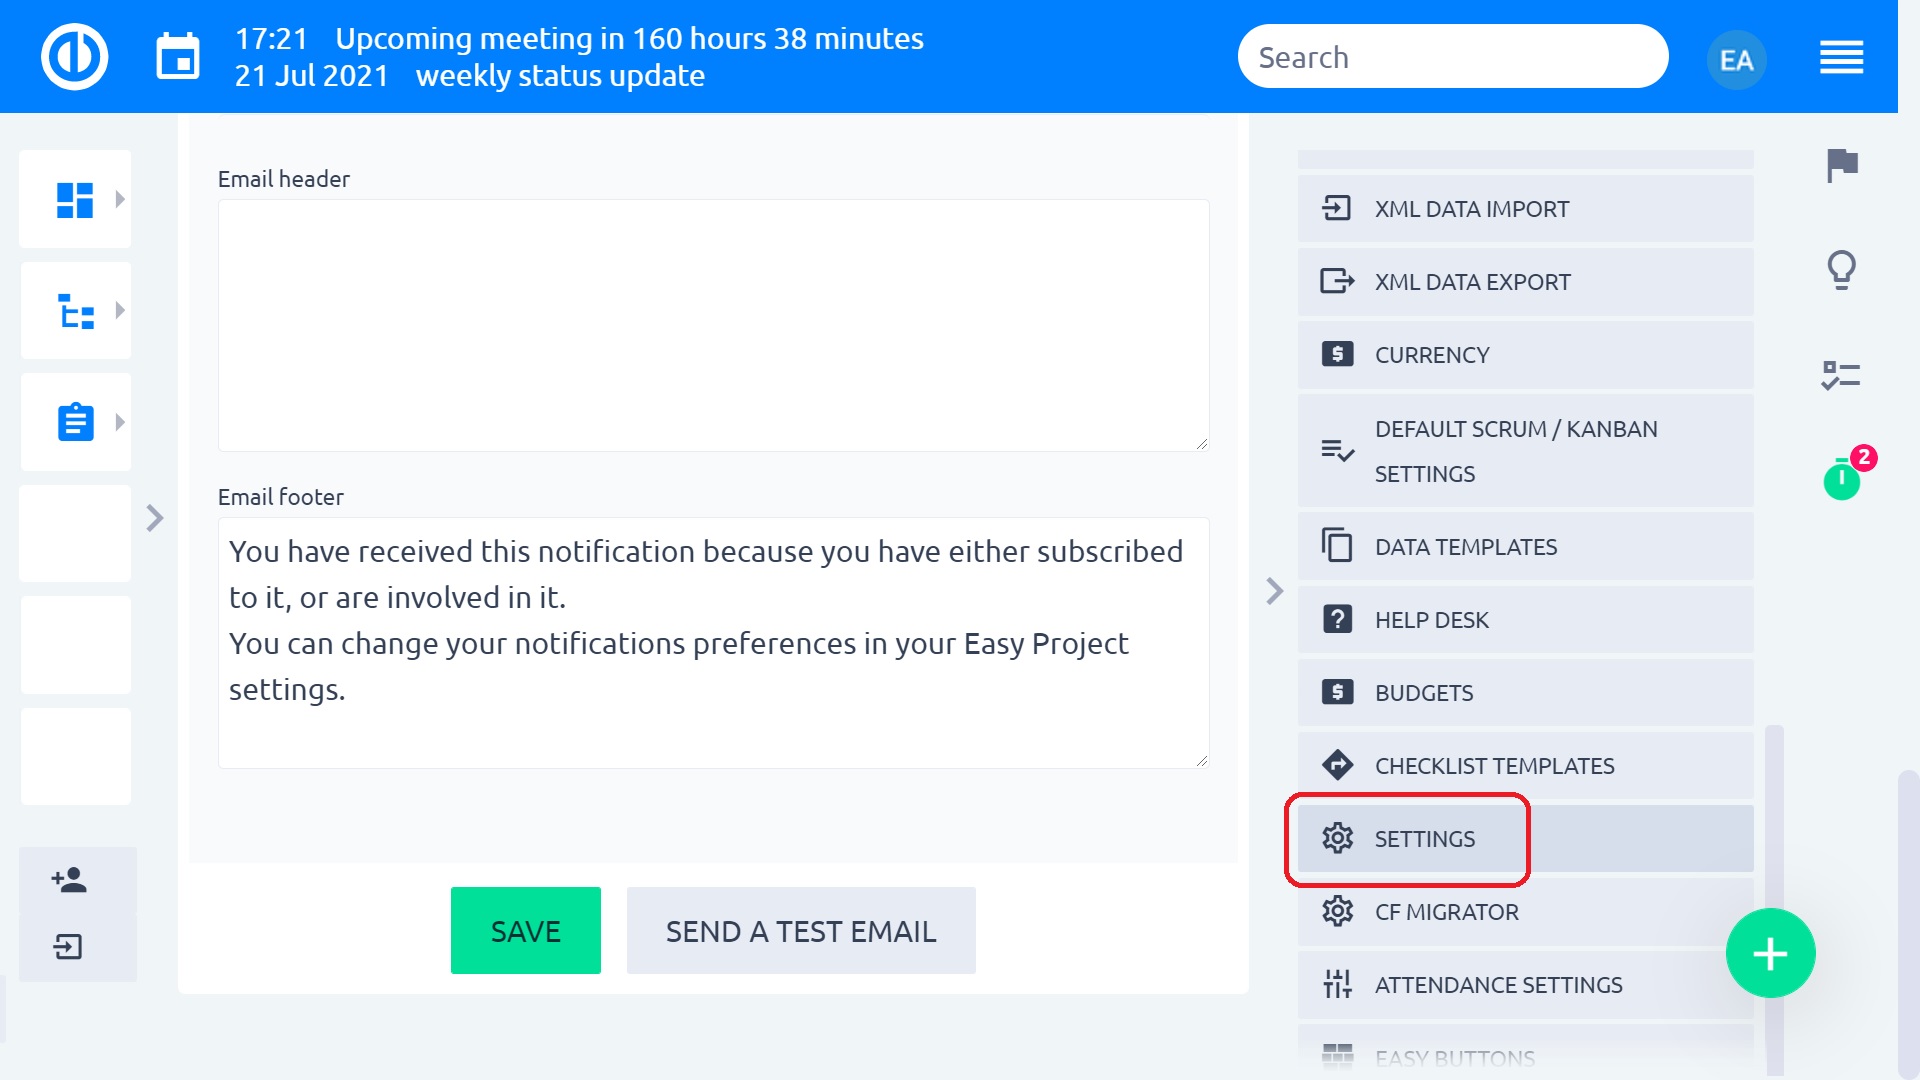
To add header and footer for HelpDesk emails, go to HelpDesk settings of a specific project (Project >> Settings >> HelpDesk).
Verify database configuration
Upgrading tests uncovered an incompatibility in two configurations that previously cooperated correctly.
Make sure that both database server and config/database.yml have the same (recommended) utf8mb4 set.
1) etc/my.cnf
character_set_server            = utf8mb4
collation_server                = utf8mb4_unicode_ci
2) config/database.yml
production:
  adapter: mysql2
  database: easy
  host: 127.0.0.1
  username: easy
  password: "EASY_STRONG_PASSWORD"
  encoding: utf8mb4
If these are not aligned, you will not be able to use any autocomplete field, e.g. Jump to project, Assignee selection, Filters, etc.
Finally, you have to run this command to set all tables encoding correctly.
for DB in YOUR_DB_NAME; do
for TABLE in `mysql -e "use ${DB}; show tables;" --batch --skip-column-names | xargs`; do
echo "Converting ${DB}.${TABLE}"
mysql -e "alter table ${DB}.${TABLE} CONVERT TO character set utf8mb4 collate utf8mb4_unicode_ci;"
done
done
Instead of YOUR_DB_NAME enter the name of your database.
Note: Correct database configuration is a general requirement for flawless running any web application. It is not just a specific requirement of this new version of Easy Redmine.
Custom design breaks (no CSS)
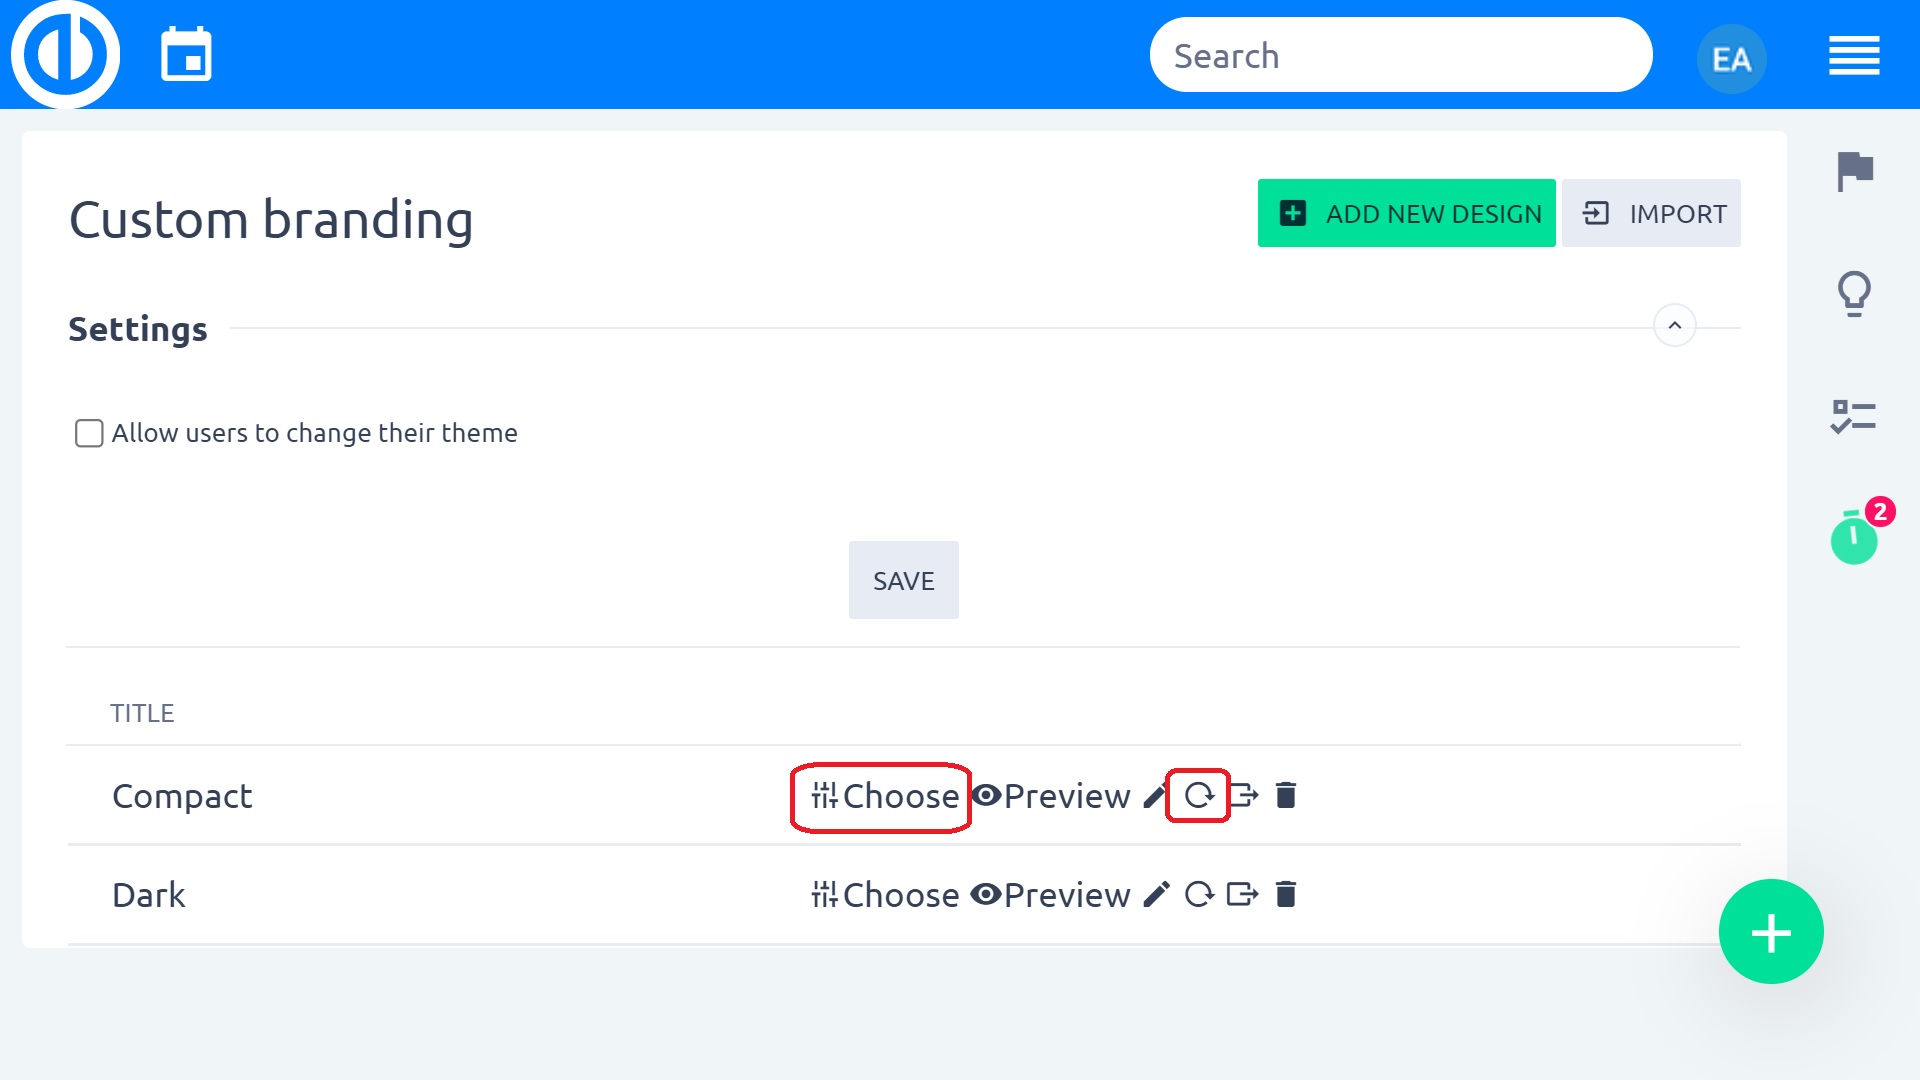
In case you had custom branding (logo, colors, background) and after the upgrade, it broke down – missing all styles, the site looks broken, you can fix it simply.
Go to page /easy_theme_desings >> find your design >> recompile >> load again. It will repair the design and load the styles.
7 Global settings
Now that we have gone through the whole usability, we can finish the rest of the settings remaining to be explained.
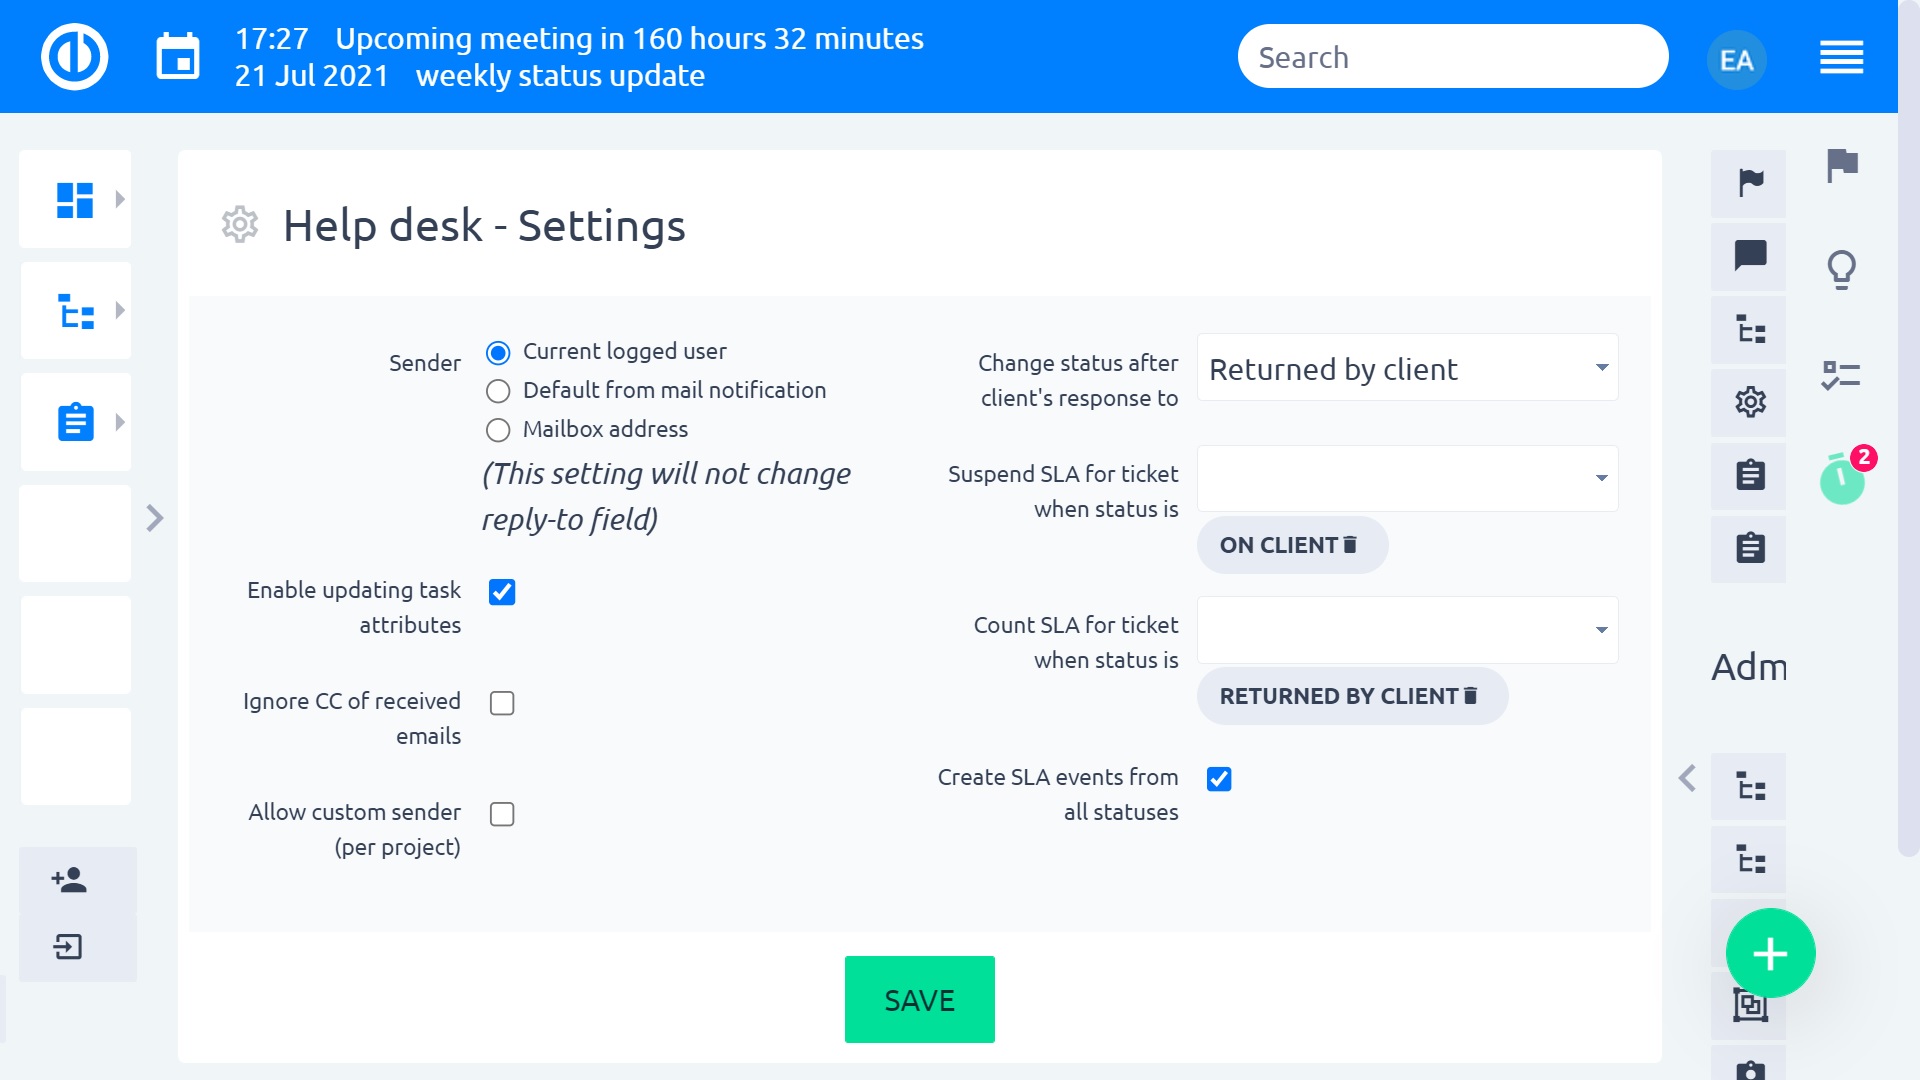
Setting notes:
- Sender – which email is listed as FROM on ticket replies to client (in relation to Chapter 5.1.3.)
- Current logged user – user who is updating the ticket
- Default from mail notification – email which is used to send standard notifications from the system to users. Set in Adminsitration >> settings >> email notifications
- Mailbox address – email, which received the original mail from the client
- This setting is loosely tied to the last checkbox Allow custom sender – if enabled, you can set a custom email as the sender on project HelpDesk settings. If a project has an email filled in the setting, it will override the Sender setting
- Enable updating task attributes – if enabled, it is possible to change certain attributes on the ticket by email. For example, by writing priority: High in the mail body, you would change the priority accordingly. This is a rather advanced function and it is not recommended to use with clients
- Accept autogenerated mails – for example newsletters
- Ignore CC of received emails – if enabled, emails in the CC are not processed and used in the field "email to" of the ticket (Chapter 5.1.3. note about mail recipient)
- Change status after client response to – everytime a client writes a reply which updates the ticket, status will be changed accordingly. This is particurarly useful when tickets are put to a closed status after a reply was sent by the operator. Unless the client replies back with some additional question, the ticket will stay closed and hidden from the active listings. When the client replies, ticket would be reopen and back to active queue of open tickets
- Suspend SLA for ticket when status is – these are statuses, when SLA deadline is not determined, because the ticket is waiting for input from the client, without which the operator has no chance of providing support
- Count SLA for ticket when status is – when the SLA is normally measured. With these functions, you can nicely set the ticket cycle. For example, operator asks the client for more information, puts the status to pasive and SLA is paused. After client replies, status is changed to consultation and SLA is recalculated according to the remaining time to SLA deadline, when the ticket was replied to
In version 12, Help desk received another interesting metric - Tickets resolved by support. You will be able to report total number or ratio of tickets that have never left the support team.
How it works
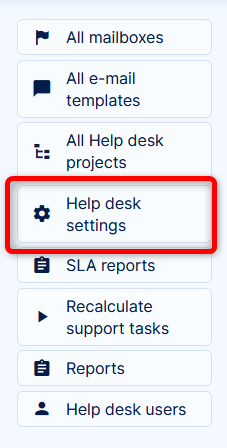
- Firstly you have to define which users are members of support in Help desk >> Help desk settings - Resolved by support settings
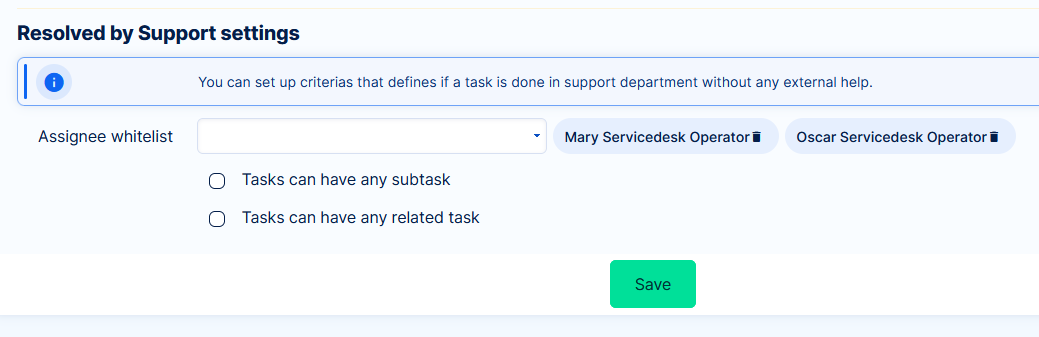
- Settings for subtasks/related tasks will determine whether tickets resolved by support can or cannot contain subtasks or related tasks
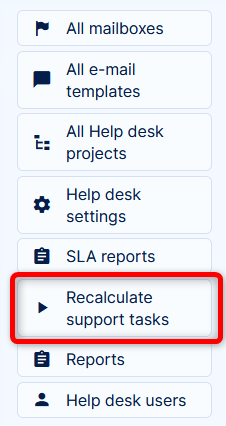
- Now, we recommend to push the button in help desk menu - Recalculate
This will evaluate tickets from the last 90 days - Finally, go to task list and find the filter Resolved by Support
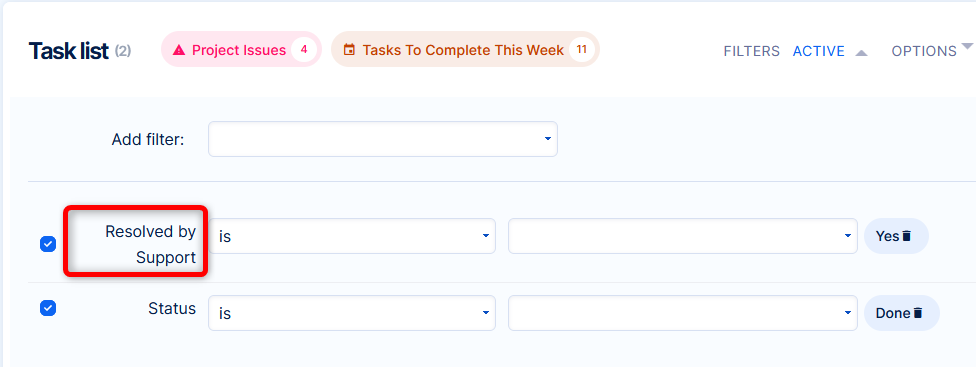
This filter will show tickets that were only assigned to members of support (as per setting in point 1). Based on settings on point 2, tickets that contain subtasks or related tasks may or may not be counted as resolved by support.
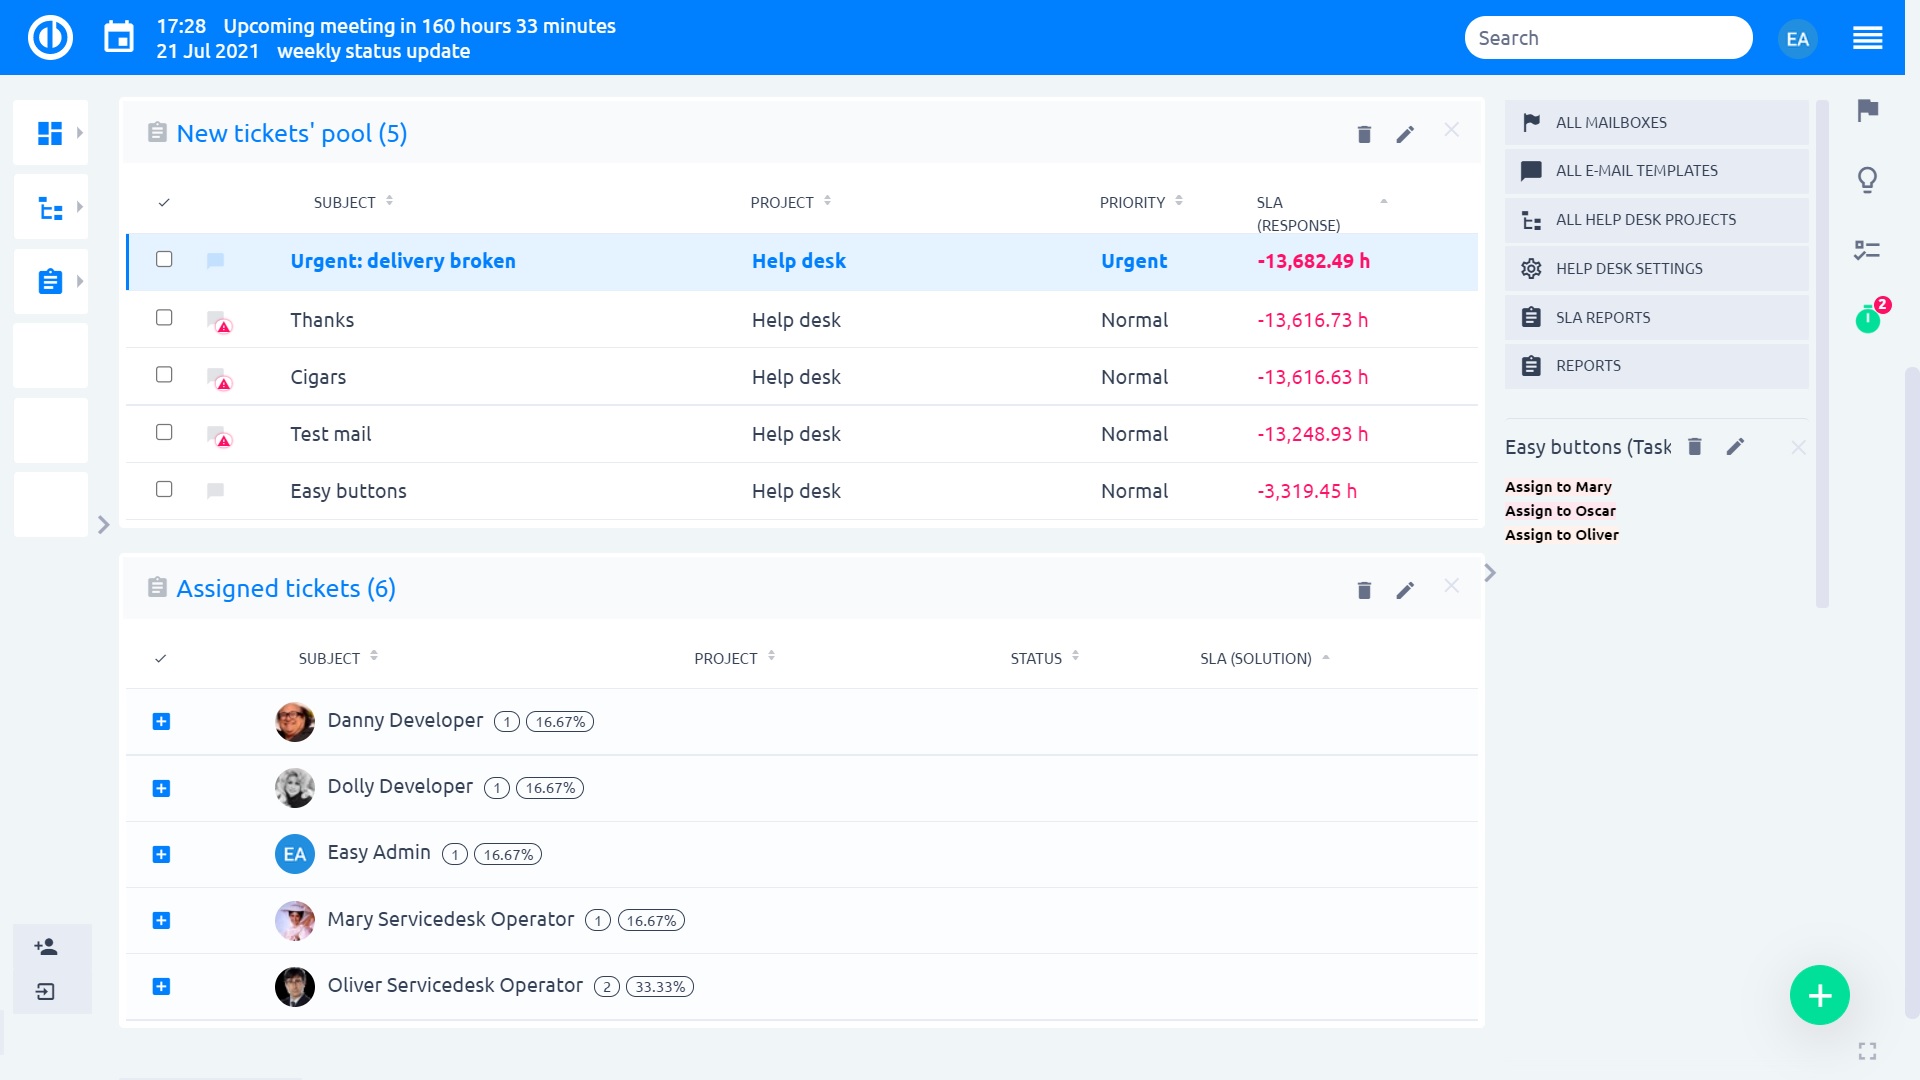
8 Filter "Need reaction"
"Need reaction" is an attribute of HelpDesk tickets and CRM cases. By default, this attribute is set to "No". It will change to "Yes" when a ticket/case is assigned to a person who answers to it by sending an email message instead of assigning it back to the sender in the Client zone or Easy Redmine. In such a case, the assignee of the ticket/case remains unchanged and so the intended recipient may not notice that the update has been made. To prevent this, the recipient should regularly check all items with "Need reaction" attribute set to "Yes" so he easily gets to know that there is something new he should check or answer even it's not assigned to him. Or you can use it when you need to "mark" some customer ticket you already answered but there is still some work on it and you need to inform customer later again. Using "Tasks from filter" module, you can simply create a box on your homepage, CRM overview or HelpDesk overview like the one below.
9 HelpDesk users (from version 11+)
Among the biggest additions to the HelpDesk in recent years are so-called HelpDesk users. Their purpose is to simplify the management of Client access to your Easy Redmine. Also, it makes it a lot easier for the Clients themselves to submit tickets and communicate with your operators directly in the application.
9.1 Preconditions
Management of HelpDesk users is under permissions View/Manage HelpDesk users under HelpDesk section in Administration >> Roles and permissions.
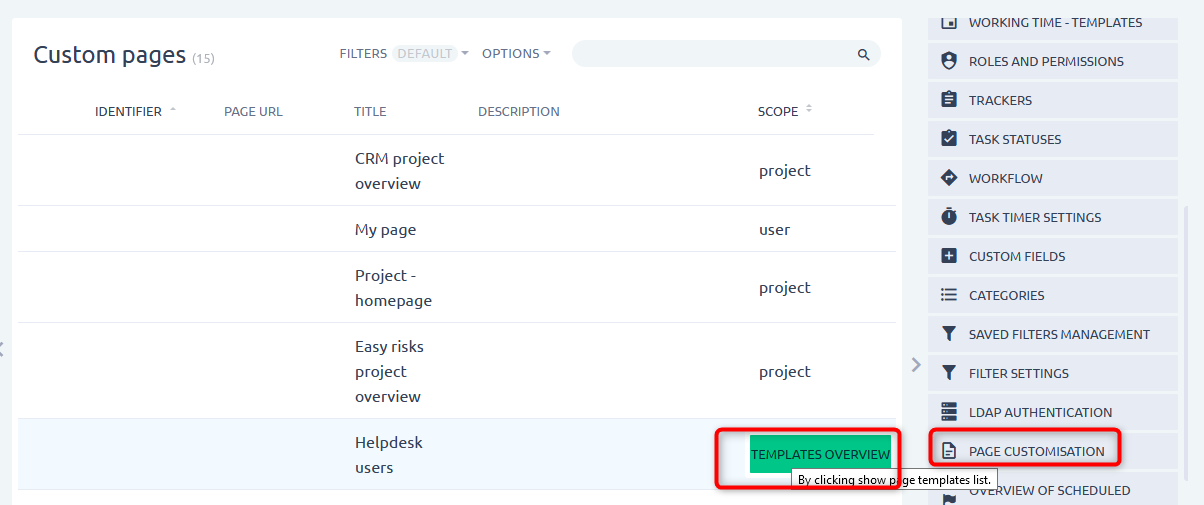
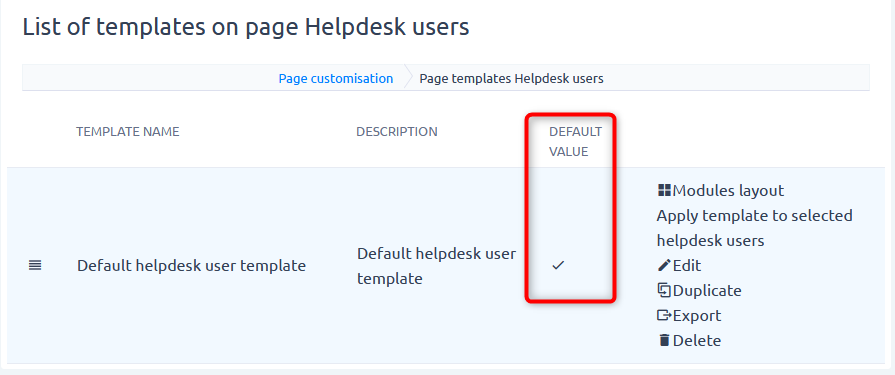
Another setting to check before you start creating HelpDesk users is Administration >> Page customization>> HelpDesk users >> Templates overview. There should be an existing page template in a basic "starter" configuration. It is important that there is a template that is set as default – this template will be applied automatically to new HelpDesk users. Otherwise, your HelpDesk users would have an empty page after they log in.
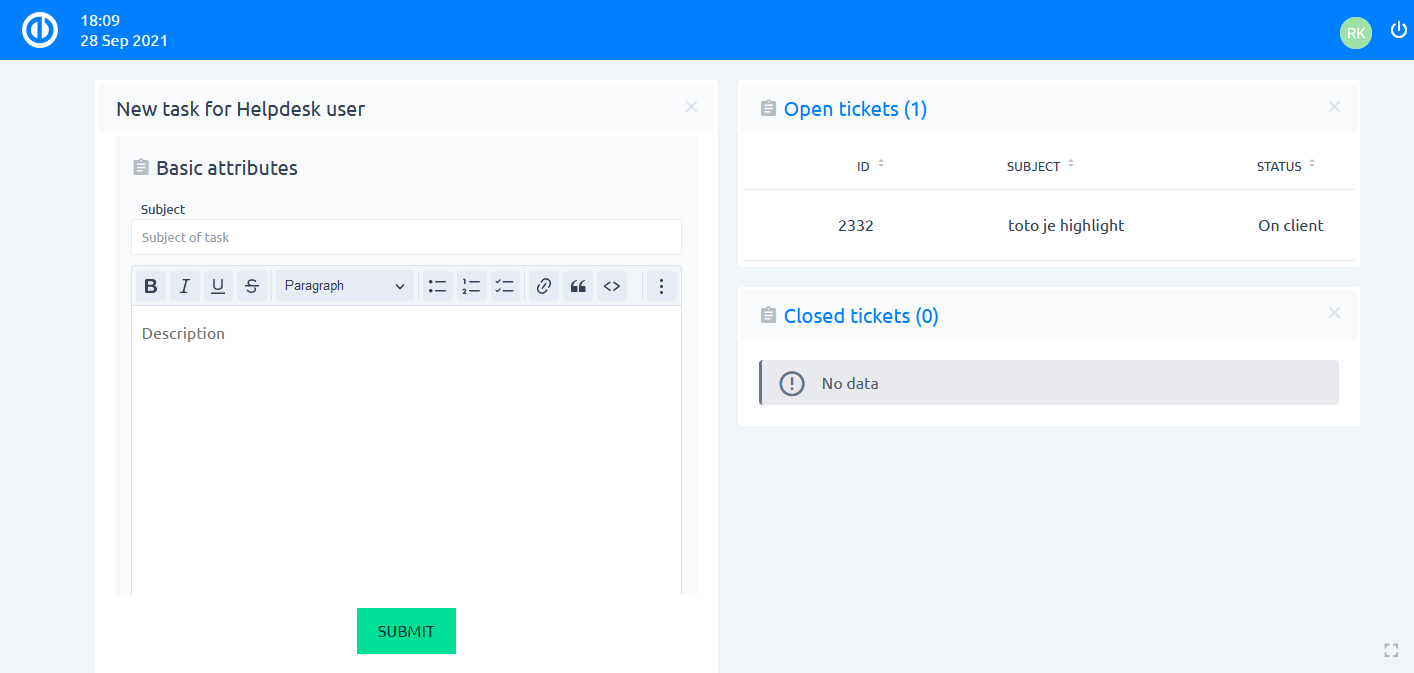
The HelpDesk user page contains 3 types of modules:
- New ticket form – It has no settings, just place it for the utmost convenience of your Clients.
- HelpDesk tickets – list of tickets created by the HelpDesk user. Each user can only see tickets that they themselves created. This module is configurable, such as all other "list" modules in the application. It contains fields visible for HelpDesk users in tickets. If you intend to show both open and closed tickets for the HelpDesk users, we recommend showing them in separate modules.
- Noticeboard – just in case you want to share some custom information with the Clients.
9.2 HelpDesk user management
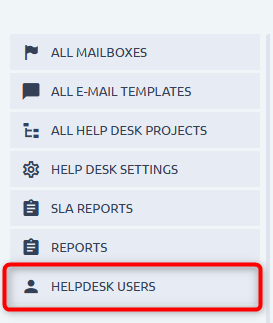
The list of HelpDesk users is available as a separate item in the control buttons on the HelpDesk dashboard.
All attributes are required:
- First name
- Last name
- Email = Login
- Language
- Project – this is the project where tickets from this user will be created. Only open projects that are connected to the HelpDesk can be selected here.
- Password – during user creation you must enter a password with an option to generate password token, so that the user may set their own password via link in an email. During user edit, a password change is obviously not required.
Additional permissions:
Each user can be granted additional permissions to view and manage all tasks
View all tasks = Allows the help desk user to see all created tickets under the same project
Manage all tasks = Allows the help desk user to Edit specific fields from already created tickets (Title, Description and also add a new attachment; but not edit the old one).
Use case
A client has a special project for their tickets in your Help desk. There are more users logging into the help desk portal and submitting tickets on behalf of this client. One of these users needs to see all the submitted tickets, because his role requires to evaluate the service that you deliver.
9.2.1 CSV import
From version 11plus.2.0, it is possible to import help desk users via CSV. Please contact your consultant about this option.
9.3 Logging in as HelpDesk user
HelpDesk users log in via a different entry point than regular users. On the login screen beneath the login button, you can find a switch. To direct your Clients to HelpDesk login, use URL /helpdesk/login. As mentioned above, email is used as the login name.
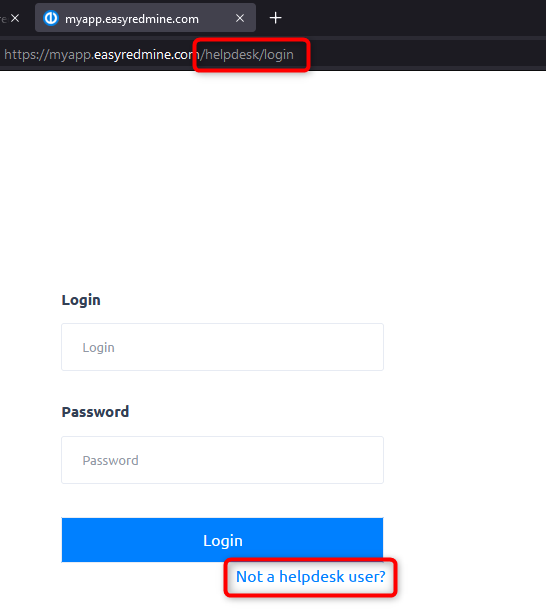
IMPORTANT: HelpDesk users are technically independent of regular users. You may use the same email for one regular user and one HelpDesk user.
Although, practice suggests this should not be the case. You either set up a HelpDesk user account, or you decide that the user needs a full account. Both types of accounts for one person should only be used for testing purposes.
After logging in, the portal itself consists of the homepage, which was configured by an admin, but is not configurable by the HelpDesk user themselves. In the top right corner, the profile can be accessed, including edit mode. Next to it, the log out button. By clicking on an existing ticket, or creating a new ticket, the user will be redirected to the ticket detail, where they can add comments or attachments. To return to the homepage, just click on the logo in the top left corner.
HelpDesk user has no roles and permission setting and you can't provide them additional access to certain areas. The listing above is all that they can access. You should not send them any links to items in your application. It would only lead to access denied message.
9.3.1 LDAP authentication for HelpDesk users
From version 11plus.2.0, help desk users can be authenticated via LDAP.
The configuration is in Admin >> Plugins >> Help desk users >> Edit - New authentication mode.
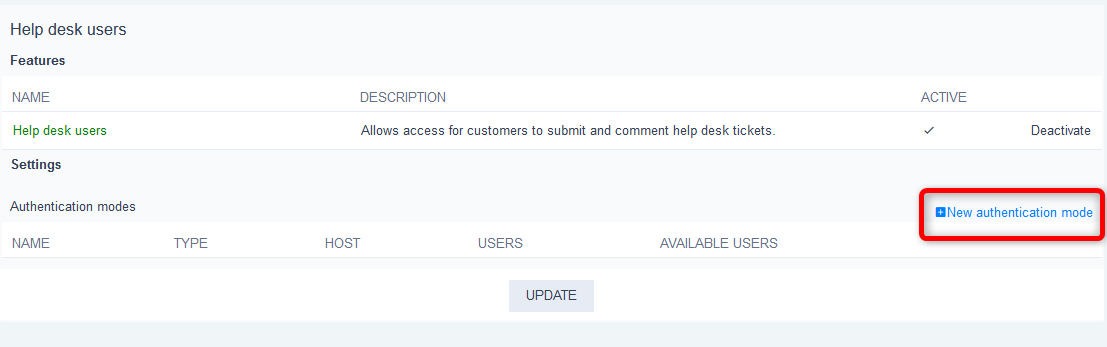
The form is identical to regular LDAP configuration, the only difference being that it applies to help desk users => on page /helpdesk/login
9.4 Working with tickets
From the Client's perspective
HelpDesk user creates a ticket via the New ticket form on their homepage. The only available attributes are Subject, Description, and attachments. The philosophy is that Clients should not worry about organizational matters when they need help from your customer care. They simply state their problem and expect a solution. No project selection, no categories, no custom fields, no priority selection – these all are the responsibility of your support team.
The ticket will be created in a project, which is set directly on the HelpDesk user. Field Email to in the ticket is filled in by email of the HelpDesk user. This user will also be set as HelpDesk author of the ticket, which is a hidden attribute (unrelated to Author, which is a generic attribute of all tasks in Easy Project). This ensures that they will always see the ticket, even if you move it to
Corner situations
- The situation when a task assignee is not a member of the project can occur in the following cases:
- the assignee was removed from the project but the tasks remain assigned to him,
- an automatic ticket updating process is set within the HelpDesk module in such a way that some tickets are automatically assigned to a former project member.
- Information about SLA Response appears in the task detail only when the task is in the default status, which is defined on a respective tracker.
- We strongly recommend that you do not change the priority of a ticket when the ticket has suspended SLA, as such an action would adversely affect the correct calculation of the SLA on that ticket.

