


Project management
Video tutorials and webinars for Easy Redmine 11
Create a new project
Project Membership and Roles
Quick project planning
Option "Update task/milestone/subproject dates according to project start date"
Copy template into an existing project
Bulk edit of projects
Close project possibilities
Public projects and anonymous access
How to use project statistics
Project e-mail notifications and overall activity
Corner situations
Create a new project
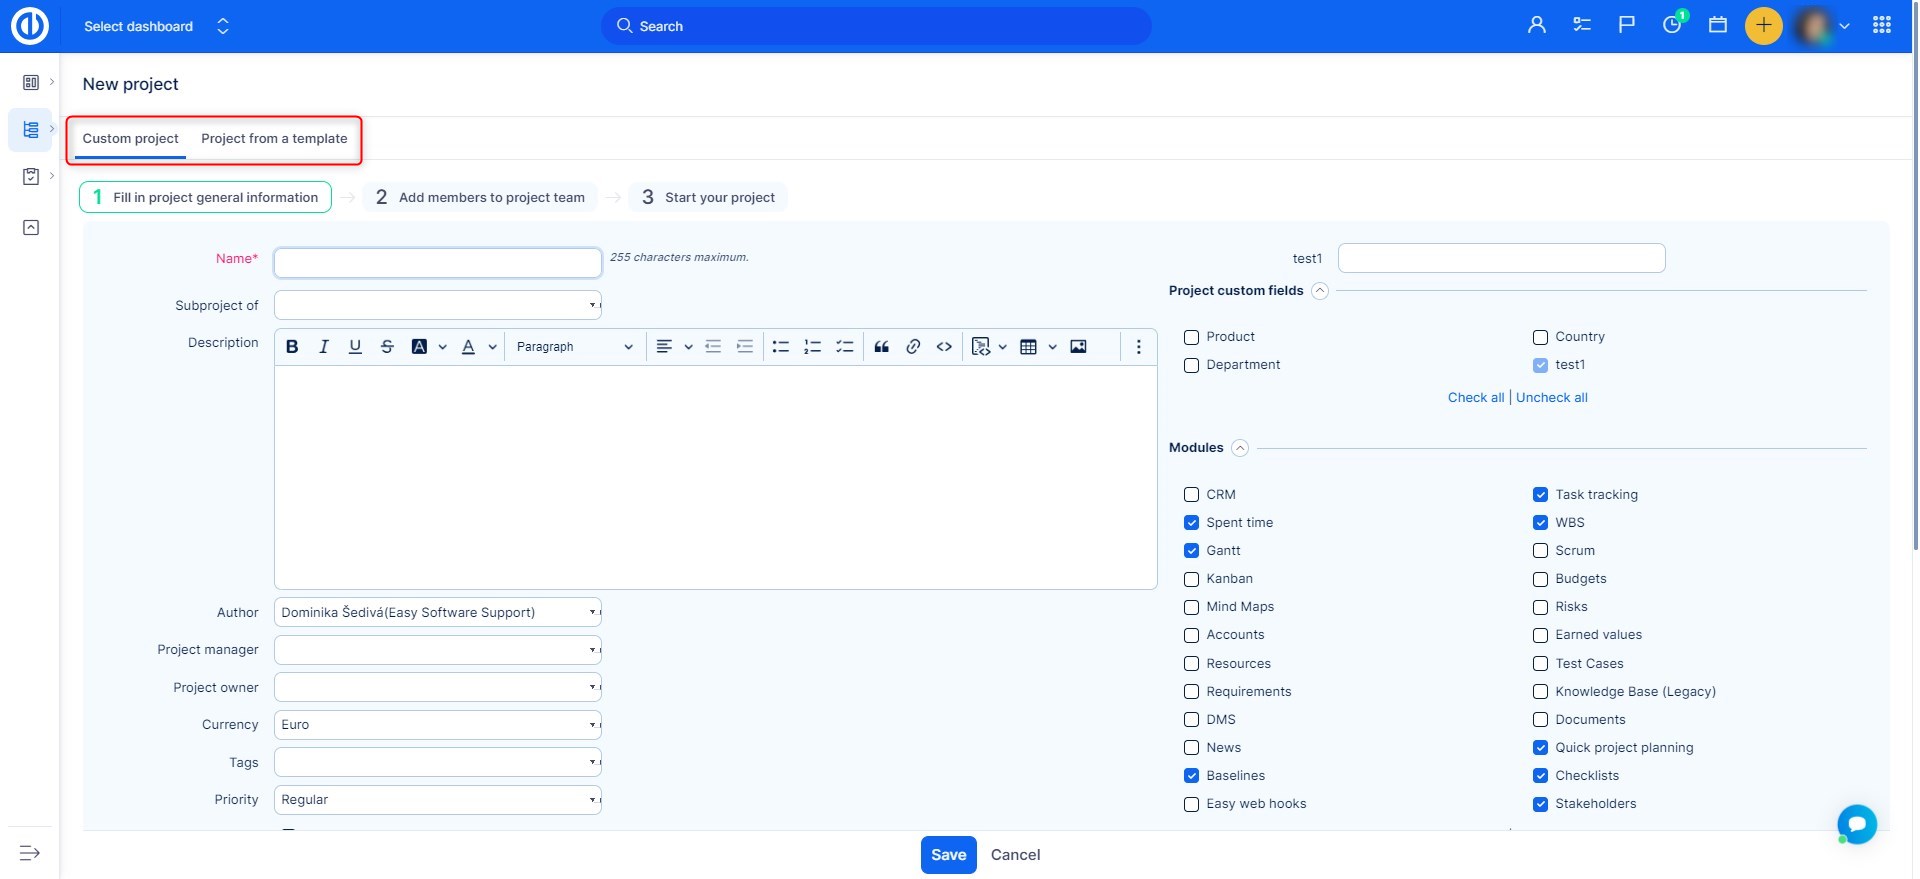
Creating a new project in Easy Redmine is really easy. You can use a template of another project for that purpose, which saves time. But first, let's take a look at how to create a project without a template. Just click on the plus button ("+" icon) in the top bar and select Project.

Then fill in the name of the project, whether it is a subproject of any existing project. Enter a description, author (if not you) , inherit members (members of the parent projects will be automatically assigned to this project) and some other options as shown below. Select a currency for this project (used by Money module). Moreover, you can choose project phase, select modules, trackers and custom fields to be enabled on this project. Everything can be later edited. When done, click on the Create button down.
After the project is created you will be able to further mark the project as public (everyone can see it) and/ or planned (no email notifications are sent).
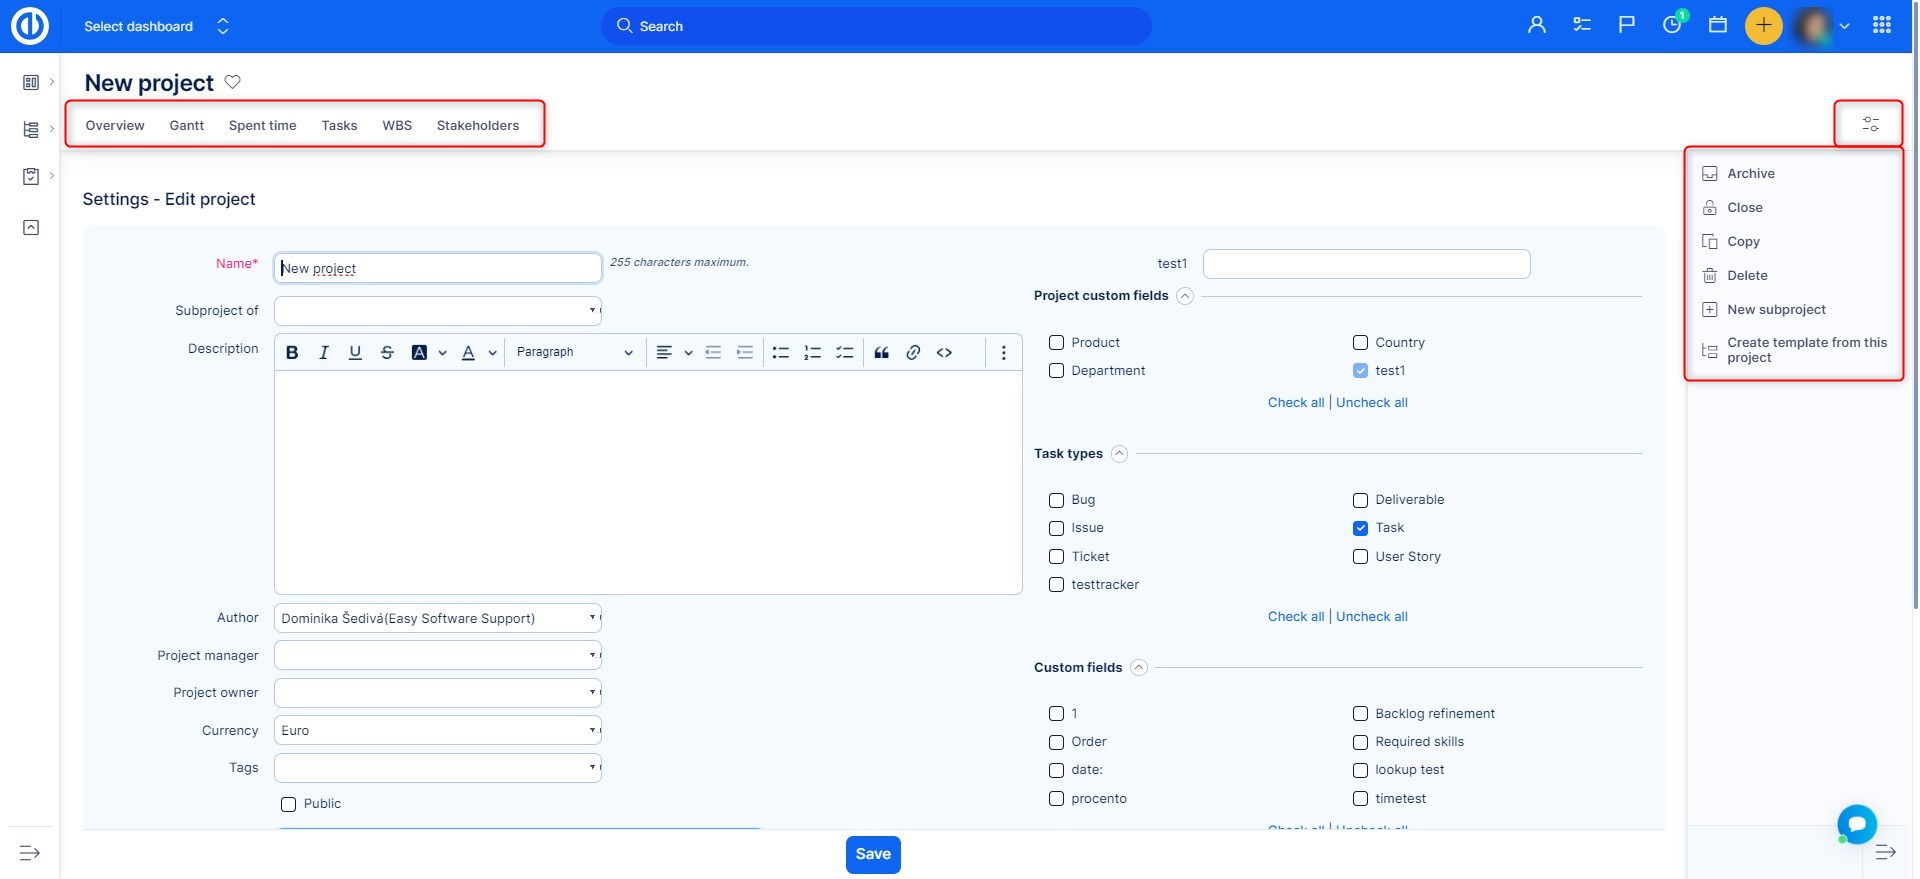
When the project is created, you land on the project's settings page, where you can always edit the settings. Besides project's top menu (modules) and project setting categories below, you can find several options on the right side.
- Archive: Archive the project for possible later restore. You can find archived projects in Global menu >> Administration >> Projects.
- Close: Closes the project, no one can add any task.
- Copy: Creates an identical copy of the project.
- New subproject: You can directly create a subproject.
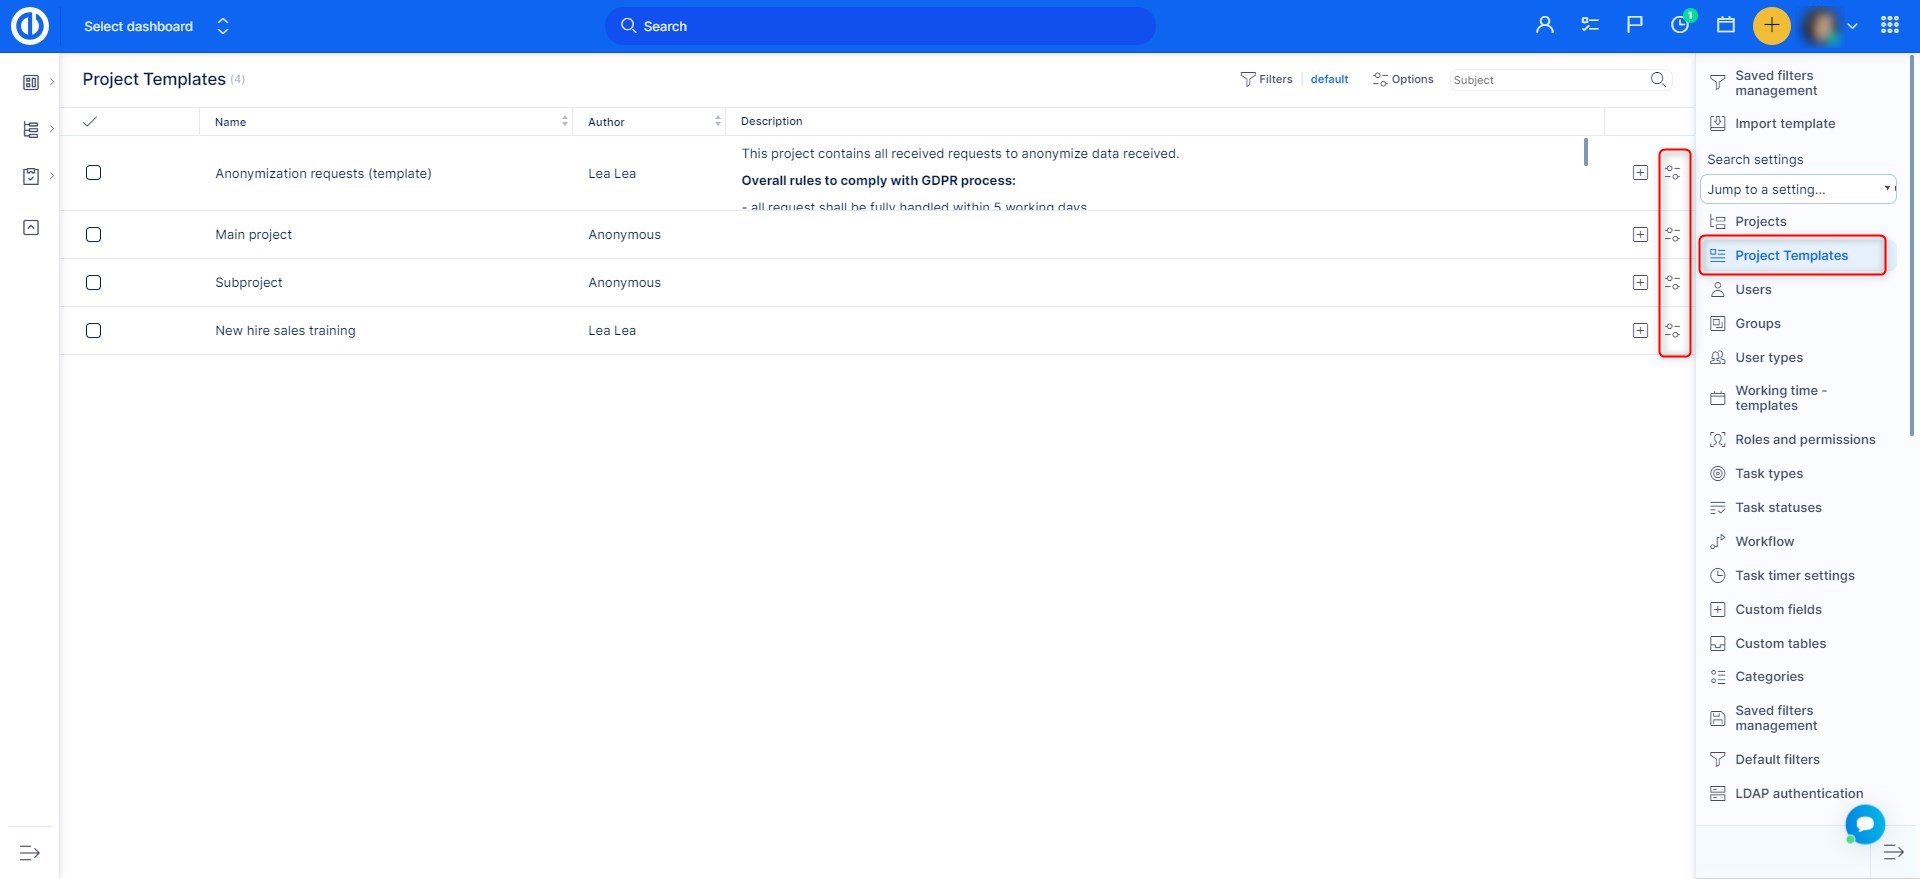
- Create a template from this project: If you really want to save time, use this feature. The whole project how you've set it up with all the tasks can be saved as a template from which you can create a new project with just a few clicks. You can find project templates in Global menu >> Administration >> Project templates.
If you want to create a new project from a template, click on the "New project from template" button on the project list. Then select the desired template. Using the buttons on the right side, you can create a new project from the template, or copy the template into existing project as well as edit or delete the template.
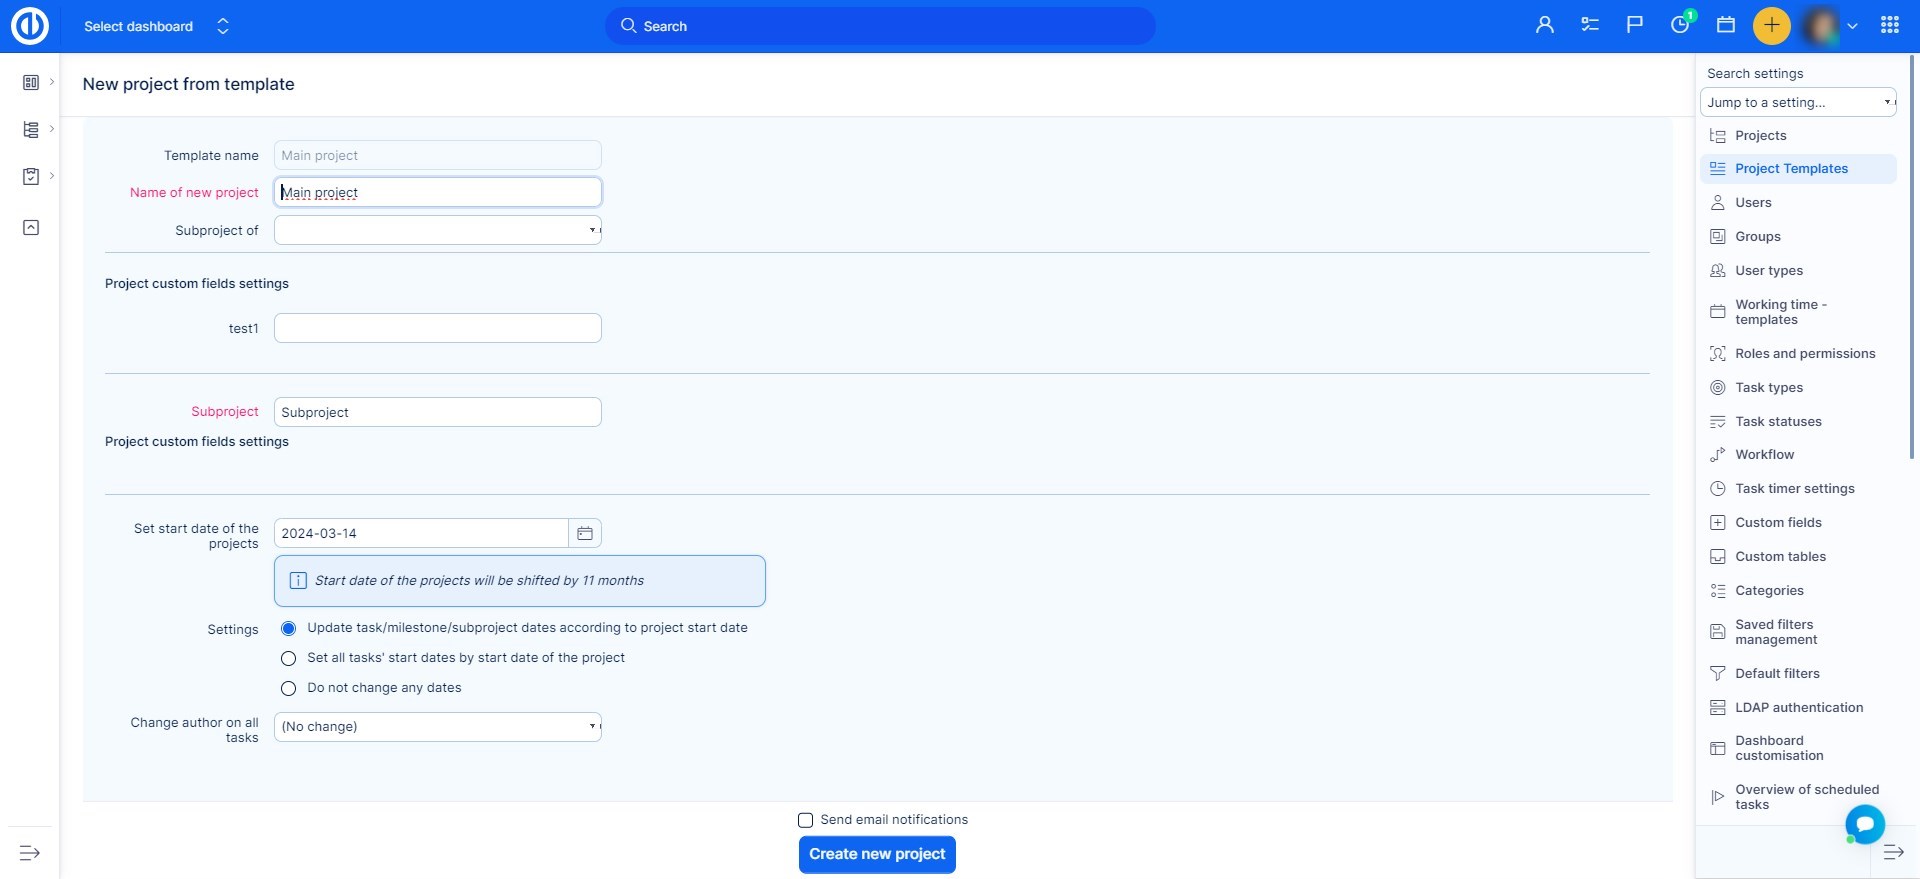
You land on the page like this. Here you can edit the name, subproject, start date, author, and inherit options to your liking. Then just click on Create button. If you need to edit more options than available here, just create the project first and then edit them from project's settings as explained before.
Project membership and Roles
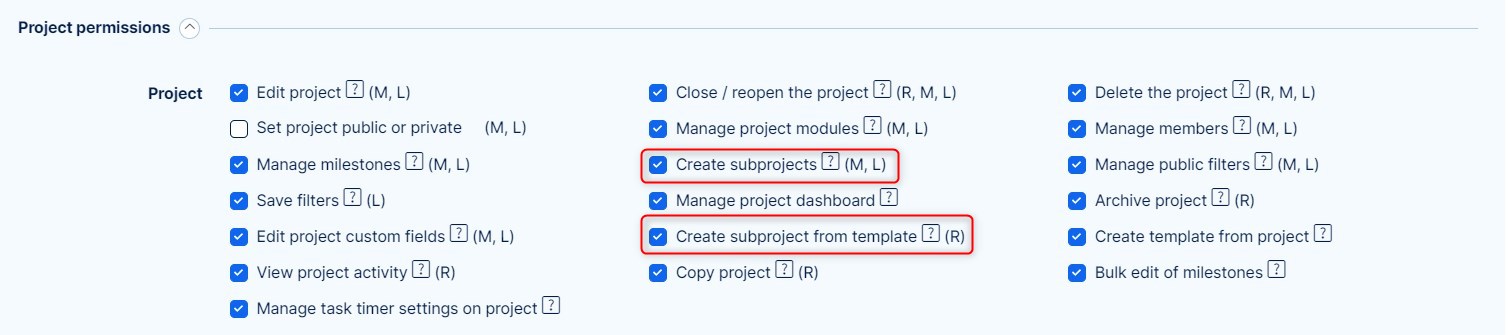
When an administrator or user with necessary permissions creates a new project or subproject, their role on the project is determined by the following examples. If you are not an administrator, you need to have the permissions to create a project and/or subproject, which can be set in Global menu >> Administration >> Roles and permissions as illustrated below.

Create a new project - Default Role Settings
When you simply create a new project by clicking on the "New project" button, the role of the author of the project is taken primarily from the settings of their user type (Administration >> User types >> Default role).

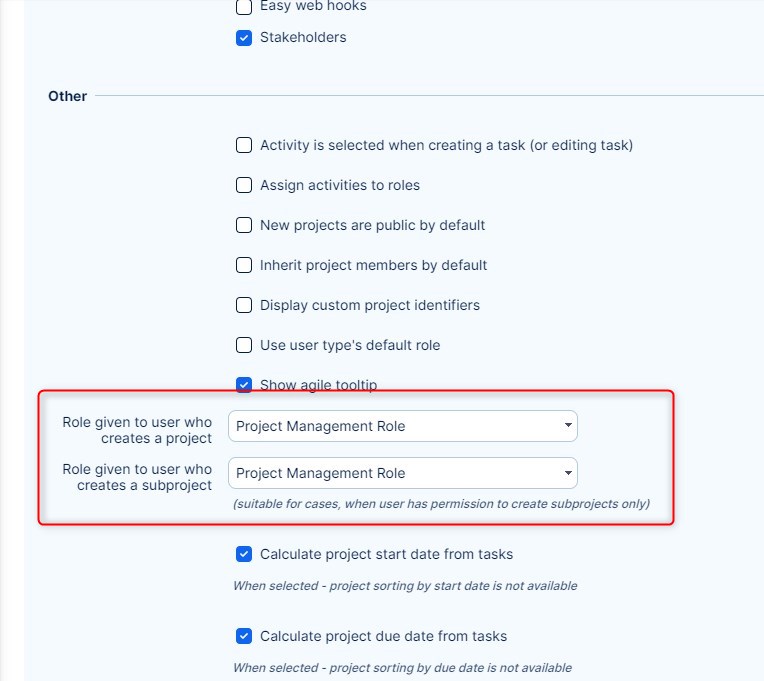
If the default role is not selected, then the global setting is used: Global menu >> Administration >> Settings >> Projects - Role given to user who creates a project / Role given to user who creates a subproject. As you see, it's possible to distinguish the default roles depending on if a project or subproject is created. All existing user roles are available to select in this drop-down menu.

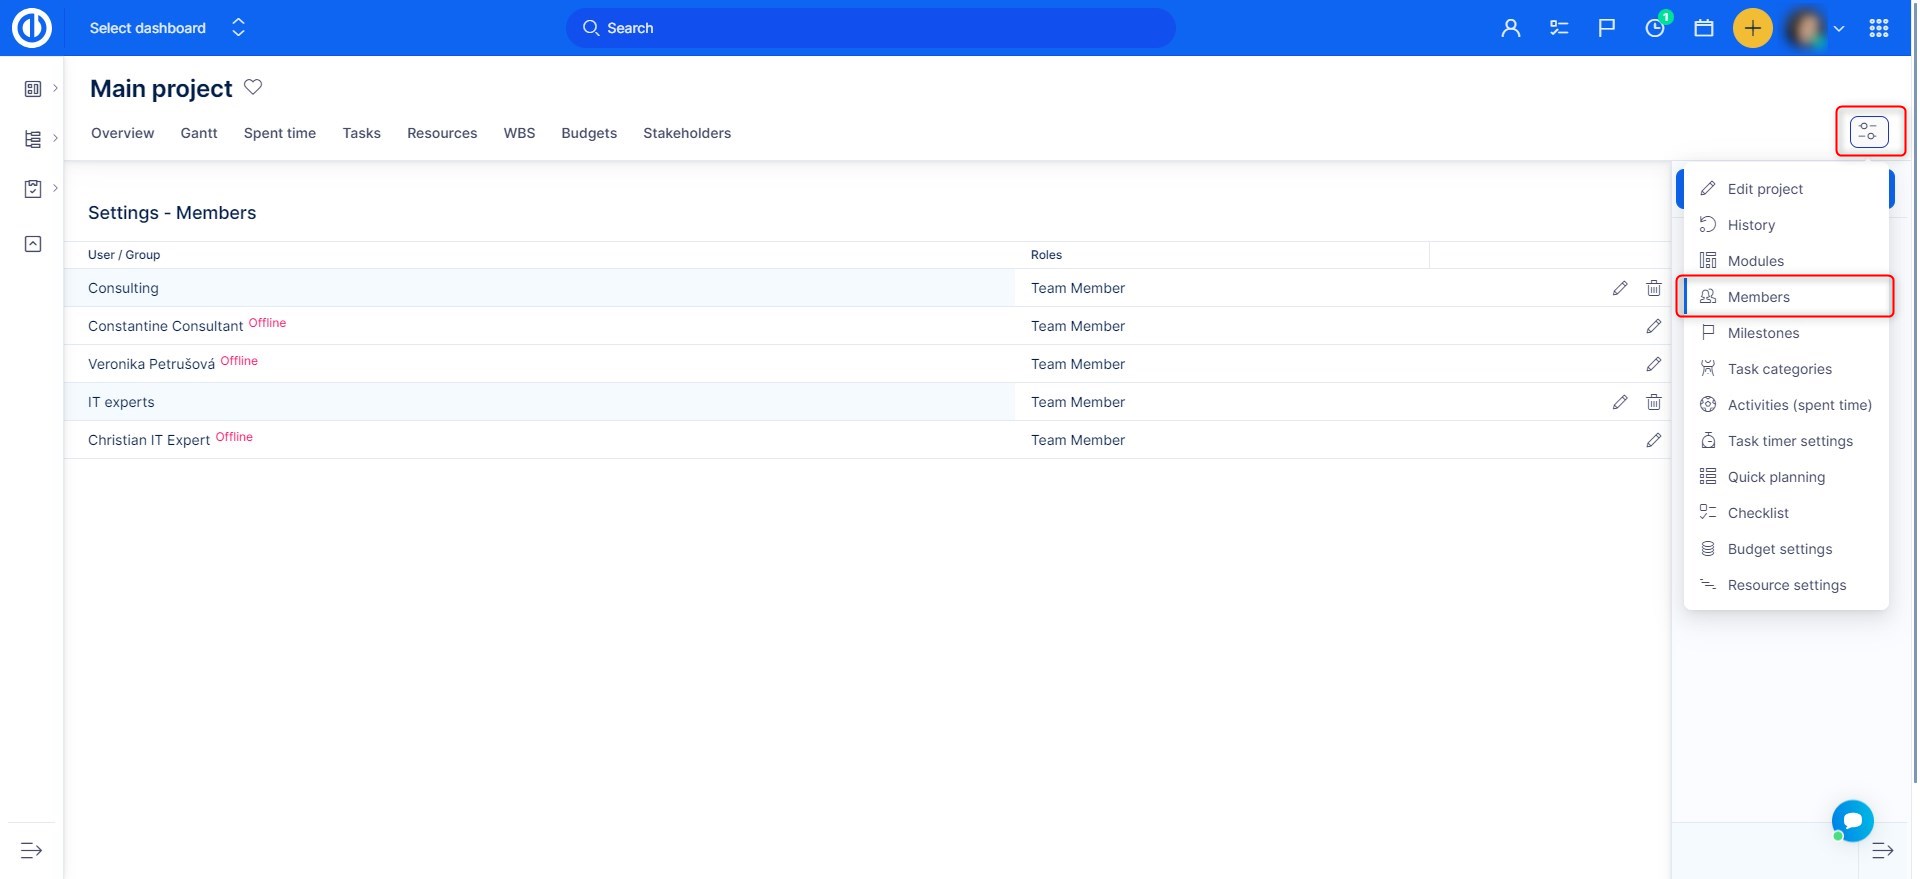
Project membership of a user, as well as a role of a project member, can be later changed by an administrator in the particular project's Settings >> Members.
Create a project from a template where I'm in a different role than default
When you create a project from a template where you have a different role than the default role, you are given a role from the template, not the default one. The role in the template is the one you had on the project by the time a template was created from it.
Create a project from a template where I'm not a member
Similar logic applies in a case when you create a project from a template where you have no role at all because you are not a member of it. Therefore, you are also not a member of the project created from this template. That means you cannot use any of your project permissions on a project you are not a member of.
Create a new sub-project where members are inherited and I have a different role than default on the parent project
In case you create a new sub-project with inherited members and you have a role other than the default role on the parent project, your current role is also inherited and therefore remains the same both on the parent project and sub-project.
Create a new sub-project where members are inherited and I'm not a member on the parent project
This is a kind of hybrid situation. When you are not a member of the parent project, you will not be inherited to the subproject. However, because you are creating a new project, you will be given the default role as per global settings (see above).
Create a new sub-project where members do not inherit
In this case, you are simply given the default role according to the current global settings (see above).
Department vs project organizational structure
In department organization structure - User A always works as, for example, Accountant. In project organizational structure - User A is a Project manager (role) in Project 1, meanwhile, User A can be a Team member (role) in Project 2 at the same time. Example:
| Project 1 | Project 2 | Project 3 |
| Project manager (role) | Team member (role) | Non-member (role) |
The same user has different permissions in Project 1 and Project 2. He does not see Project 3, because he is not a member (technically he is assigned Non-member role, that is strongly recommended not to have any permission - all checkboxes in Non-member role are unchecked). This results in the fact, that User A might be able to do and see different things in Project 1 and Project 2. This is the logic the application is using.
The only exceptions from this rule are public projects and administrators (obviously, the administrator sees all the projects regardless of his/her project membership).
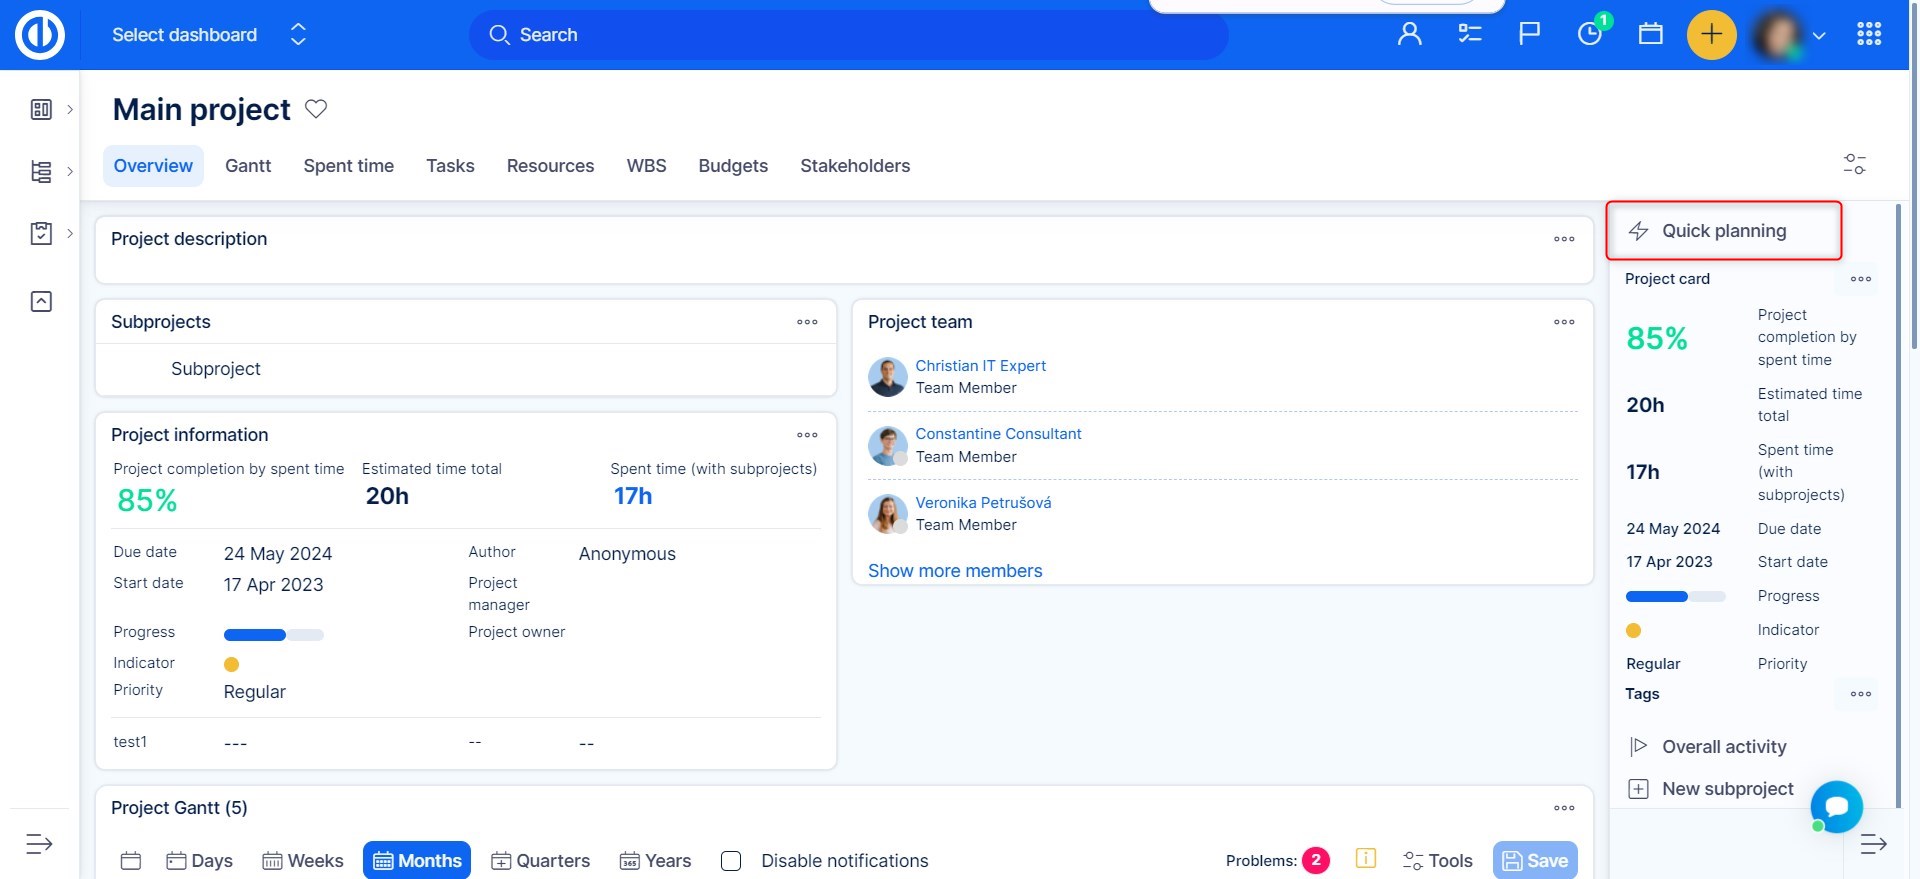
Quick project planning
Video tutorials and webinars for Easy Redmine 11
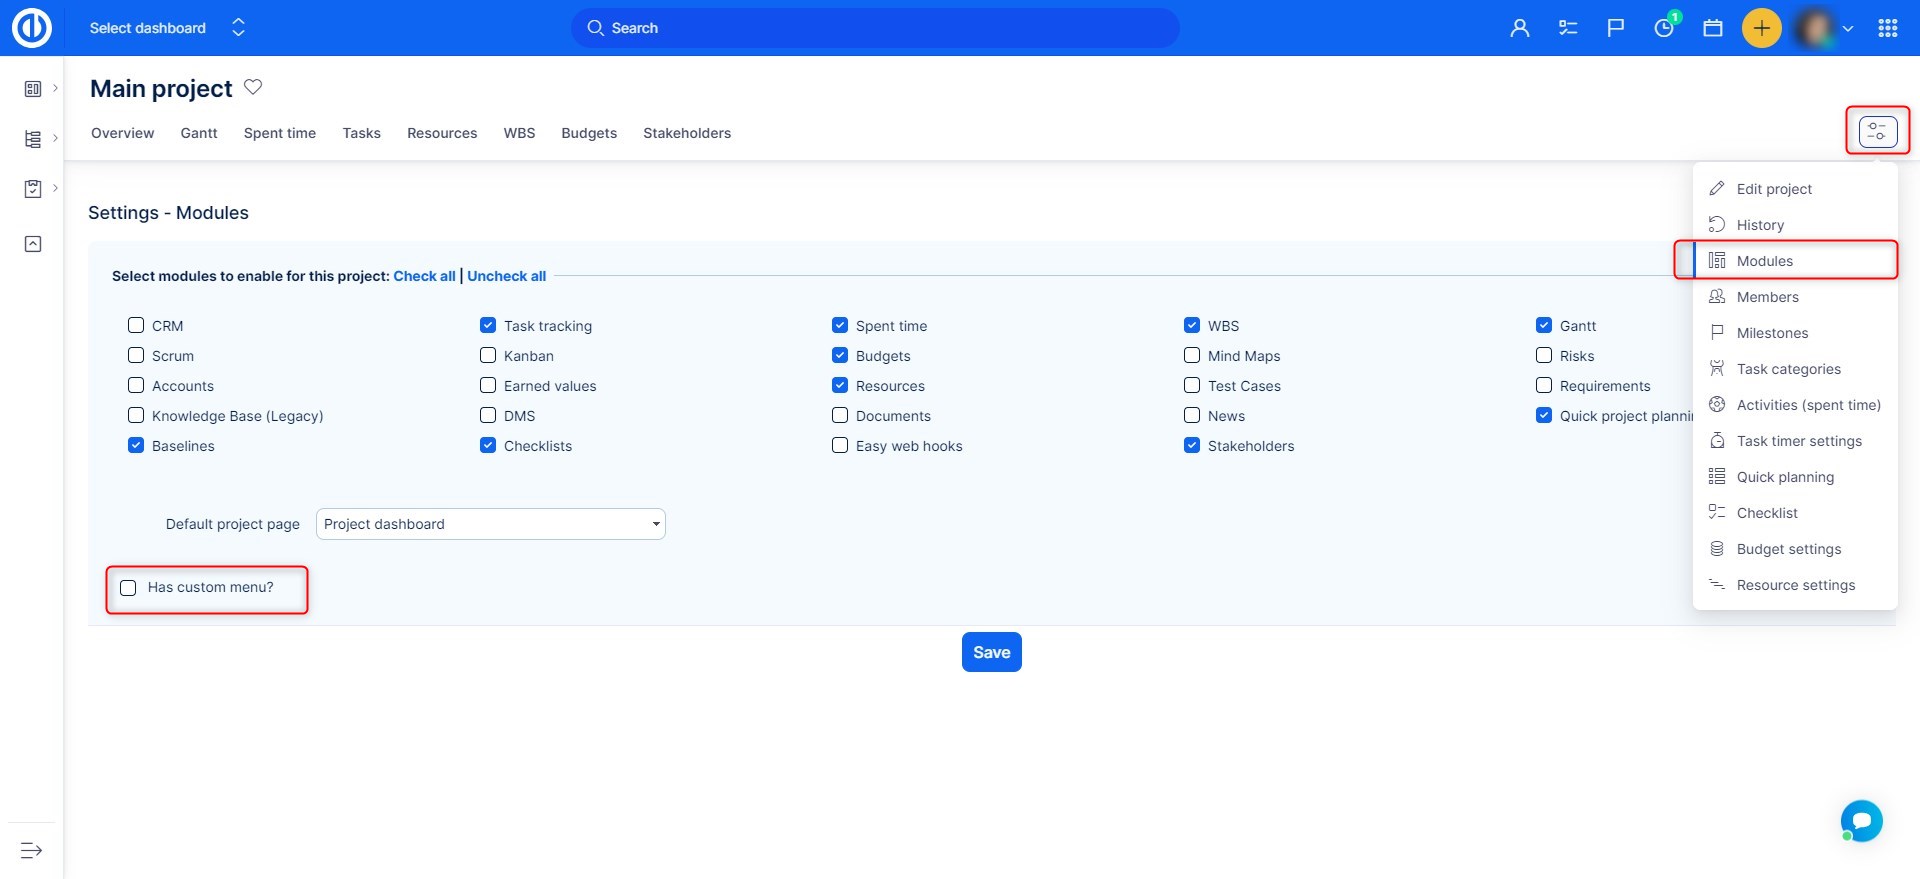
With this module, you will save a lot of time! Quick project planning is part of the basic Easy Redmine package, no plugin needed. It has to be activated in the project settings in the modules tab.
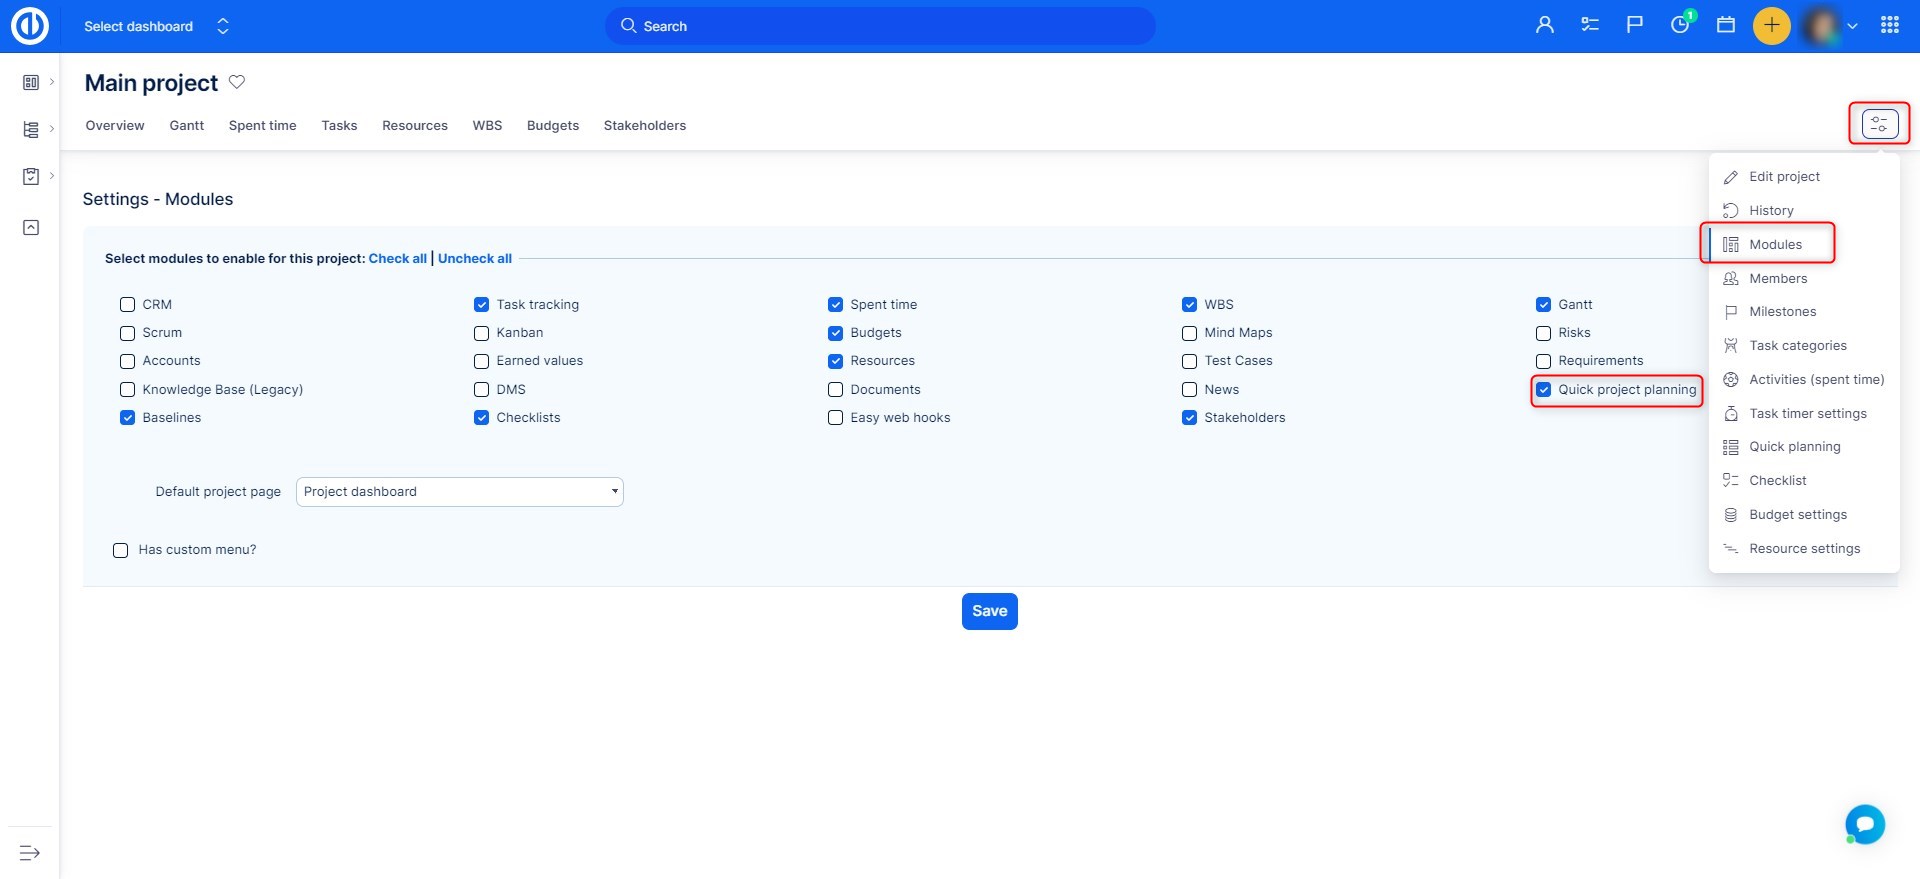
To activate Quick project planning, click on the green button on the right.
You are able to delete or create tasks at quickly while you have the perfect overview what tasks are already created. To add a task simply fill in the fields on the top.
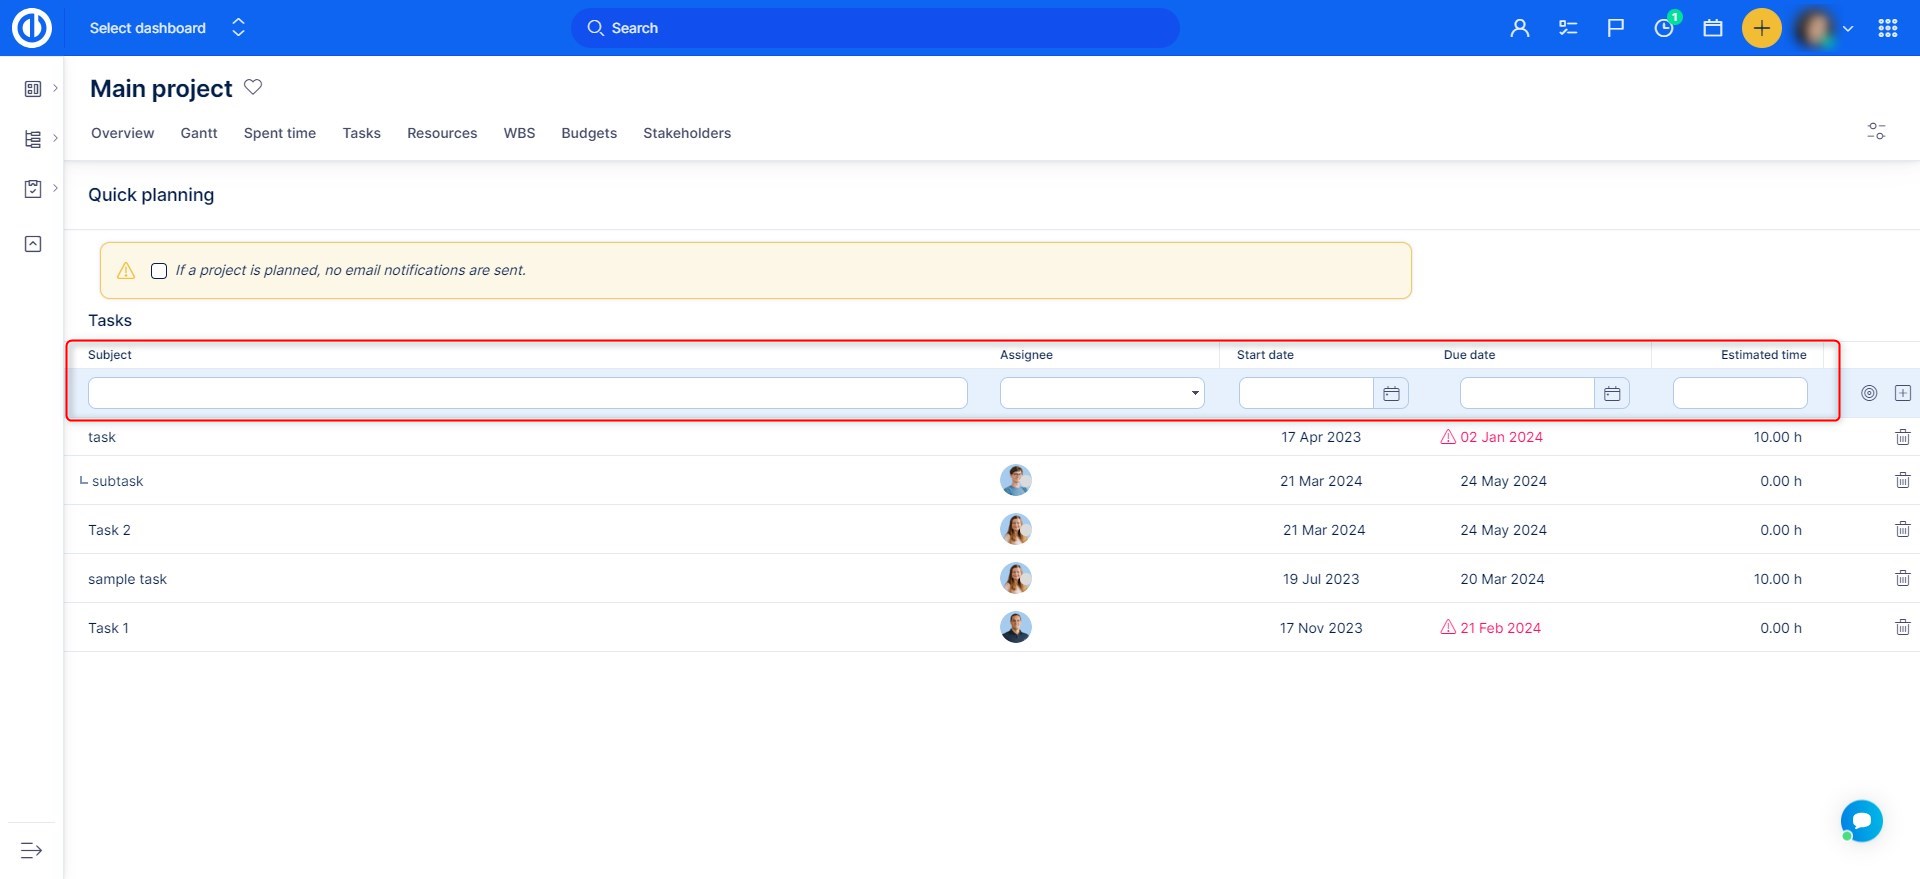
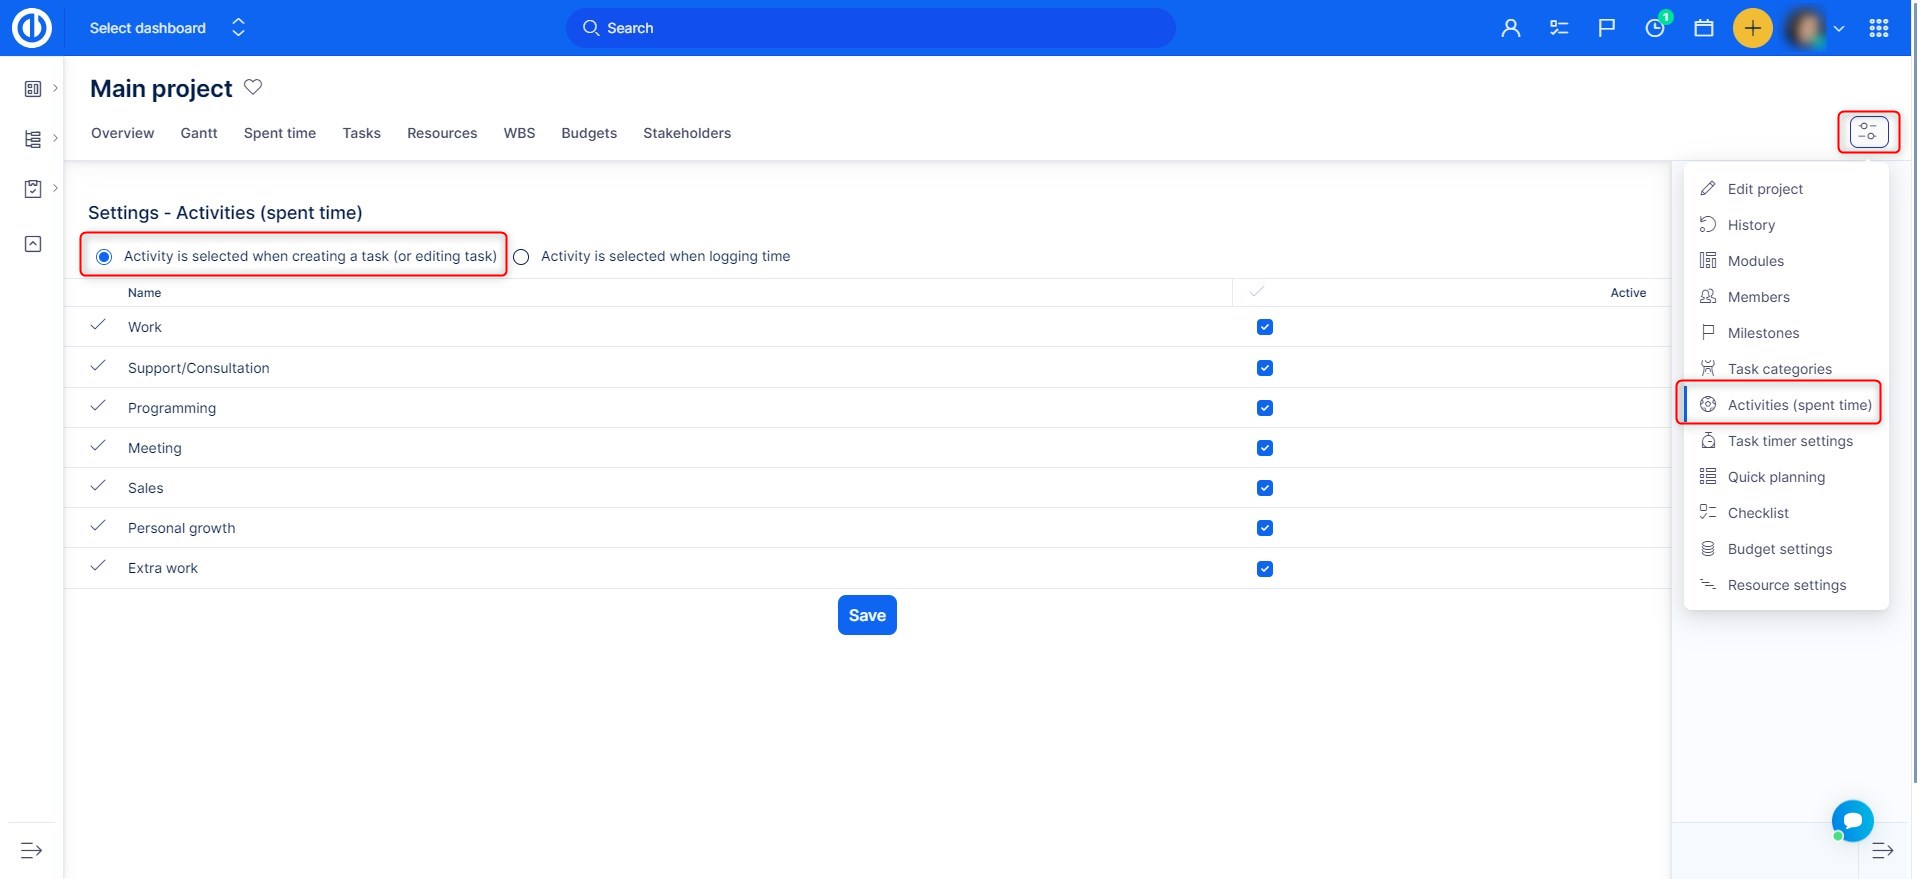
Please note that every time you create a new task, all required custom fields and standard fields must be filled in, even in the Quick Project Planning. If they are not filled in, an error message will show up. Special caution should be taken when there is active option "Activity is pre-selected when creating a task" in project's Settings > Activites (time tracking) as illustrated below. In such a case, the activity field is always required field when creating a new task.
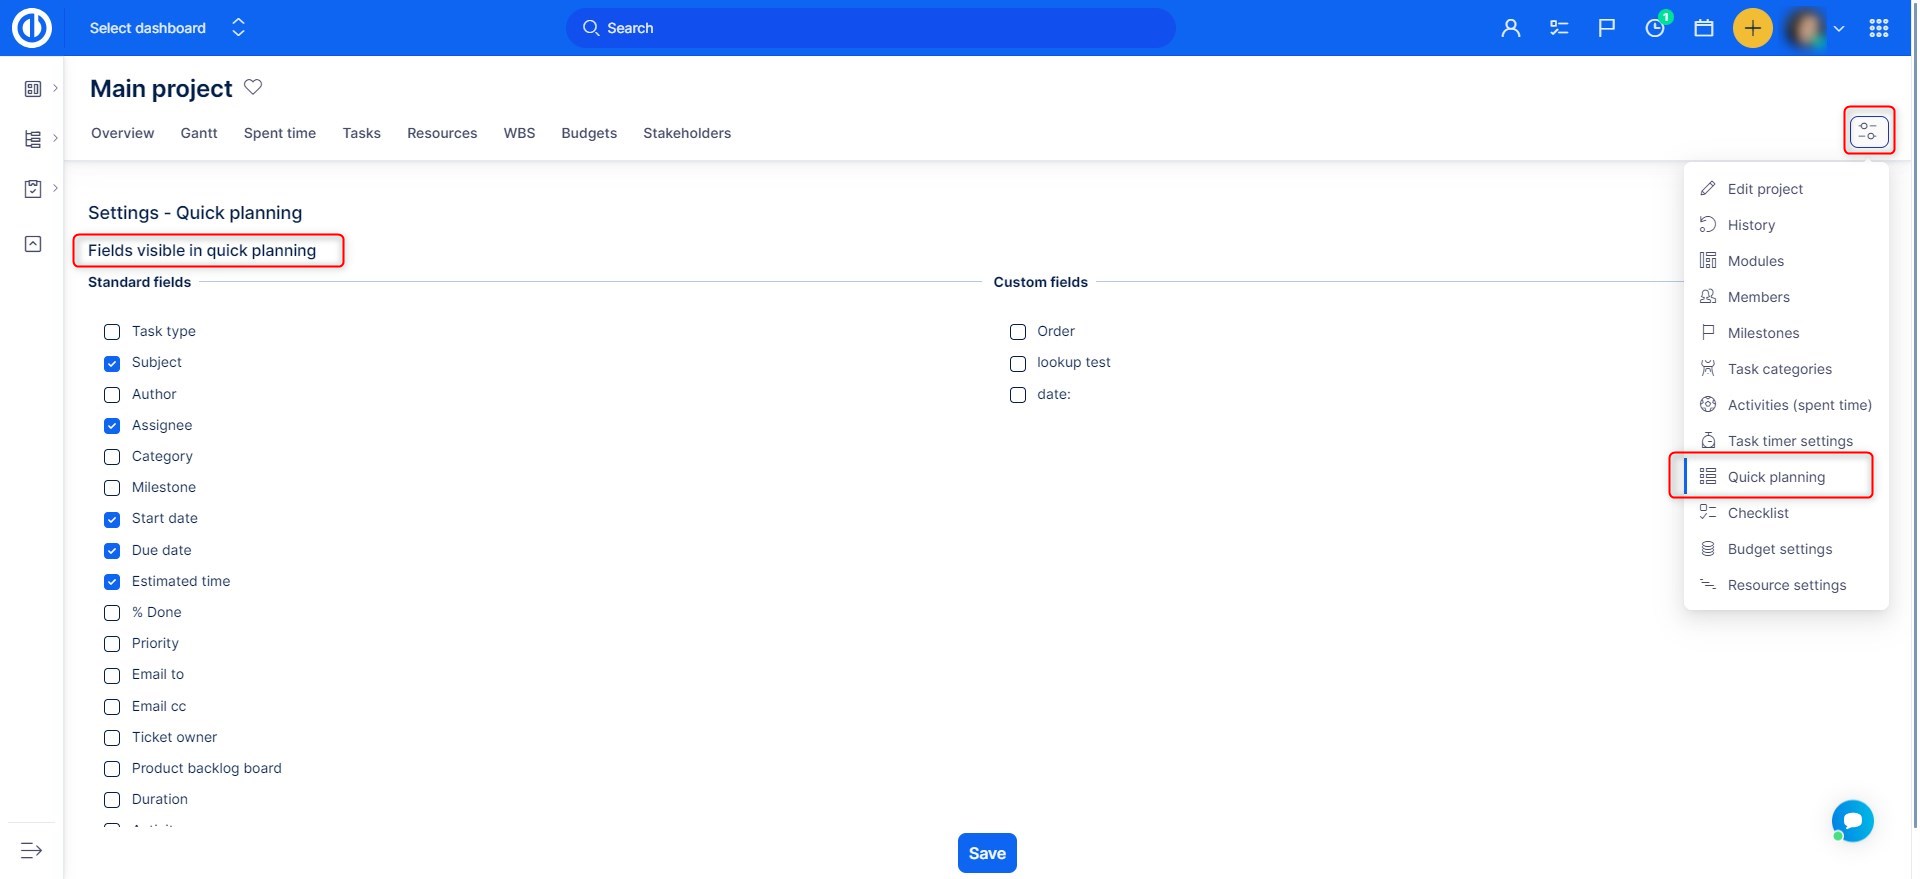
To select which columns are required to fill in when using the Quick planning, navigate to project's Settings >> Quick planning >> Fields visible in quick planning, where you can choose from both standard fields and custom fields. We recommend selecting just about 3 columns co that the Quick planning actually fulfills its purpose, to remain quick and simple.
Option "Update task/milestone/subproject dates according to project start date"
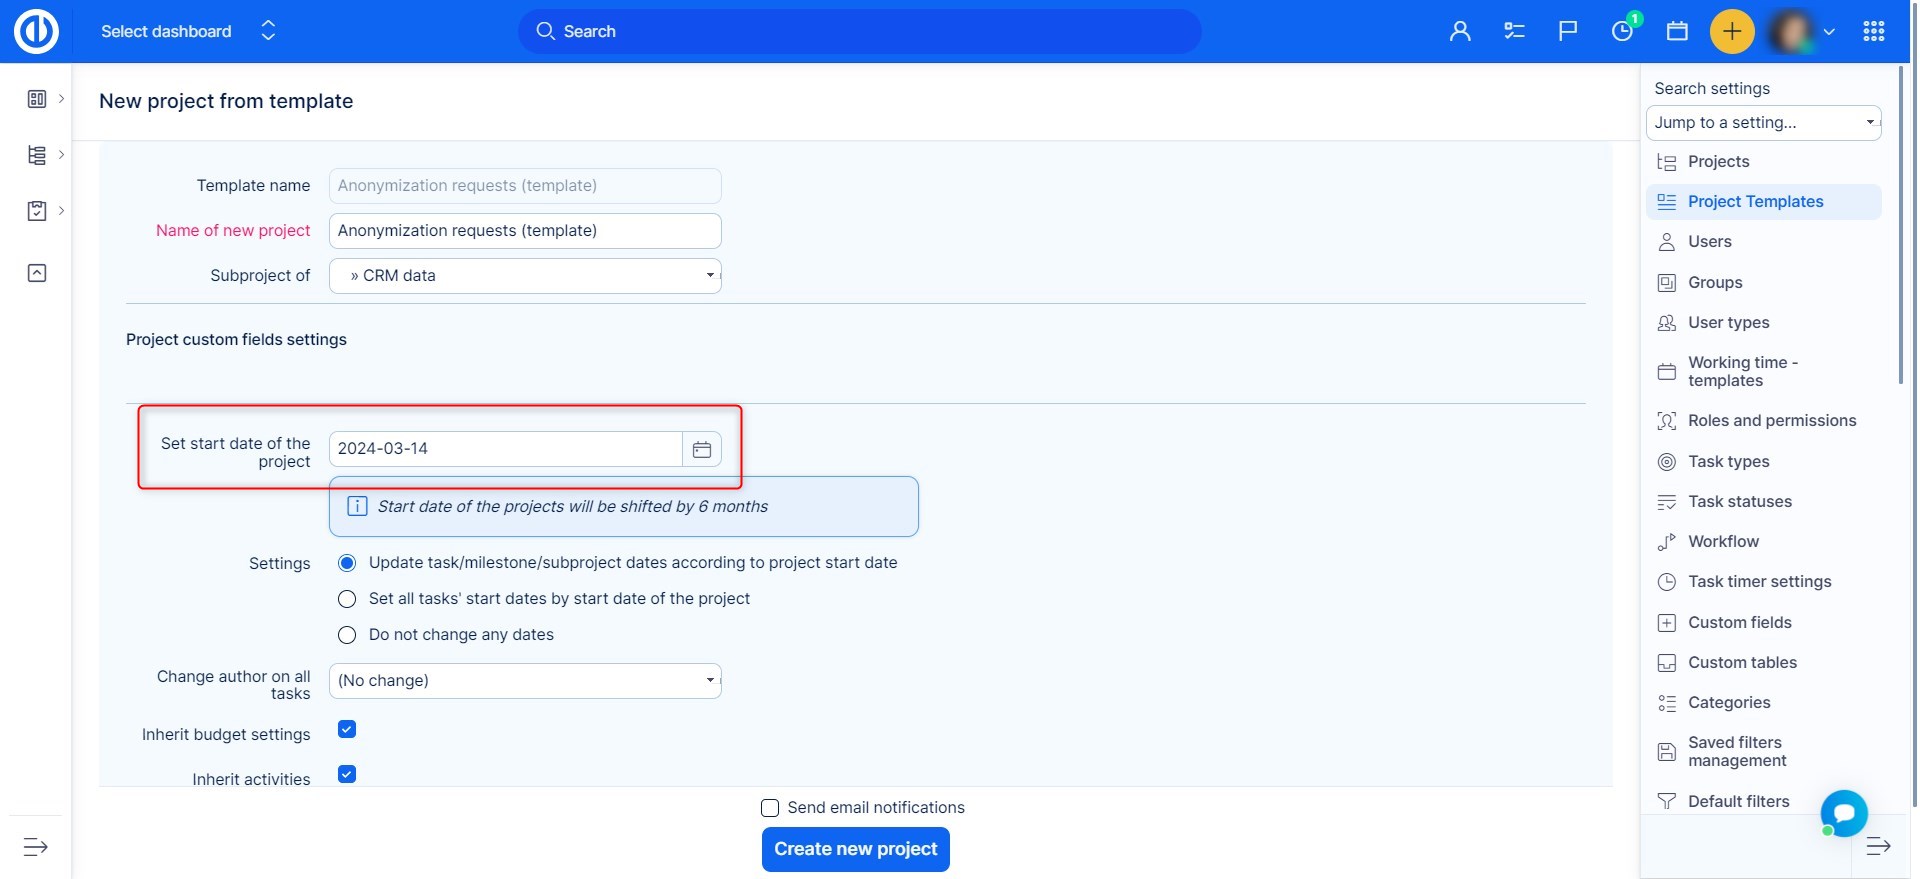
If the option Update task/milestone/subproject dates according to project start date is selected when creating a new project from a template, it is important that the project has specified start and due date (fields must be filled with dates) OR start and due date must be calculated from tasks. It is recommendable that all task in the project template have start and due dates as well, especially in the latter case.
Be careful, the template can lose the start and due date in case that the setting of project start and due date is changed in Administration. Case: The checkbox Calculate project start/due date from tasks is firstly selected and project templates are saved. Later on, the mentioned option for project start/due date is unchecked. That leads to the situation that project start date and due date in the template are missing.
Further explanation of Update task/milestone/subproject dates according to project start date behavior:
This checkbox
- counts the date difference from the original project start date in template and the manually set/pre-filled start date on the form for creation of a new project from template
- according to this difference all relevant dates are moved (e. g. milestones, start/due dates, date of creation of a task)
Example:
Start date project in template: January 1
Start date of the project from template is set to: May 1
A task in the template starts on: February 1
The same task in the new project from template start: June 1
That means that if there is no start date of the project in template, the project start day won’t move according to the start day you set for the new project from template, as you may expect.
Recommendation for data setting in project template based on consultants’ experience:
Sometimes project managers tend to create all thinkable relations among tasks in the project template with the aim to create the best copy the reality. Nonetheless, it is recommendable not to create too many relations among tasks in the template though they may all seem logical. It is better to stick only to those essential. Firstly, the project Gantt view would not be clear anyway. Secondly, it may cause troubles to move tasks in Gantt in the real project.
Copy template into an existing project
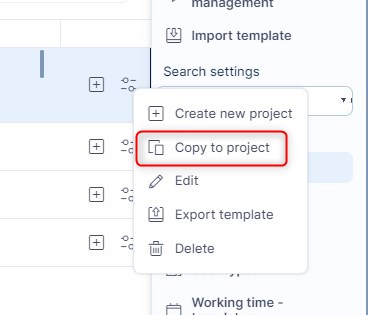
There is an option to copy project template into any existing projects. This option copies and transfers the same data as the "Create from template" option, except for the project settings. For example, all customizable widgets on the project dashboard will be overwritten as well as all data that is linked directly to the project or any of its modules. Moreover, all data (such as tasks, time entries, activities, invoicing, money...) present in the project template will be added to the target project (any existing data of the target project will not be deleted). To start the process, go to Global menu >> Administration >> Project templates. On the list of templates, click right mouse button to the required one and then click on "Copy to project" as shown on the below screen.
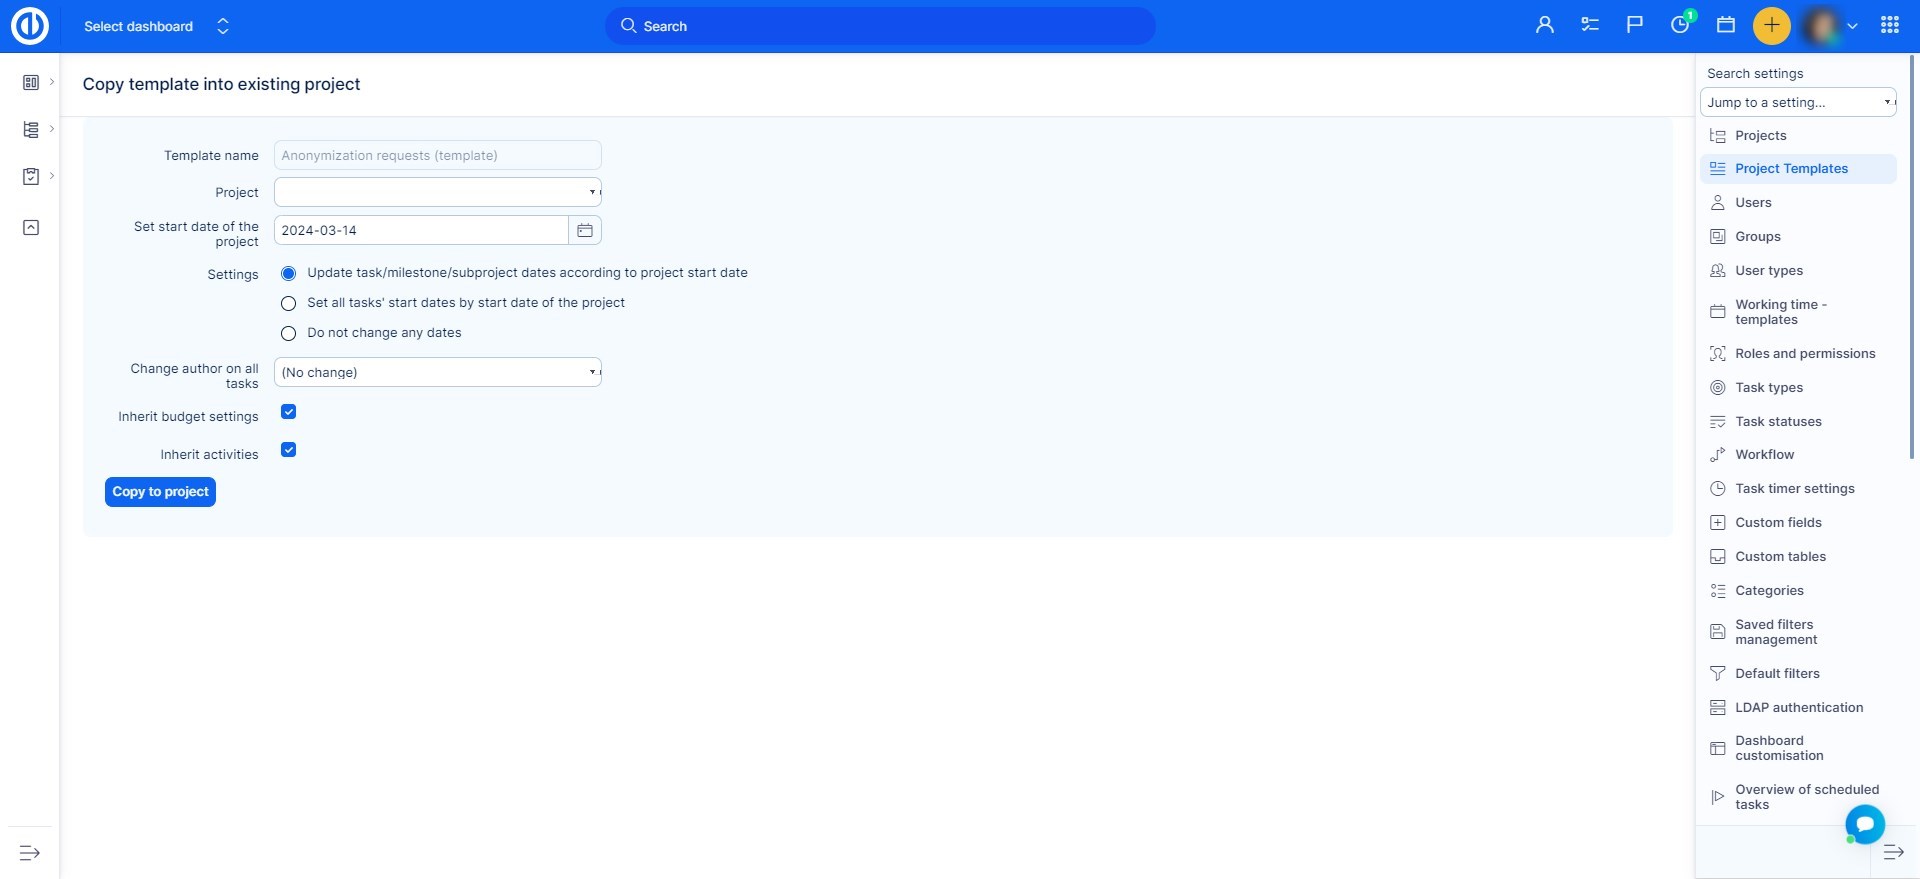
Now there is a form that needs to be filled in. The project template has already been selected but not the target project yet. Choose it from the drop-down menu. Set start date for the project (pre-filled is today). There is a checkbox "Update task/milestone/subproject dates according to project start date", which only relates to tasks, milestones, and subprojects, nothing else. The following checkbox will change tasks' start dates accordingly. Moreover, there is a possibility to change author on all tasks by selecting him from the drop-down menu. Inherit activities, invoicing settings and money settings means that the target project will inherit all this data from his parent project (if having any). When everything is set up correctly, just click on the green button "Copy to project".
To summarize how it works:
- Completely rewritten from template - Project dashboard
- Changed settings - Comments on tasks are private by default and Enable copying of task comments to parent task
- Newly created data - saved filters, wiki, milestones, task categories, tasks, members, documents, spent time, news, project status, custom project menu (widgets), calculation, checklists, contacts, knowledge, budgets, budget rates priorities and test cases.
All existing data of these types on the project are kept.
Bulk edit of projects
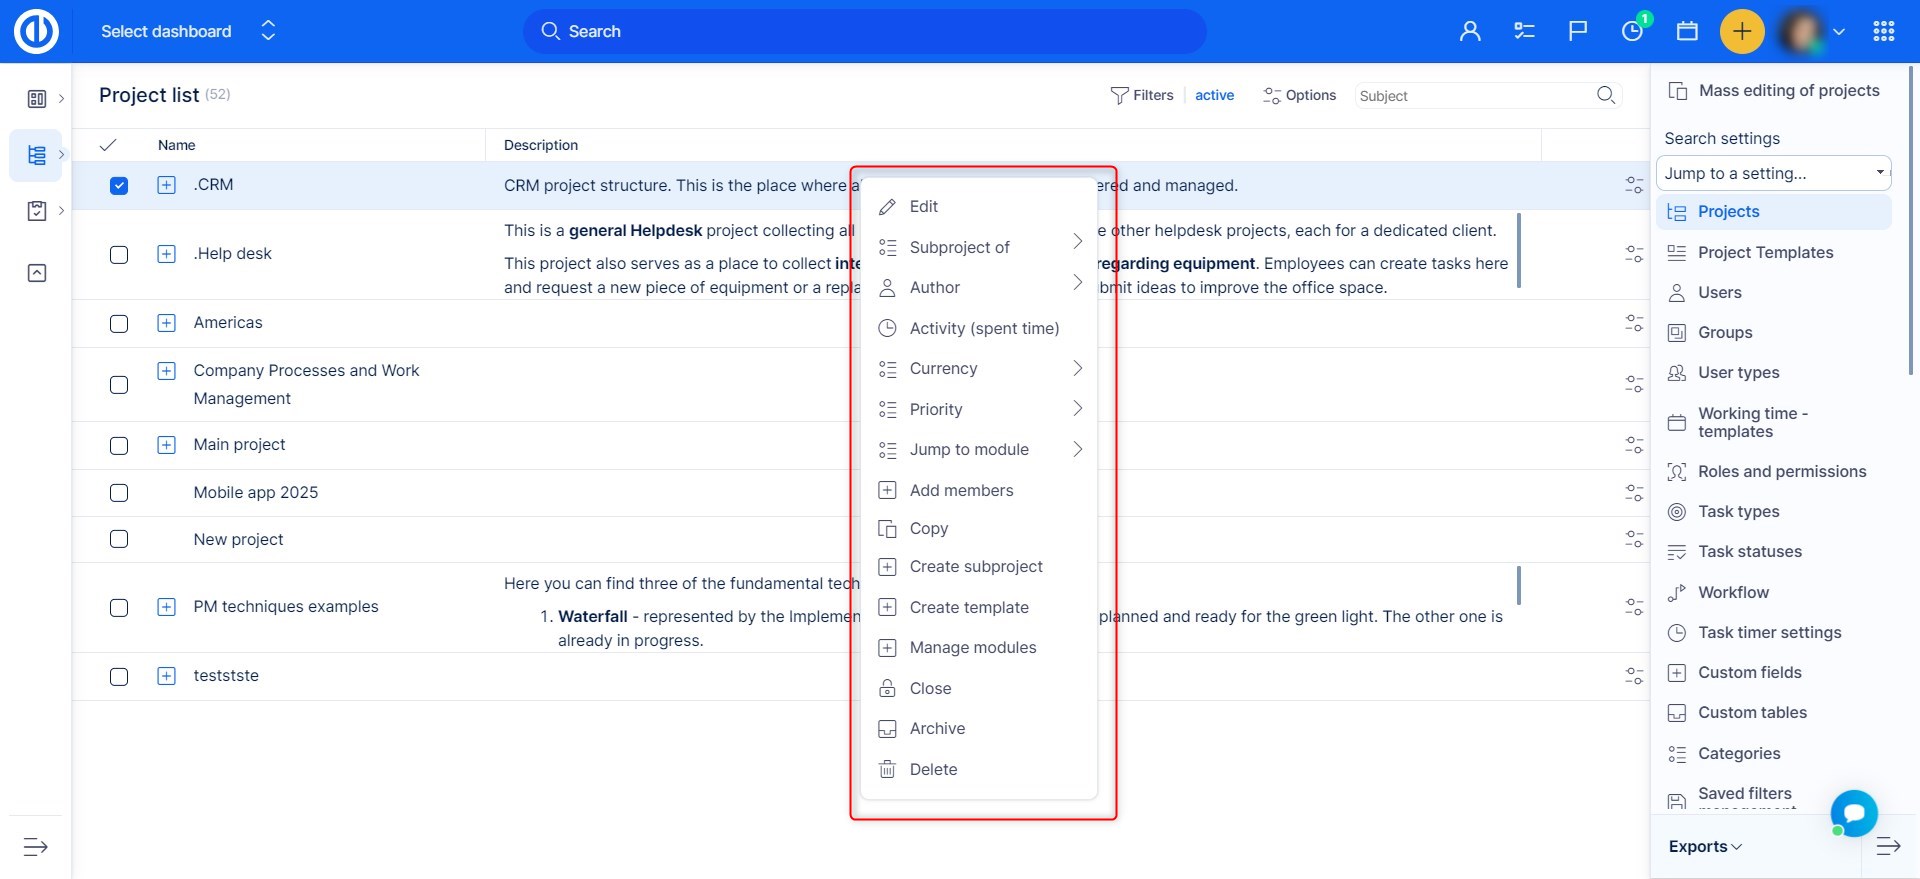
On the project list, use CTRL + left mouse button to mark more projects. Then click the right mouse button to display the context menu. Here you can make a change that will apply to all the selected projects at once, such as archive/close projects or add/remove modules.
Close project possibilities
When finishing the project, you have the following options available in the context menu of any project under Administration >> Projects:
1) Close the project
The closed project is read-only, nobody can change anything in the project. Only people with the permission "Close / reopen the project" can reopen. The project is still visible in the project list in the menu (for all former project members). Spent time reports still include time spent on this project. When to use? When you need to access the project easily for lessons learned. Because of spent time reports
2) Archive the project
The archived project is accessible only for admin. Admin can Unarchive the project. The project is not visible in the project list but can be found under Administration >> Projects - filter for Archived. Only spent time entries can be seen on this project, any other information is hidden. When to use? For a project that you no longer need to access, but do not want to lose the data completely
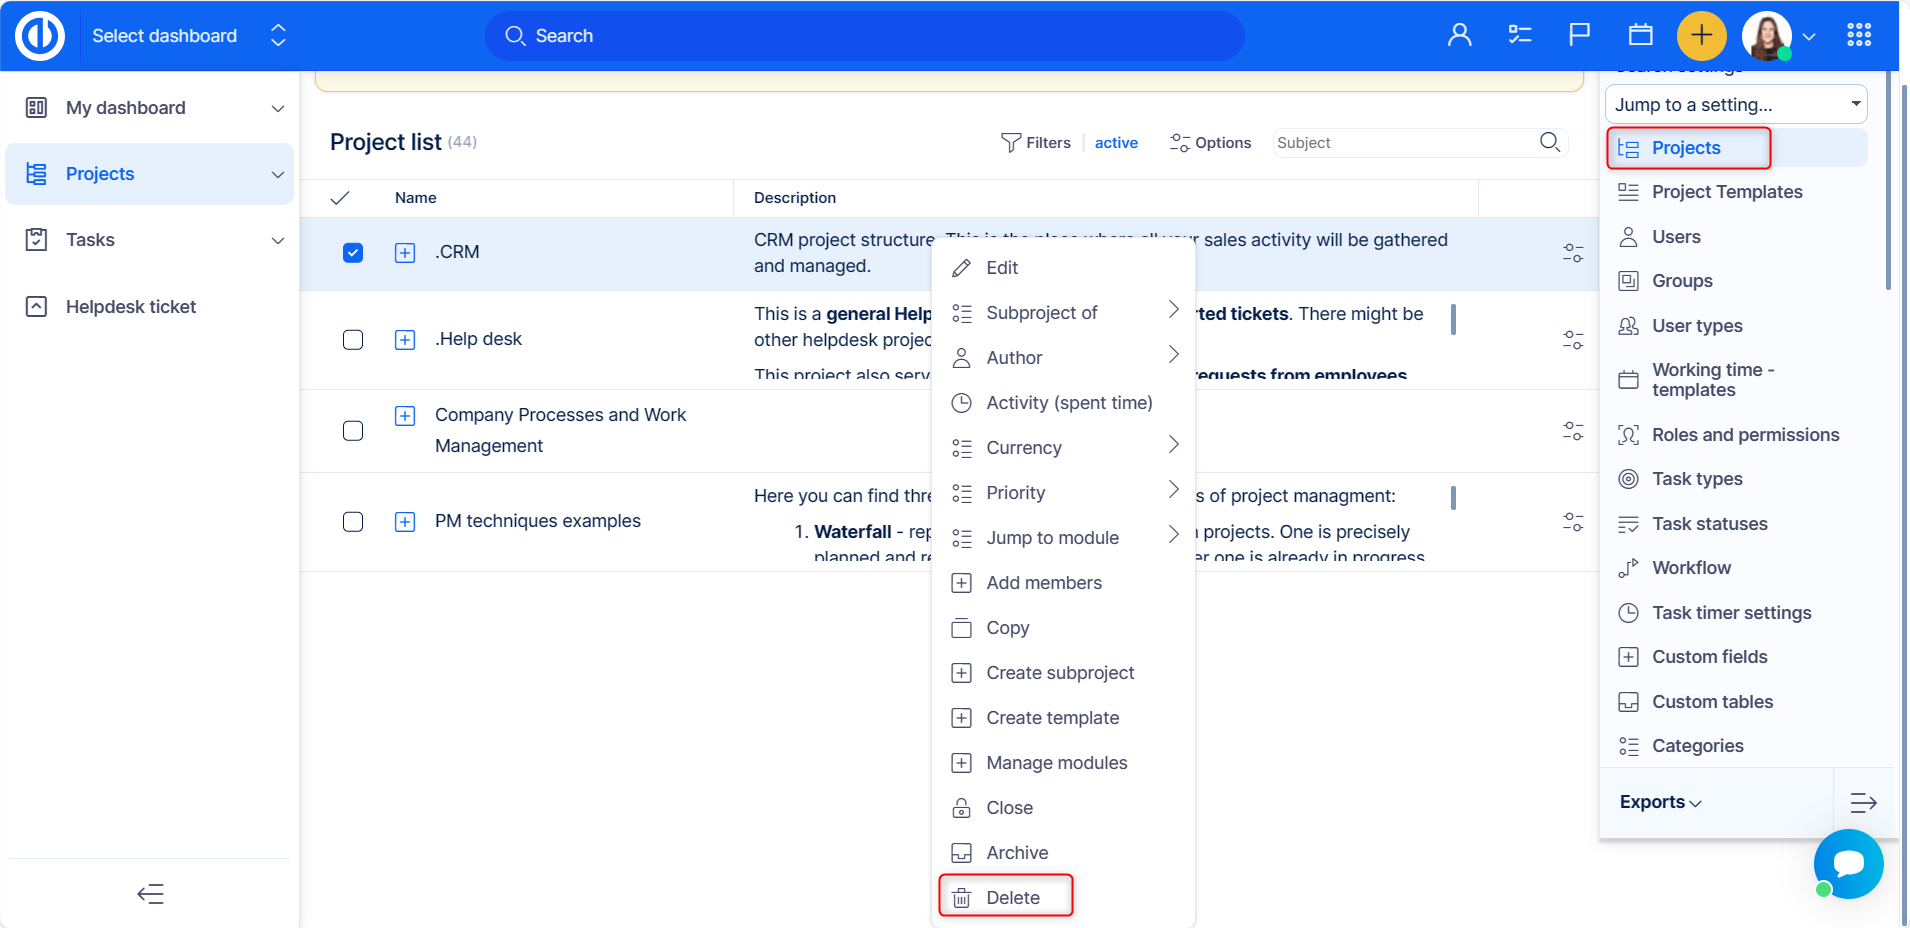
How to delete the project
Please be aware that project deletion is an irreversible process, and it cannot be undone or restored anymore!
Only administrators have the authority to delete a project.
To delete the project, simply right-click on it within the admin >>projects section and follow the instructions (the project's name must match with all the spaces in its name).
Public projects and anonymous access
What are public projects
Public project are visible to all users in the system, you do not have to be a member of the project to be able to see and access it. If your Easy Redmine system doesn't require users to log in, this project is visible also to visitors who haven't logged in - anonymous users.
Anonymous access can be useful if you wish to enable for people without login to have access to certain information in your system. We advise making sure information you give access to are not sensitive. Anyone with a link to the app will have access to this information.
How to make a project public
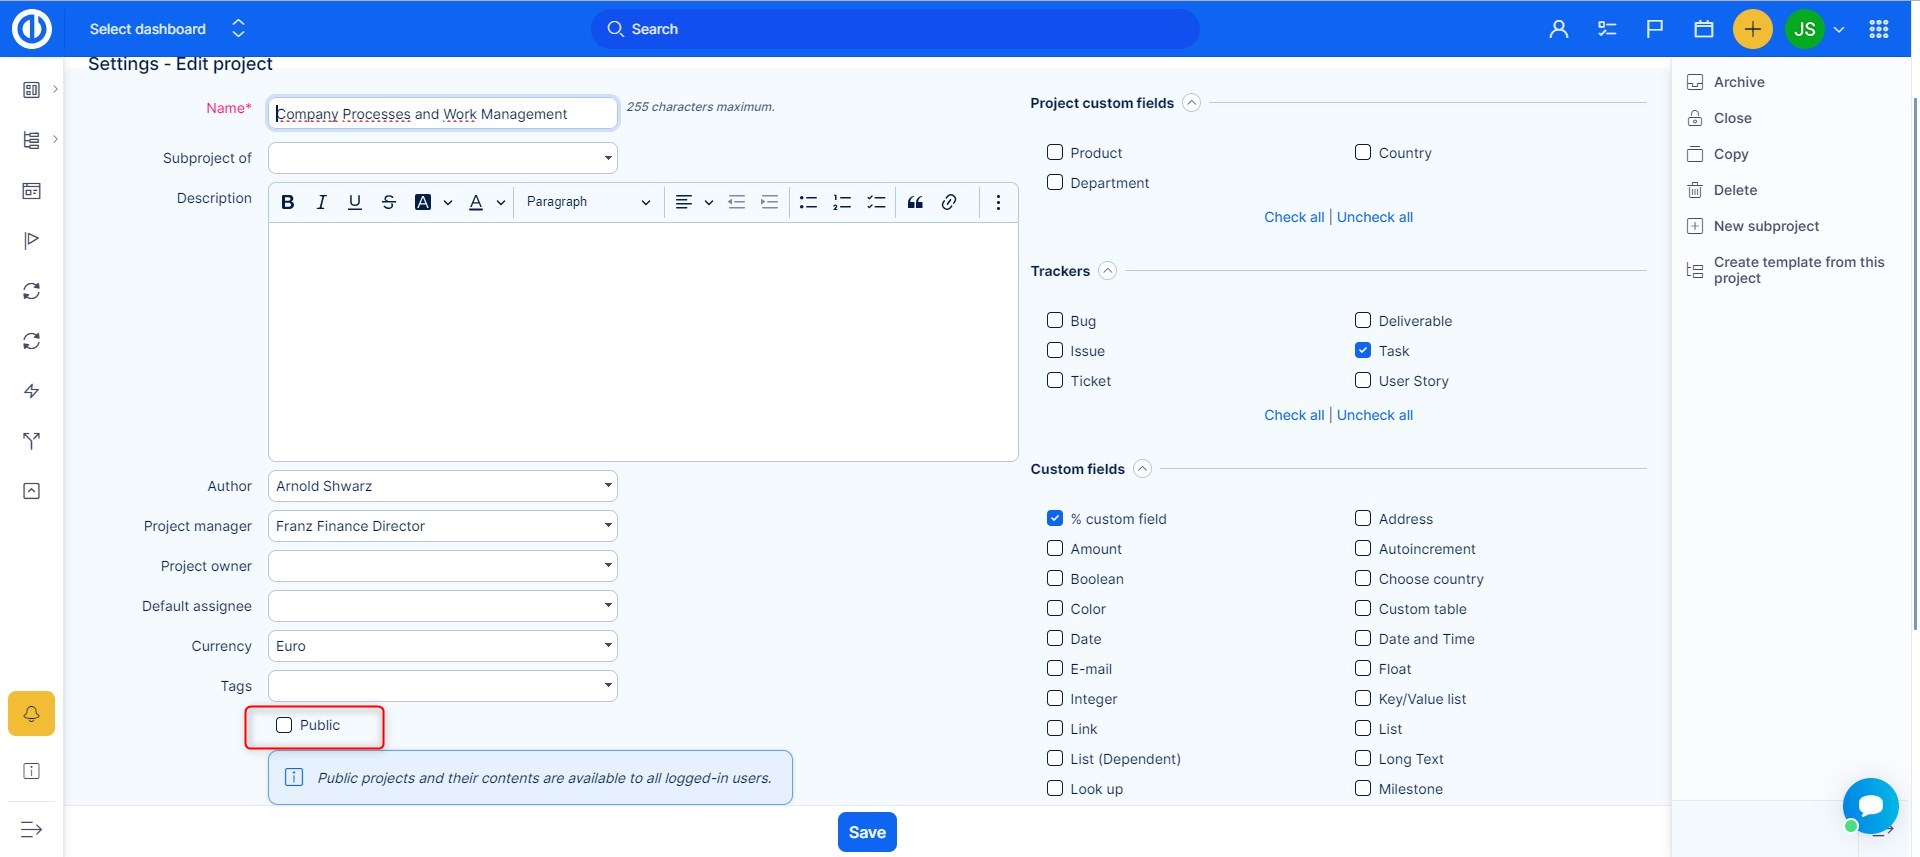
If you wish to set a project as Public, follow these steps:
- Go to a specific project, which you want to give access to. Open project settings and mark it as public
- Give the link to your project to the person and he will be able to see it like this without the need to log in
How to enable anonymous access
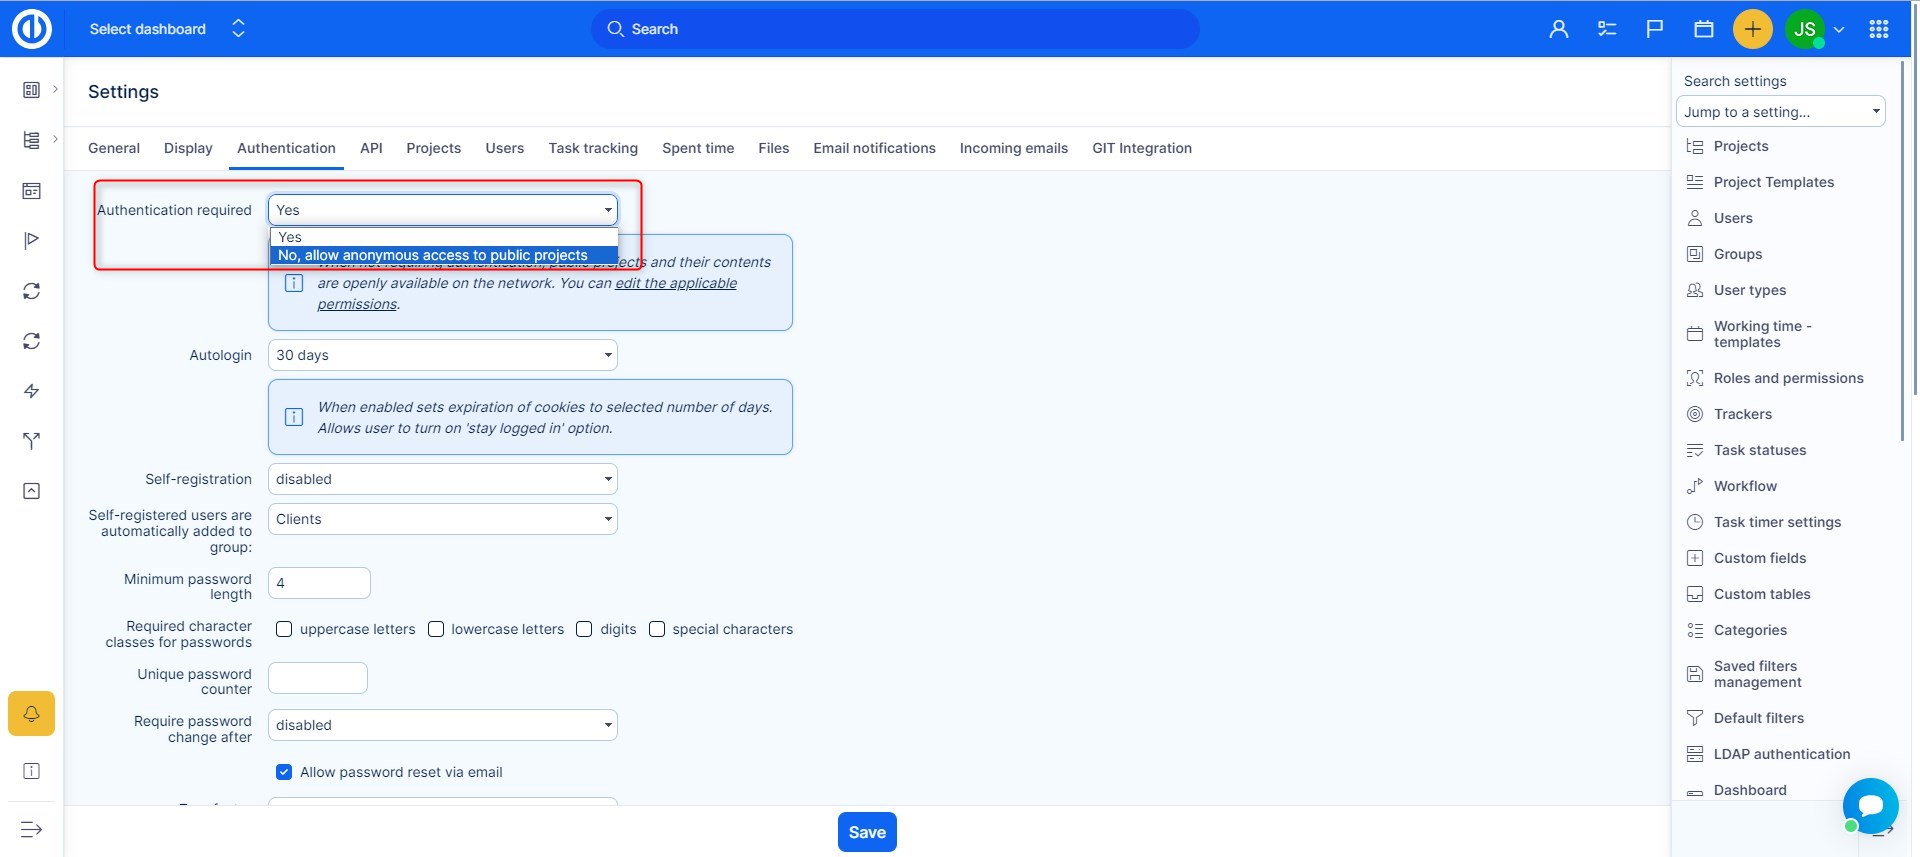
Go to Administration >> Settings >> Authentication
Here, find the Authentication required field and make sure it is unchecked.
Setting permissions to anonymous users
Go to Administration >> Roles and permissions and find the Anonymous role.
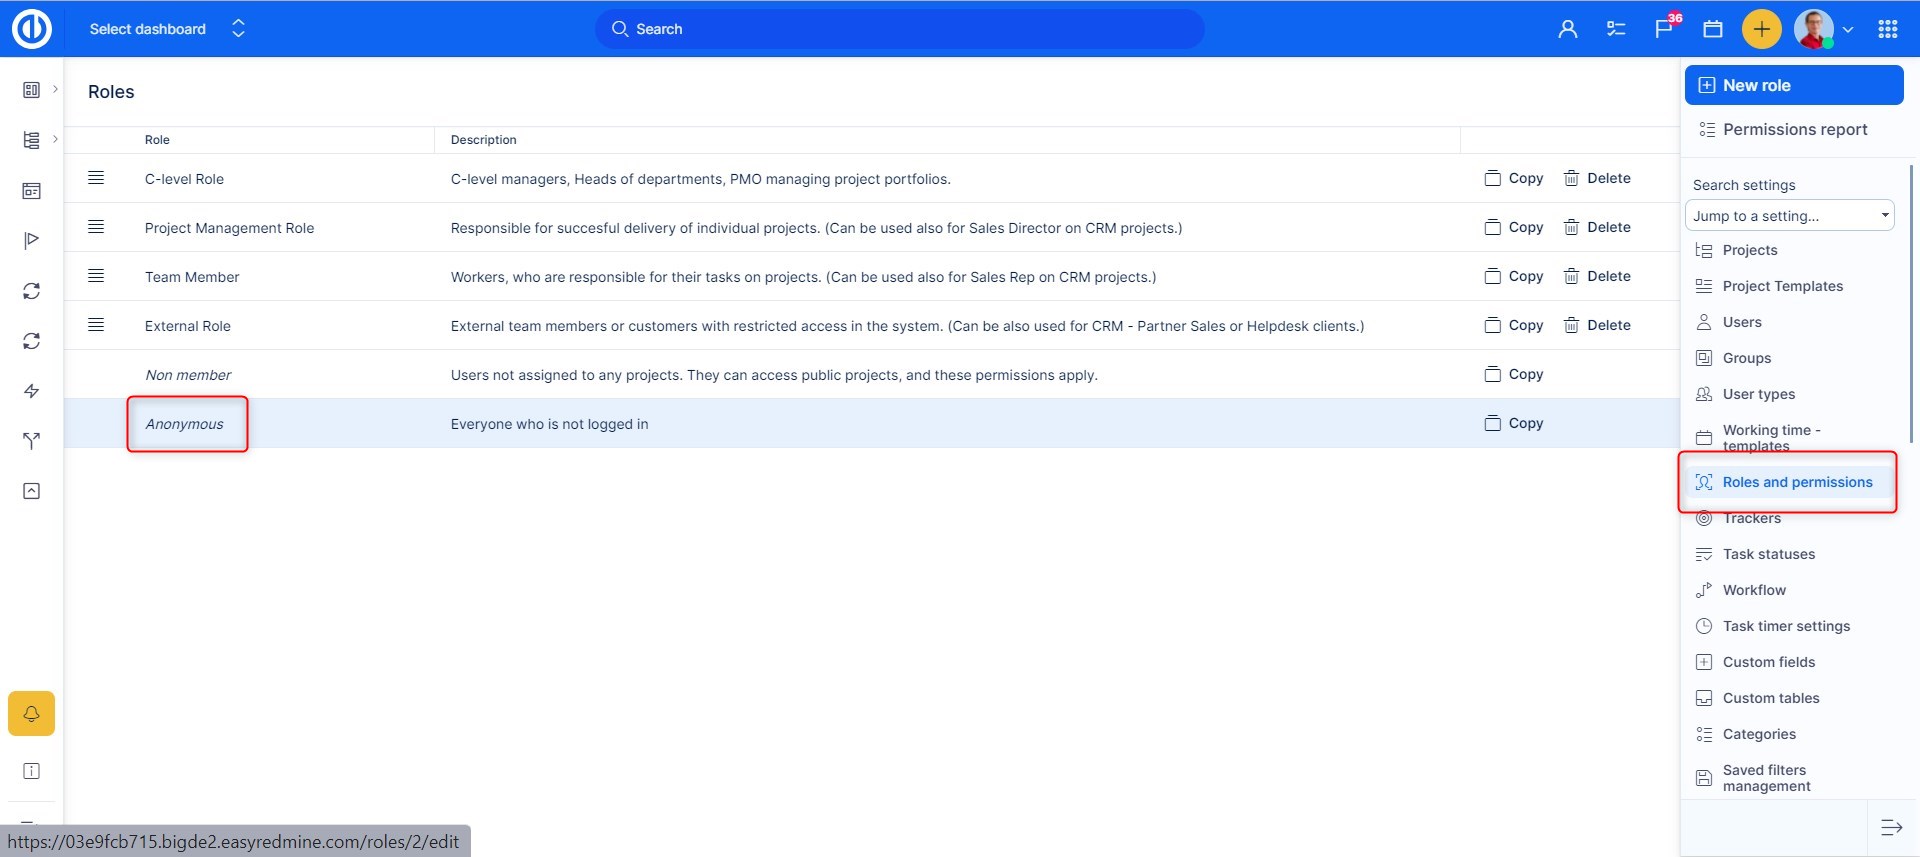
In the roles, check what you wish an Anonymous user to do - usually they should view projects and tasks (they will only see public projects and public tasks and within them only public comments and updates.)
How to set up a dashboard for an anonymous user
This can be done as on any user's profile edit via the "My dashboard" tab.
First you need to find the actual user, you can do this the following way.
- Go to Administration >> Users
- Open filters and add the following filters: Status is not active, Last name is Anonymous
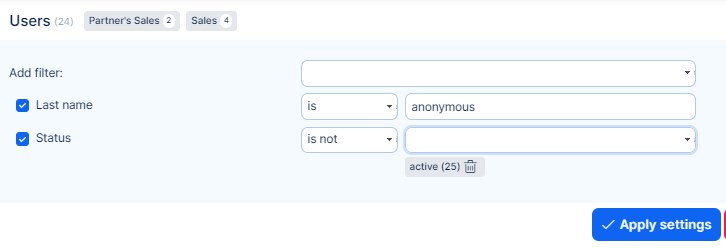
- Edit the user which appears in the results.
- Open the "My dashboard" tab
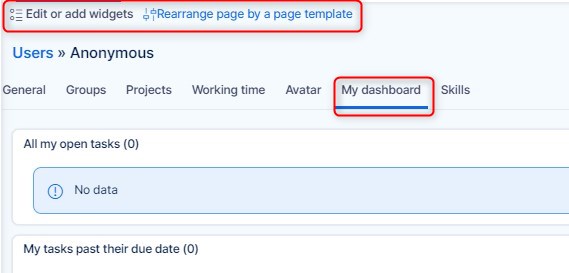
- Set up the dashboard as you see fit.
Further, you can edit the left menu of the user by giving the user a specific User type in the user edit.
Please find more on how to manage user types in the following article : User types
How to use project statistics
If you want to have even more control over your projects, there are Project Statistics. On the project dashboard you can set a panel with some basic statistics.
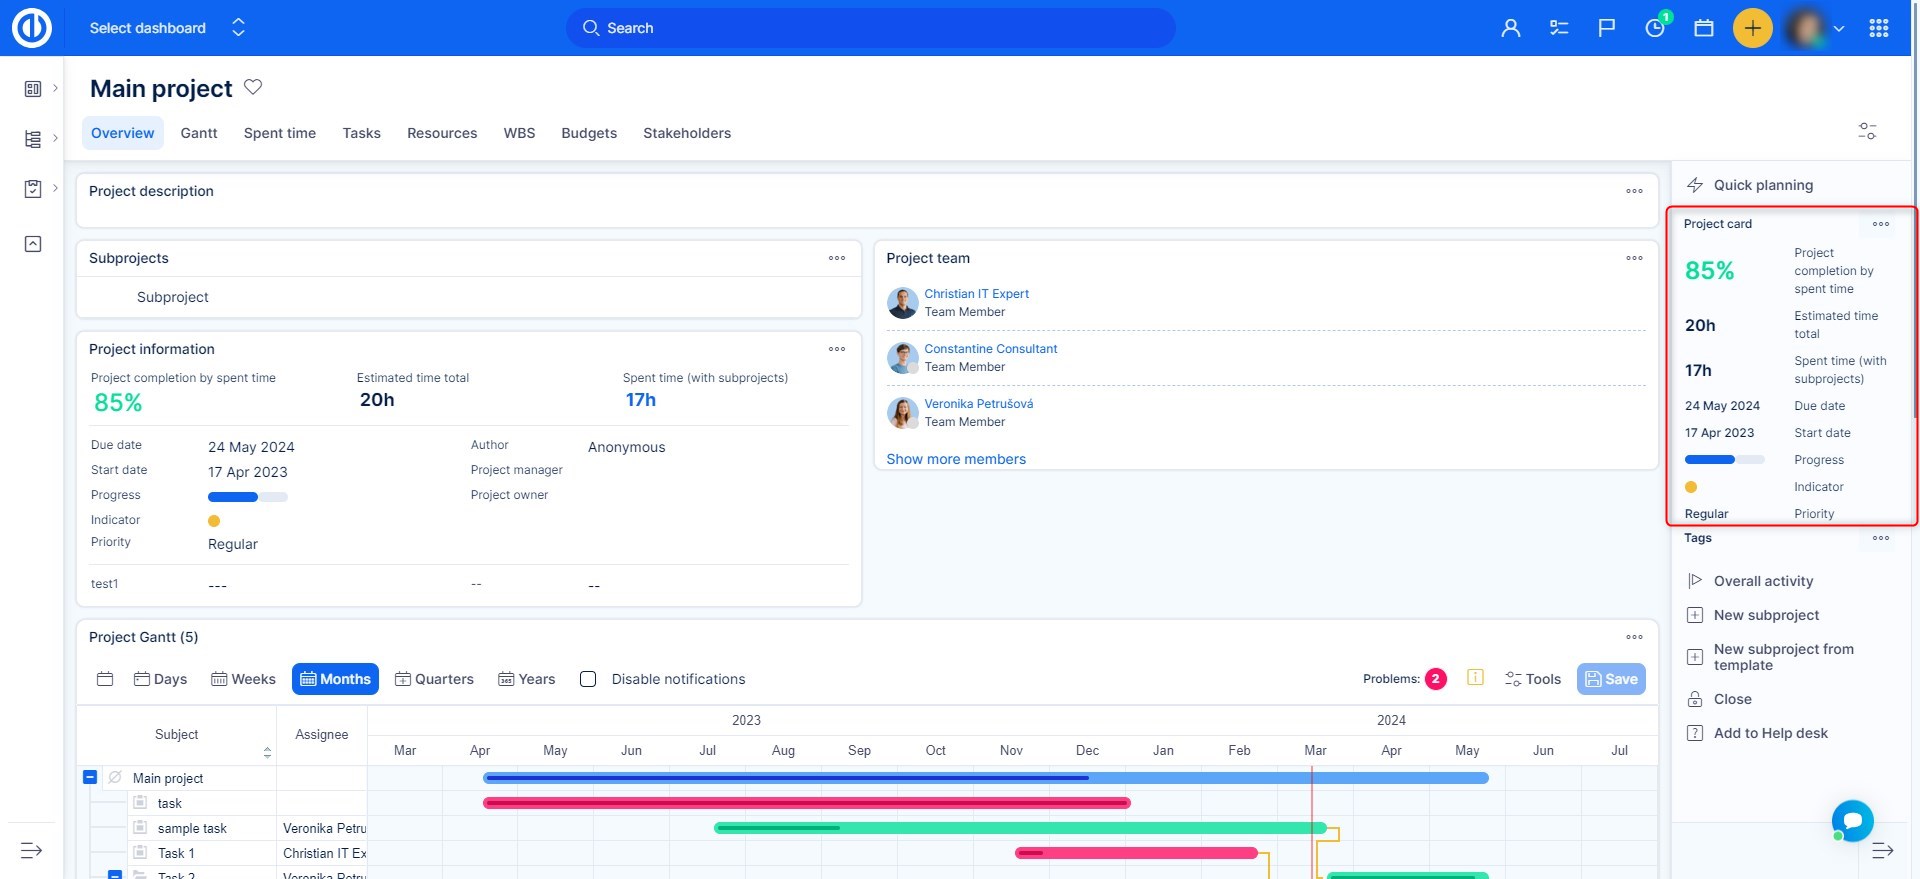
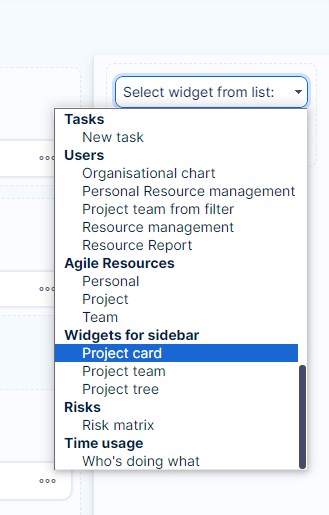
To see this panel, you have to first find the Personalize this page button, it is usually on the bottom left of the project dashboard. In the personalization, you will find series of boxes in which you can choose what you want to see. The options are categorized, so you can find it quicker.
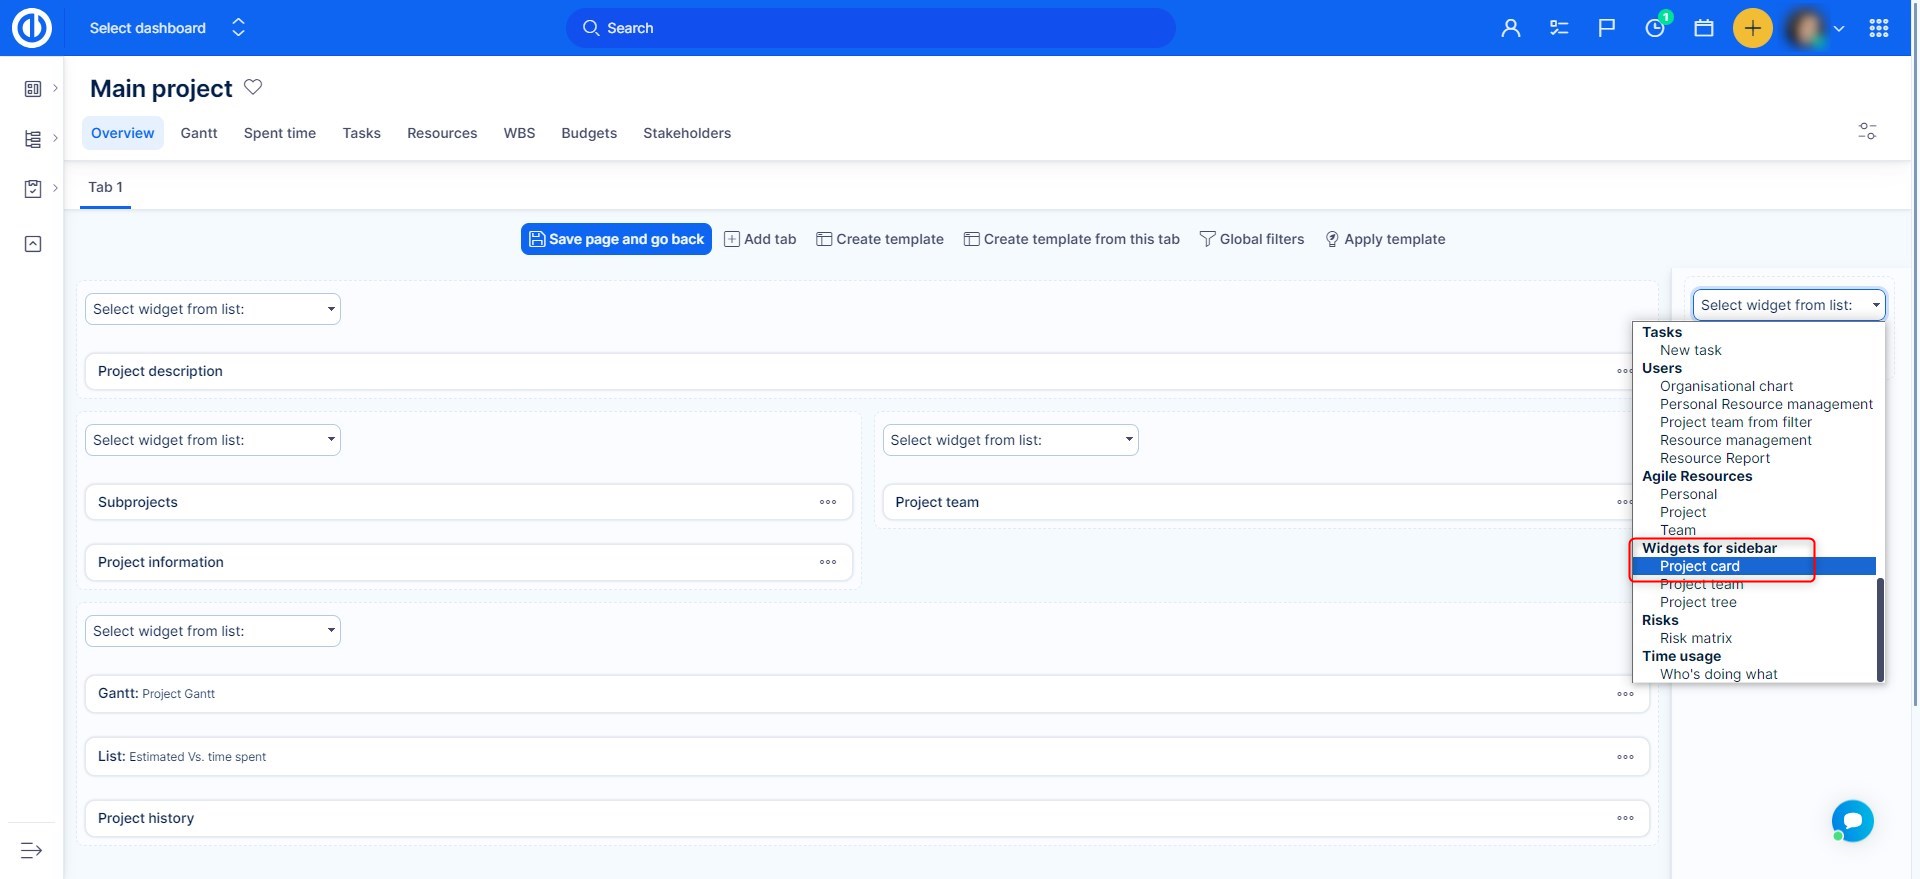
After that just click "Save page and go back" on the top left. You will see the sidebar above with all the basic information about this particular project. Let's get back to what this sidebar contains.
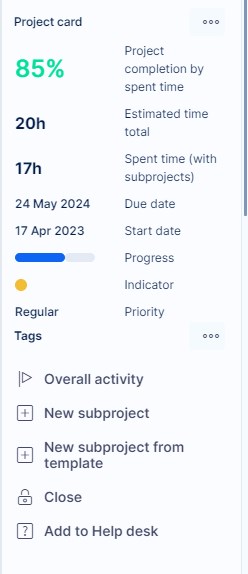
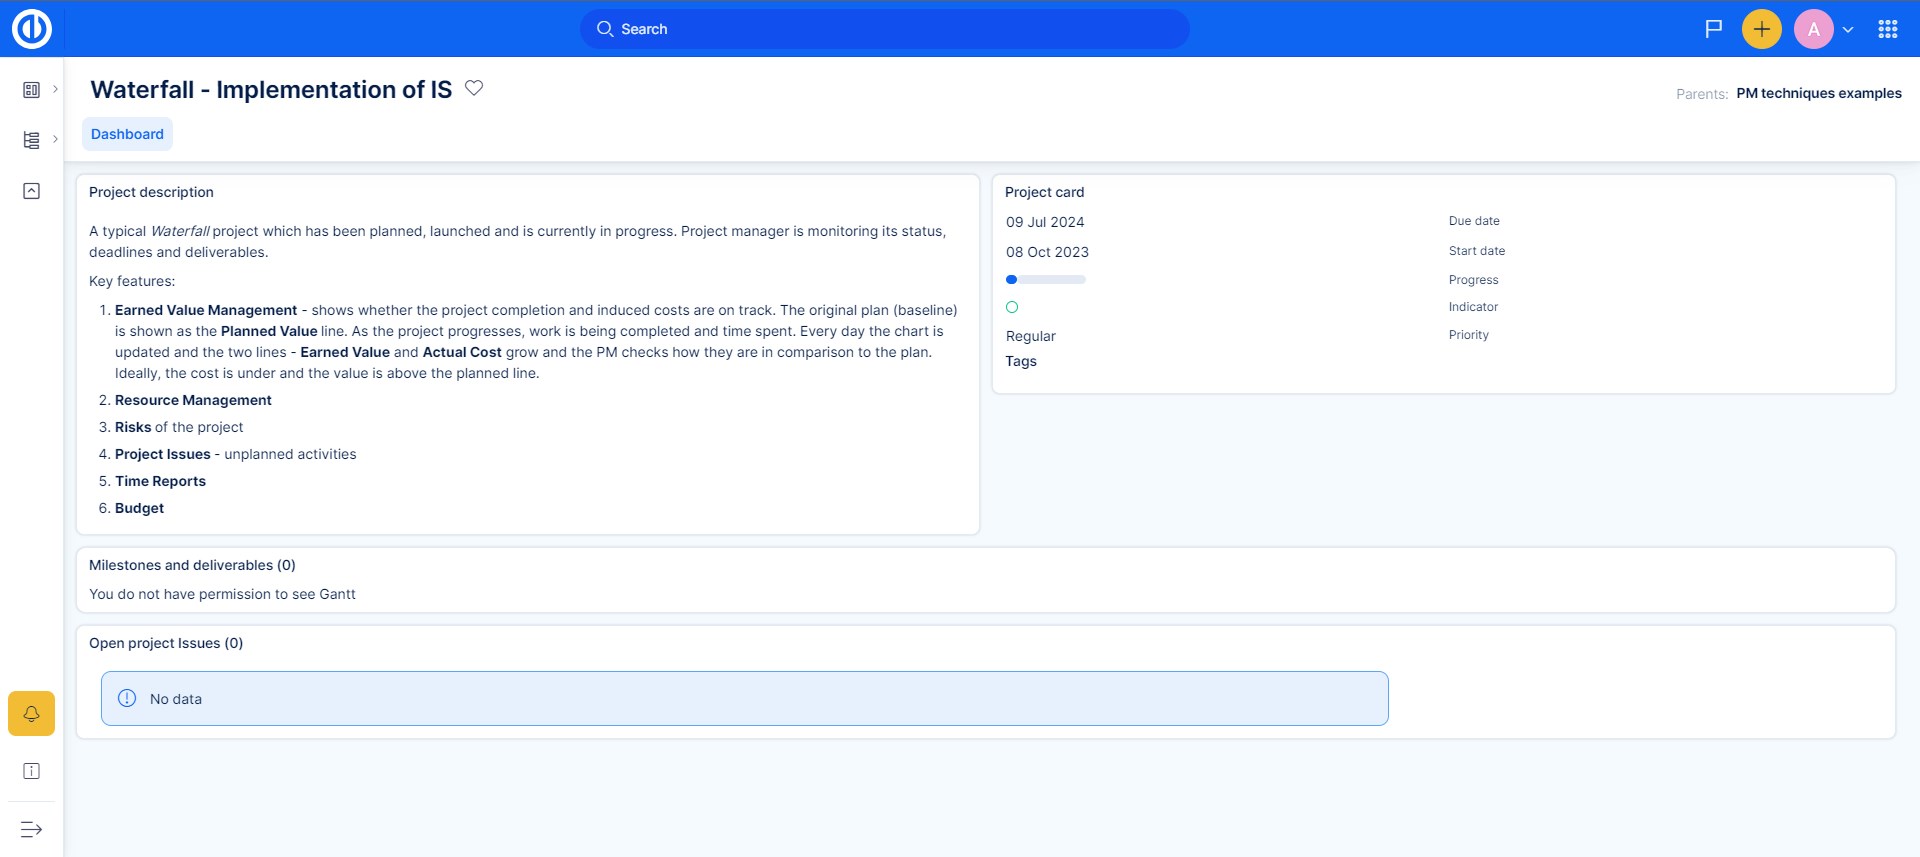
Due date, estimated time and spent time - you can find a description in another knowledge base post. Indicator = thanks to this, you can watch if there are any tasks in this project overdue. If they are overdue, the indicator will turn orange. If everything goes according to plan it will be green like you can see here. And if the project passes its own due date, the indicator will turn red. If you make a project as planned, the indicator will be always green, no matter the circumstances. Overall activity = you will see all activities made in this project in one list.
project completion done ratio
To see project completion (% done ratio) within the dashboard of a particular project, first you need to add project card widget using "Customize this page" button down on the Project dashboard.
When added, click on the green button "Save page and go back". The project card box then appears in the sidebar of the Project dashboard, as illustrated below.
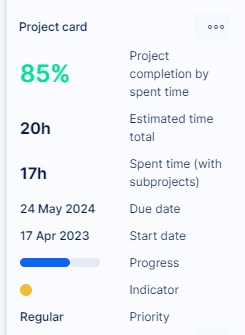
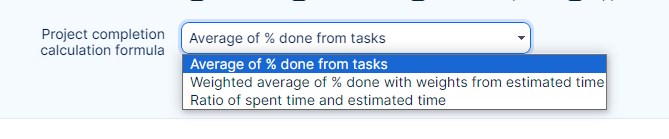
The project completion (% done ratio) can be calculated using 3 different methods as shown below. You can select one of them in Global menu >> Administration >> Settings >> Projects - Project completion calculation formula.
Project e-mail notifications and overall activity
How to set project notifications and overall activity
Default events for overall activity on a project
How to set project notifications and overall activity
You can have control over the notifications which are being sent to you. To set the default notifications, navigate to Administration >> Settings >> E-mail notifications. Here you can set a notification e-mail address (FROM). This address doesn't have to exist, whatever you enter will appear as the e-mail sender. However, make sure it has a correct e-mail form: something@somewhere.com. If you prefer plain-text notification e-mails instead of standard HTML-formatted e-mails, tick the checkbox "Plain text mail (no HTML)".
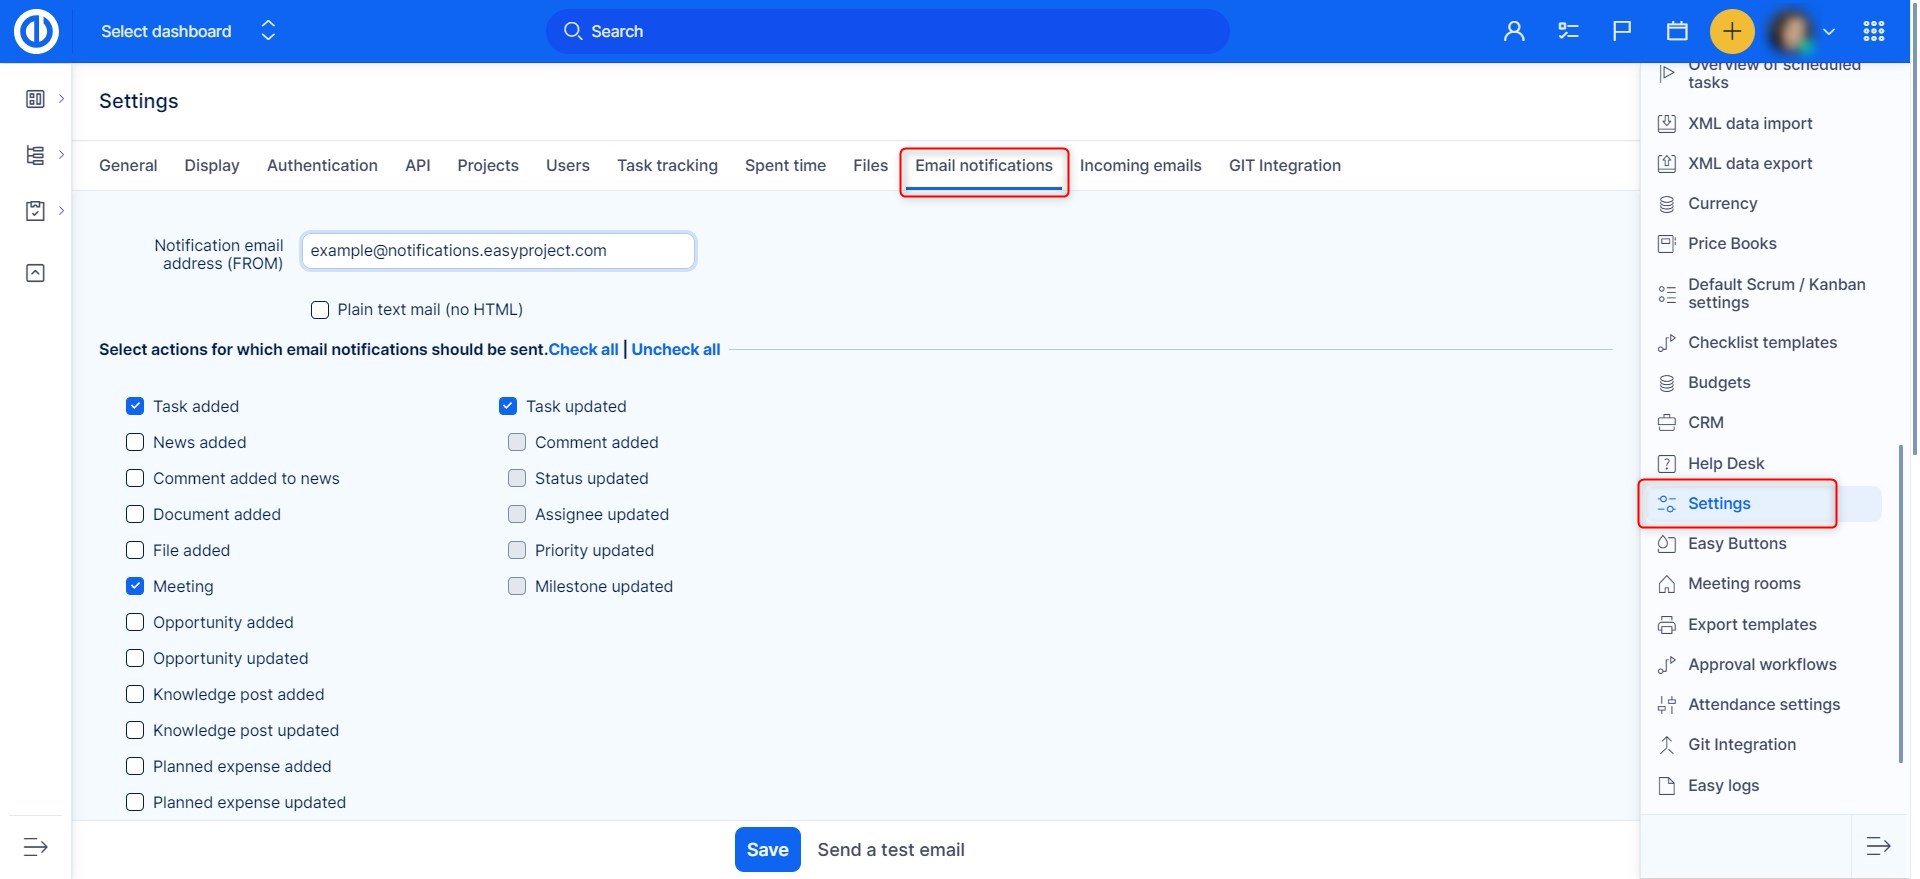
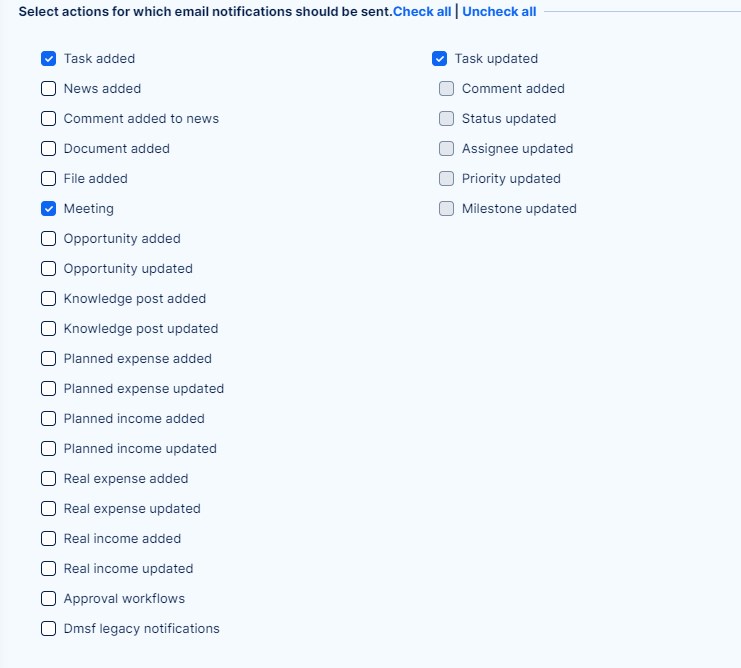
Select actions for which e-mail notifications should be sent.
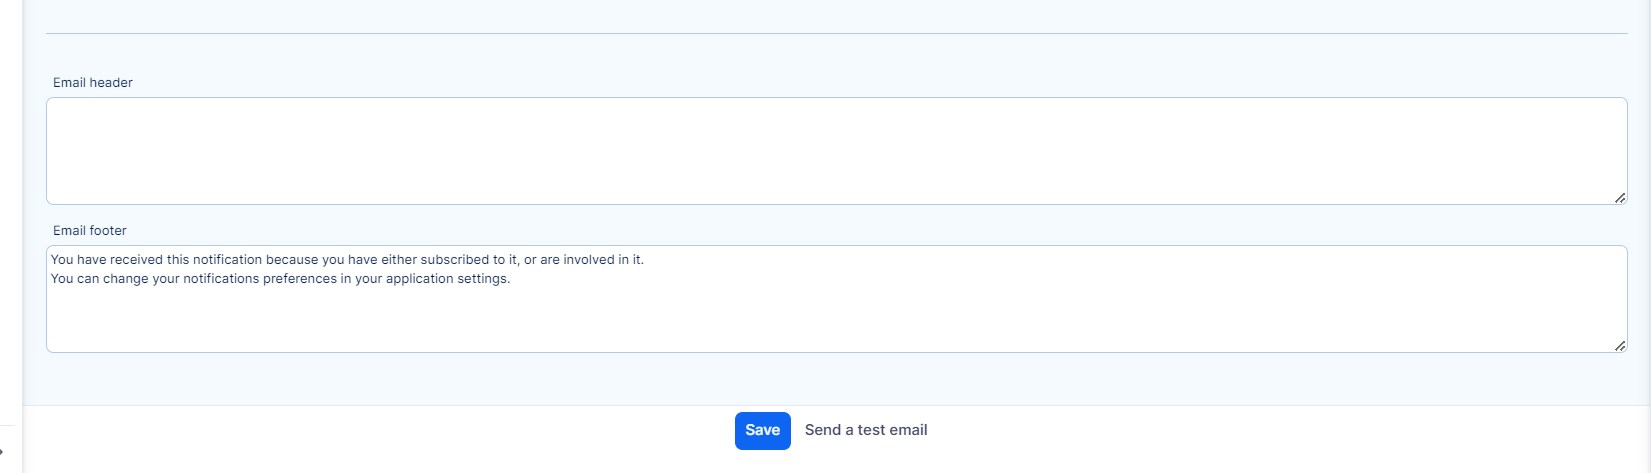
You are also able to personalize the e-mail a bit by adding a header and footer.
A user is also able to modify the notification settings by himself on his user profile, if he has permission to edit his profile. (More details are in the following section Email notifications of a user)
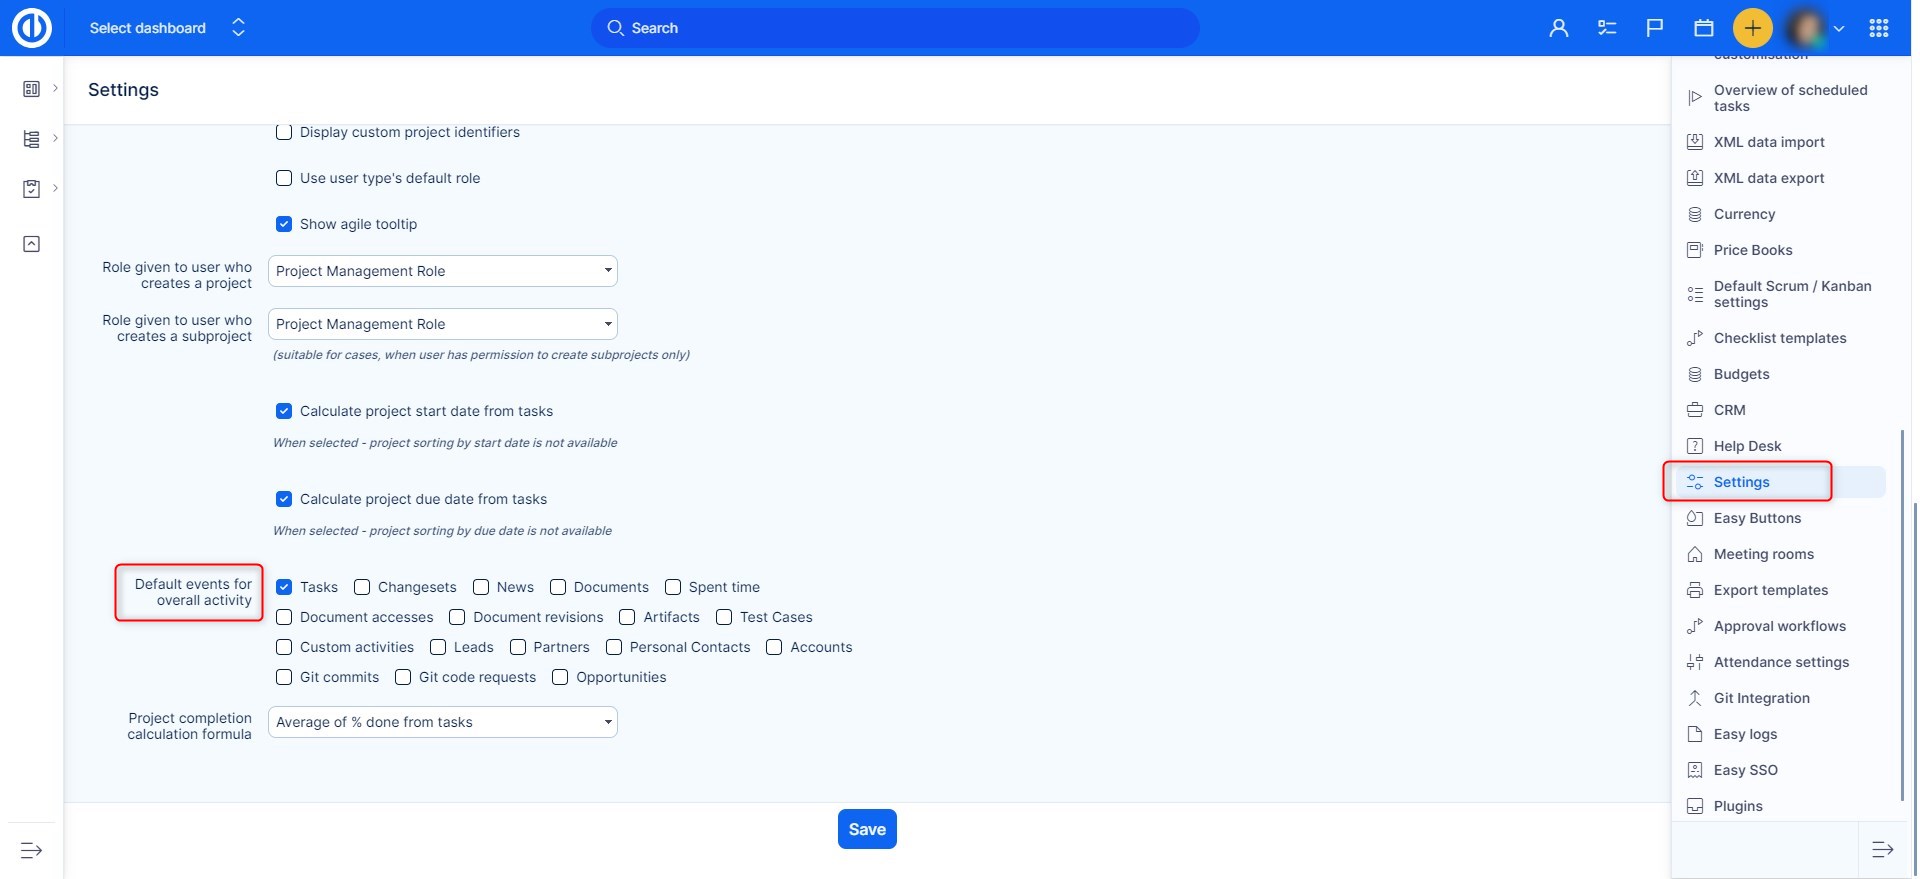
Default events for overall activity on a project
To configure which types of activity should be visible in the "Overall activity" view of a project by default, navigate to Administration >> Settings >> Projects - Default events for overall activity. Here you check the requested activity types and save them.
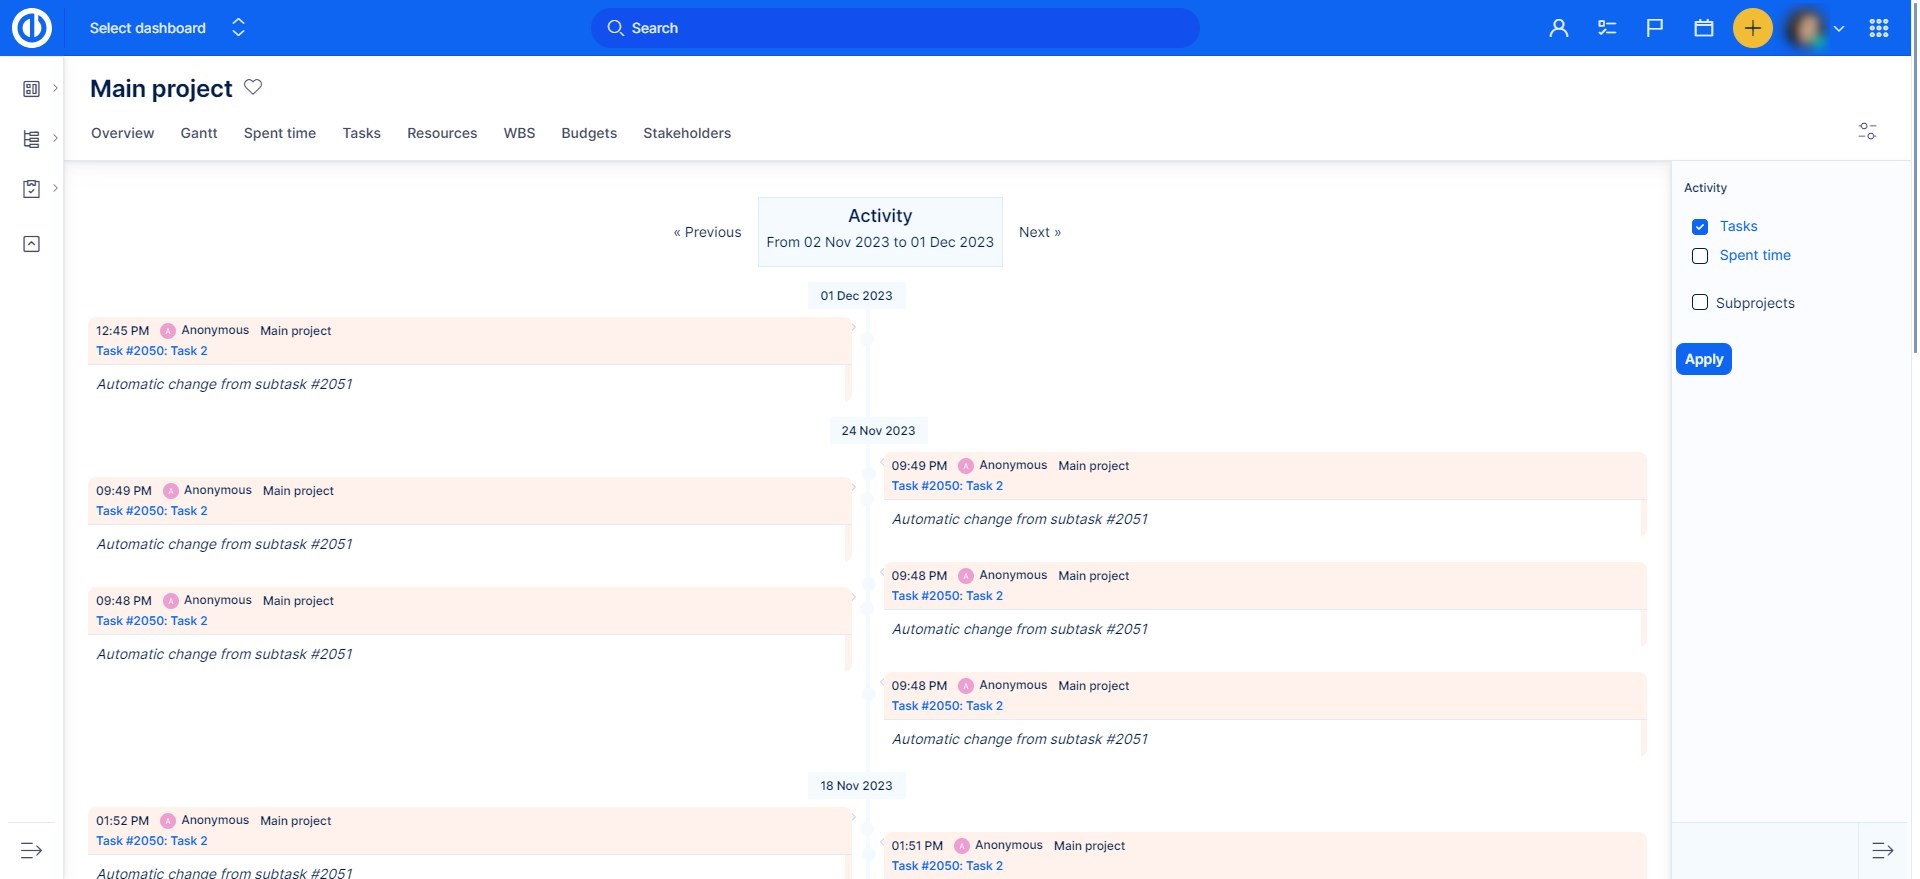
To see the "Overall activity" view of a project, go to the project main page and click the "Overall activity" button in the sidebar.
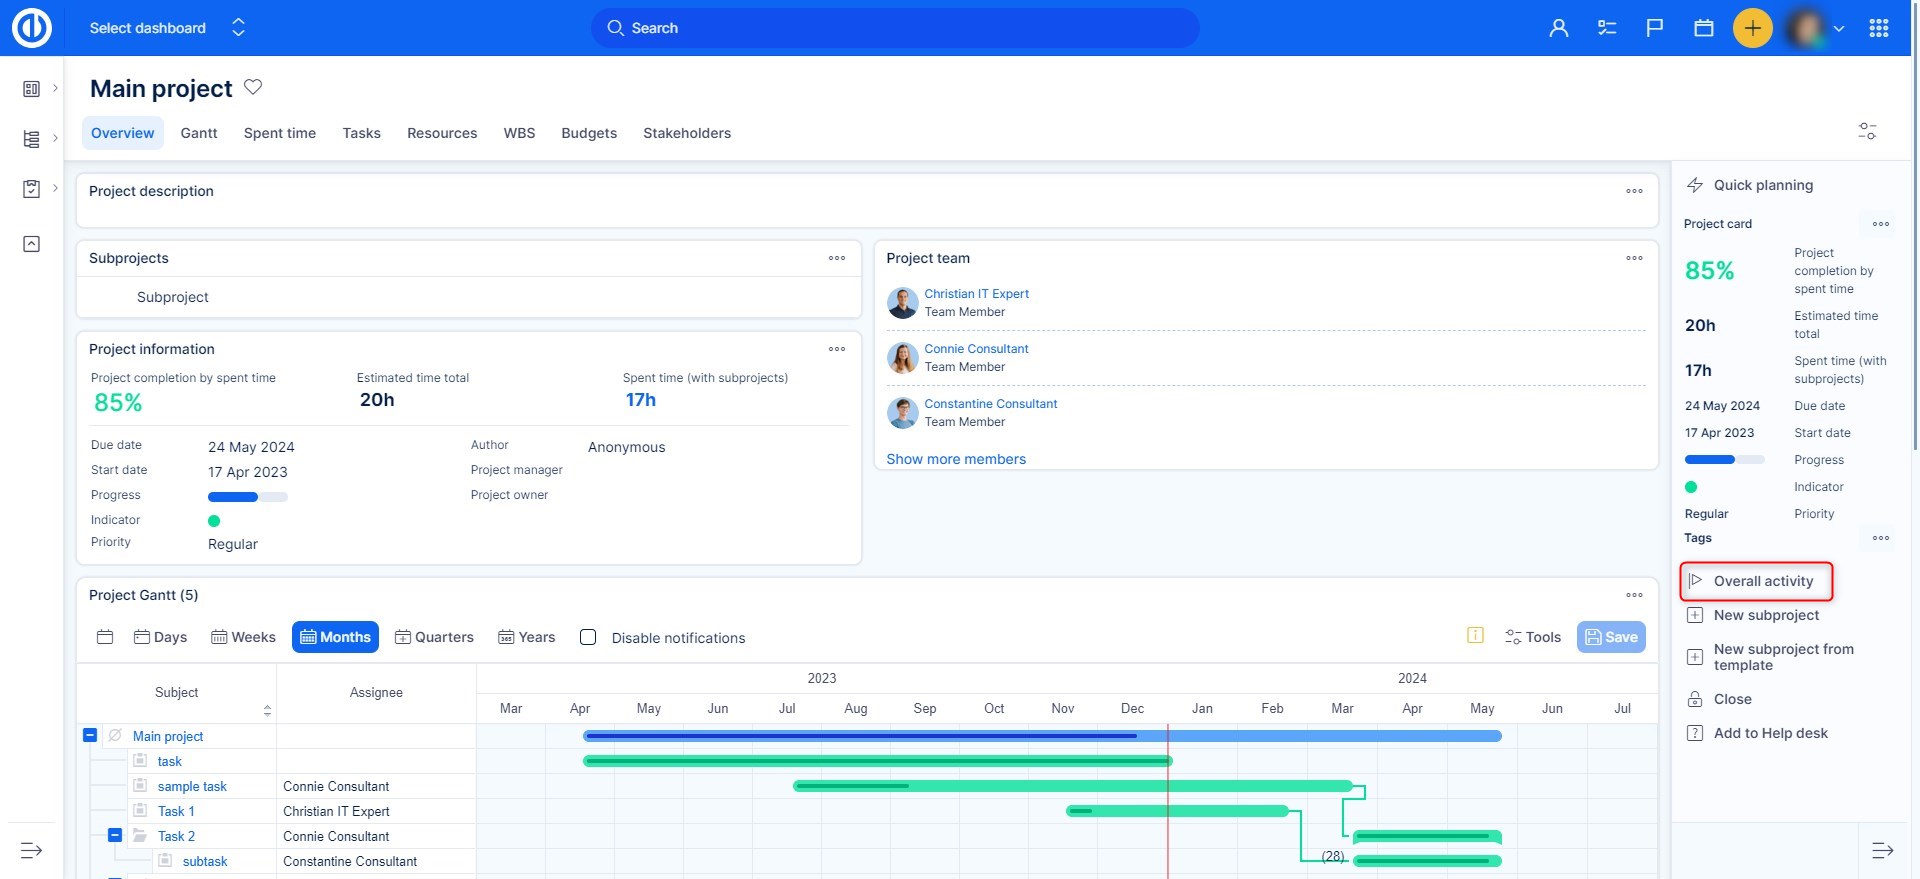
The activity types are pre-selected according to your default settings, but you can always overrule these default settings manually for a specific project.
Email notifications of a user
In this section you will find, what can each setting do and what notifications you will get. You can specify the events you want to be notified via e-mail using this default setting in Administration >> Settings >> Email notifications.
- For any event on all my projects = You will get notifications about every event that happens throughout all your projects.
- For any event on selected projects only = This is the same as the first option, with a difference, You can select a specific project about which you want to get those notifications. For unselected projects, you will only receive notifications about things you watch, or you're involved in (e.g. tasks you're the author, assignee or coworker).
- Things where I am the assignee, co-worker or author = You will get notifications only about tasks where you are the assignee, co-worker or author.
- Only for things, I am assigned to = You will get notifications only about tasks you are assigned to.
- Only for things, I am the author of = You will get notifications only about tasks you are the author of.
- No events = You will not get any notifications.
Settings on a user profile
The settings for a specific user may overrule the default settings. To do so, go into editing a user profile.
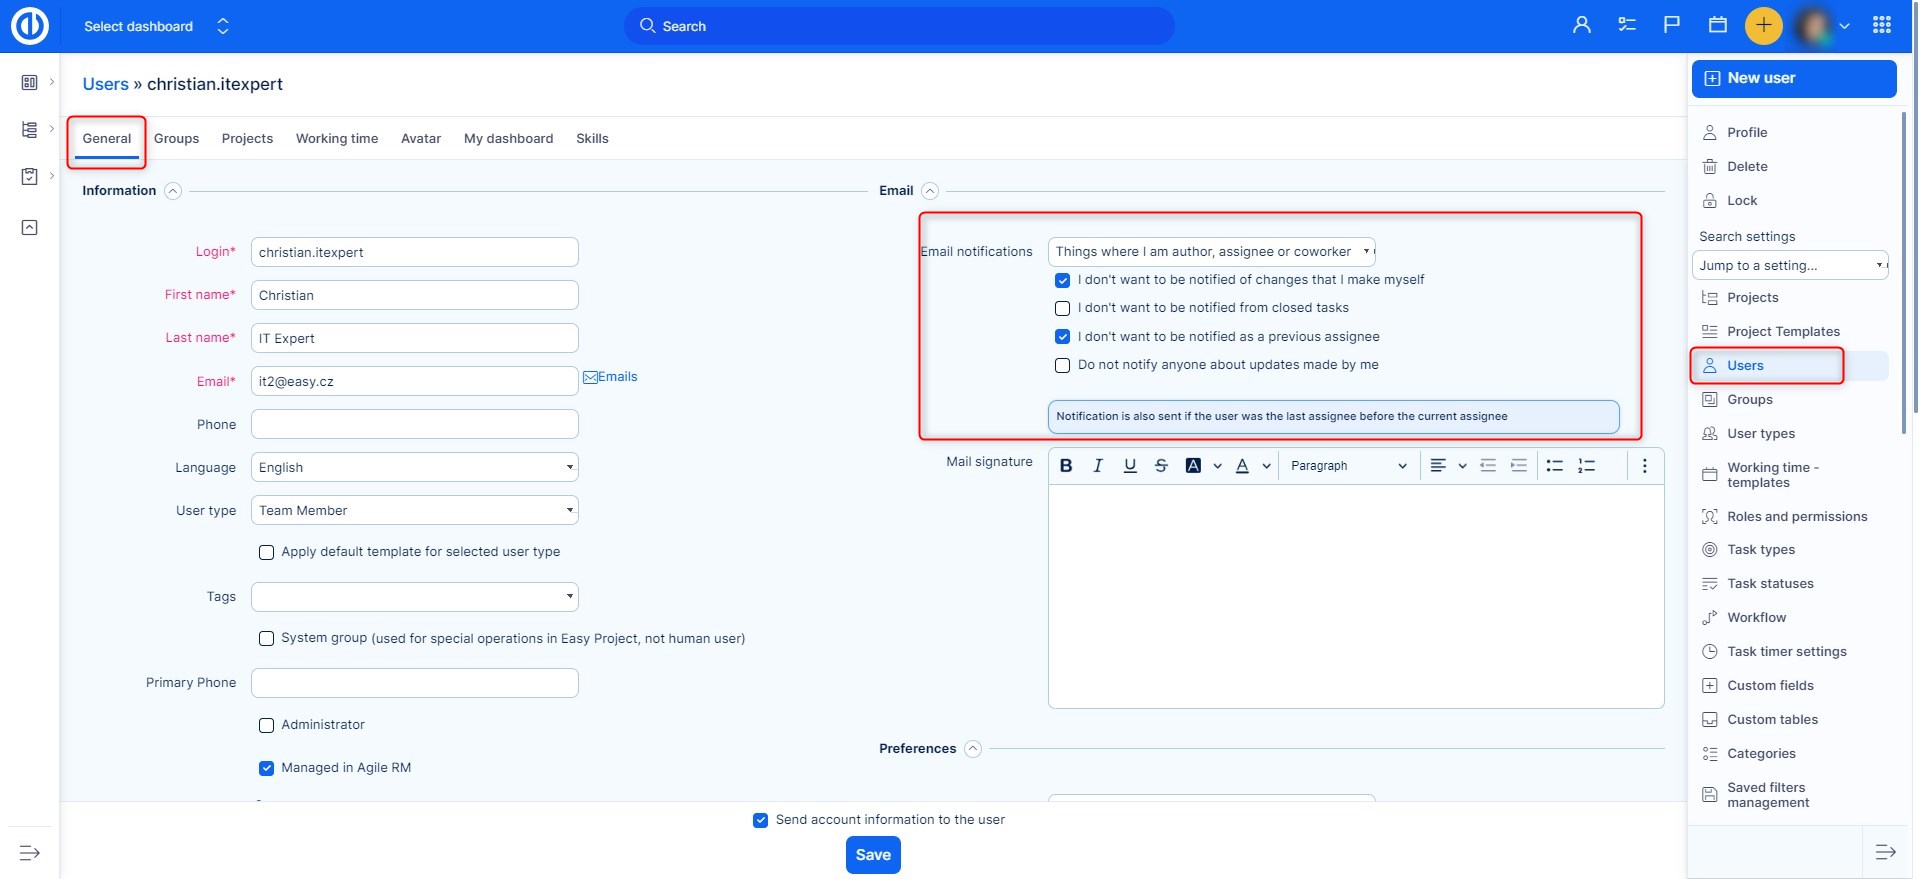
- I don't want to be notified of changes that I make myself = You won't get notifications about changes you made yourself.
- I don't want to be notified from closed tasks = When a task is closed and it is updated, you will not get a notification about that if you check this box.
- Do not notify anyone about updates made by me = When you make updates, no one will be notified about them.
Corner situations
- You create a template with the "following" relation between 2 tasks and 0 days delay between them. The first task ends on Friday and, for that reason, the following task starts on the next working day - on Monday. Now you want to create a new project from that template and because of the different time frame, the first task ends on Tuesday. Now the second task should start again on the next working day - on Wednesday but it starts on Friday because of the weekend that was between the two tasks in the template.
Unfortunately, there is no algorithm, that would be able to determine whether the original delay was during the weekends, and which would be modified when creating a new project. - When you have the option "Has custom menu?" enabled and want to activate or deactivate a module on the project, first you need to untick the custom menu. Then set up the modules you want and save. Finally, you can enable the custom menu once again (see below).
- If project widgets (such as News, Documents, Gantt, Kanban...) are added to a project dashboard page using the "Customise this page" button and a project member sets them as disabled in project widgets setting, these widgets either disappear from the project dashboard or show no data.
-
When project start dates are calculated from tasks (this can be configured in Administration >> Settings >> Project - tick the checkbox "Calculate start date from tasks")...
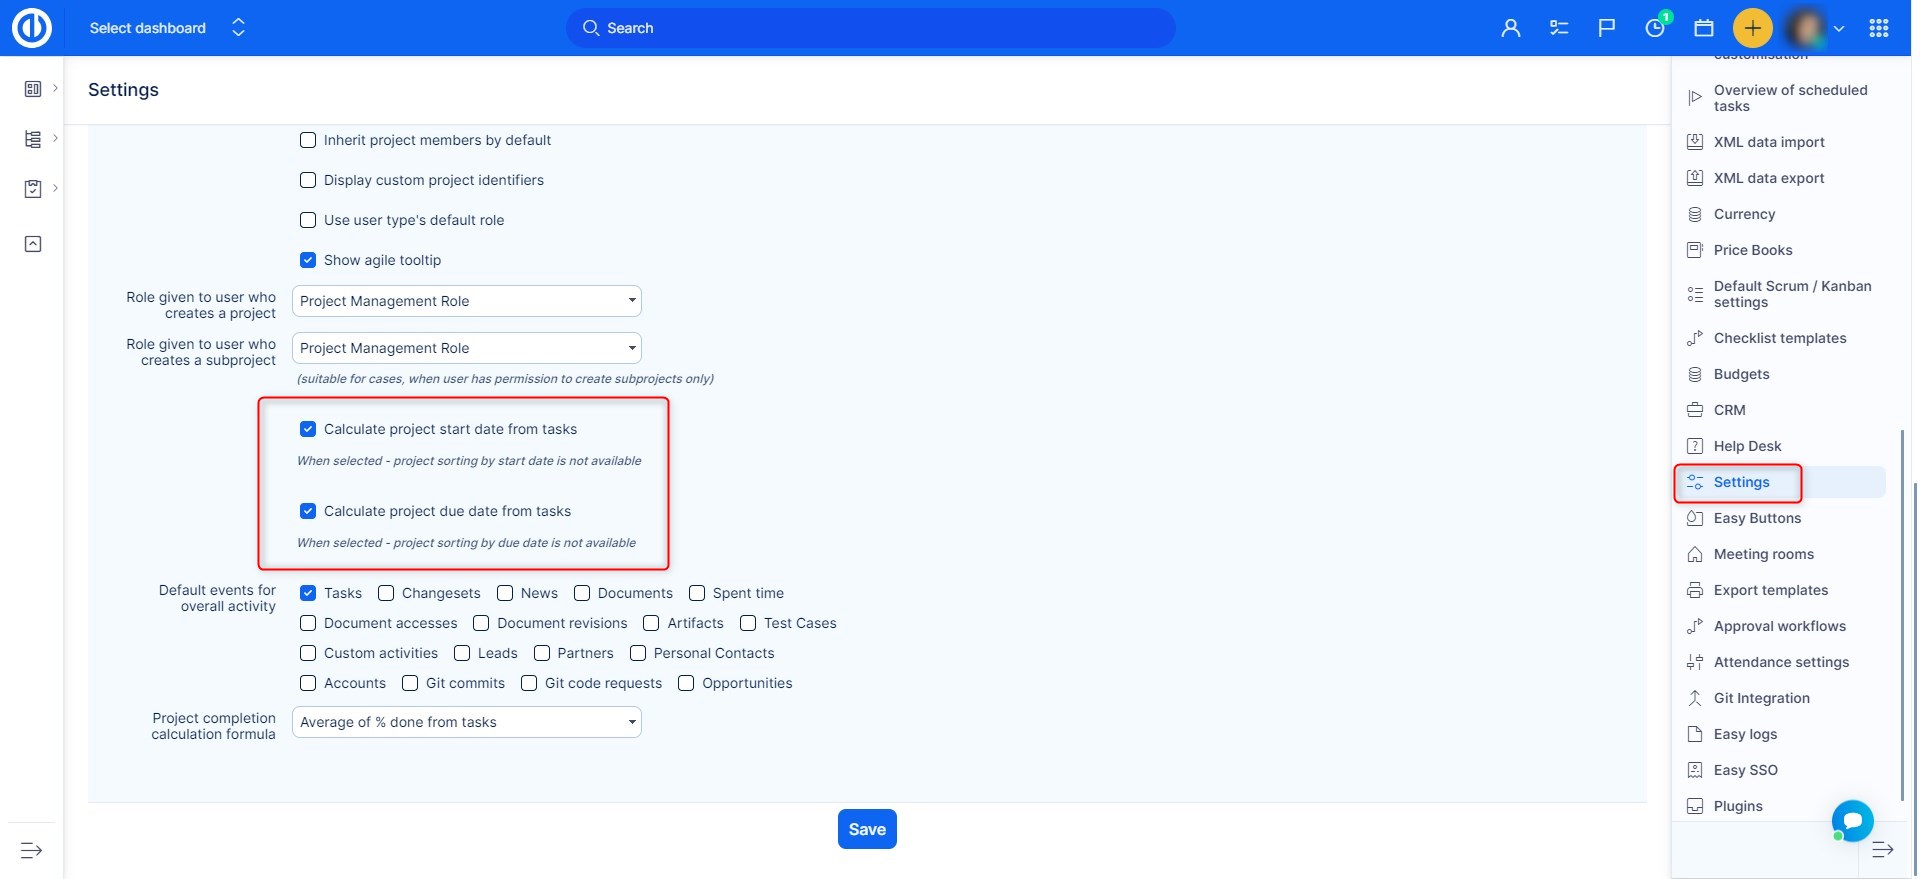
...then Start date of existing project templates is defined by:
1) earliest start date of a task in the template
2) earliest start date of any task in a milestone that is shared with all projectsFor example, you have a project template that contains tasks starting from 1st May to 31st May. You think that the calculated start date of the template is 1st May. However, the application contains a milestone shared for all projects and that milestone contains a task in a different project with start date 1st January. So this is the real start date of the template. When creating a real project from this template, you are setting a new start date and calculating all dates according to the new start date.
In this example, all data from the template will be moved by difference "11th May - 1st January" and not by difference "11th May - 1st May" as one would expect. In the light of this behaviour, please do not to use milestones that are shared for all projects if you are using project templates this way. It will cause dates of the tasks in the created project to be shifted very dramatically.
-
When creating a project template, it is strongly recommended that the template does not contain any task allocations (i.e. tasks assigned to particular users). If a template contains task allocations, these tasks will automatically be assigned to the users in Resource management with real projects. It may result in users' overload as well as issues with incorrect displaying of daily workload per such users in Resource Management.
-
If a project is created from a template and one of the options "Update task/milestone/subproject dates according to the project start date" and "Set all tasks' start dates by start date of the project" is selected, it may happen that tasks will be created with start date or due date on the weekends or holidays. Also if the template itself does not have a filled start date, none of these options will do anything.
-
Setting a specific start date in a project from a template does not lead to a time shift of subprojects relative to the parent project, only the tasks themselves are shifted in time. Therefore, when you set the start date of the project in the form, this date is set for all projects included in the template (parent project + subprojects). So, if you want subprojects to jump off adequately, you won't do that this way. To solve this situation, uncheck the option "Update task/milestone/subproject dates according to project start date" and the project will be created in the sequence you want. Then move the project in the global Gantt chart to the date when it should start. This will also shift all sub-projects accordingly.
-
A parent task cannot be changed inside a project template using the standard template edit mode. To make the change, create a new project using the template, make the required parent task change on that project and then save the project as a template again.
-
When a new project is created from the copy of an existing project including tasks linked to milestone(s) belonging to that project (or shared with the project), the new project will get the identical copy of the milestone(s), however, links between tasks and milestones cannot be copied and, therefore, they need to be recreated manually.
-
If a user is only a member of a subproject, he will not be able to edit the Scrum/Kanban sprint on tasks created in the parent project because he is not a member of this parent project.

